
Manual


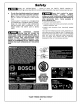


Getting To Know Your Miter Saw
4
2
40
30
3
28
22
29
5
32 26
27
6
19
20
16
23
21
o 18
8
9
40
18
15
17
16
12
14
13
43 10
34 11
To avoid injury from accidental
starting, remove plug from power
source outlet before making any adjustments.
1. Switch "Lock-OFF" Button
This button must be pressed to activate the power switch.
2. Power Switch
The power switch (used with the "Lock-OFF" button) ener-
gizes the unit.
3. Switch Handle
This handle contains the switch. The blade is lowered into
the workpiece by pushing/pulling down on the handle.
Never pick up tool by switch handle.
4. Arbor Lock
Allows the user to keep the blade from rotating while tight-
ening or loosening arbor screw during blade replacement
or removal.
5. Lower Blade Guard/Lower Guard Lip
The lower blade guard helps protect your hands from the
spinning blade. It retracts as the blade is lowered. Guard
Lip can be used to raise the lower guard manually, only as
recommended in this manual.
6. Blade
Use only 10" blades between 1.4 and 3.0mm thick, with
5/8" arbor hole.
7. Stationary Fence
Supports the workpiece. The fence has a cast in scale to
make repetitive cuts easy. The fence also has holes which
are used to secure an auxiliary fence if desired.
8. Kerr Inserts
9. Miter Detent Override
Allows detent action to be locked out allowing for fine
adjustments to any miter angle.
am