
Installation Guide


12
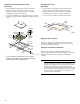
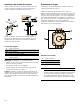
Install Burner Grates
Properly position and install each burner grate as shown
in the illustration below.
24” 4 Burner
9 WARNING
To prevent flare-ups, properly support pots and
avoid spills, all grates must be properly positioned
on the cooktop whenever the cooktop is in use. Do
not use a grate if the rubber feet are missing or
damaged.
For replacement of rubber feet: Call Customer Support
at 1-800-944-2904.
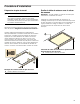
Check the Installation
Place each correct sized burner cap in its seated,
notched position and check the operation of the electric
igniters. Check flame characteristics. Flame should be
blue with a minimal yellow tip on the outer cone of the
flames.
Checking Flame Characteristics
Note: If the flame is completely or mostly yellow, verify
that the regulator is set for the correct fuel. After
adjustment, retest.
Some yellow streaking is normal during the initial start-
up. Allow unit to operate 4-5 minutes and re-evaluate
before making adjustments.
Service
Before Calling Service
If the igniters do not spark or the “on” indicator lights
(available in some models) do not glow, check the power
source to see if a fuse has blown or if the circuit breaker
has tripped.
Refer to the Statement of Limited Warranty in the Use
and Care Manual. See the Use and Care Manual for
troubleshooting information.
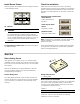
Product Rating Label
The rating label shows the model number and the FD
number (production number/product’s unique identifier)
of your cooktop. It is located on the underside of the
cooktop.
Rating Label Location
Model number and FD Number
The model number and the FD number of your appliance
are found on the rating label. Make a note of these
numbers in the space below to save time in the event
your appliance requires service.
Keep your invoice or escrow papers for warranty
validation if service is needed.
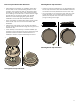
Yellow Flames:
Further adjustment is
required.
Yellow Tips on Outer
Cones:
Normal for LP Gas
Soft Blue Flames:
Normal for Natural Gas
A Rating Label
Model # FD #
Bosch Customer Support 800-944-2904
$