
Owners Manual

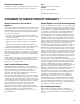
Table Of Contents
- Built-In Convection Microwave Oven (Speed Oven)
- Table of ContentsUse and care manual
- Produktinfo
- IMPORTANT SAFETY INSTRUCTIONS
- READ ALL INSTRUCTIONS BEFORE USING THE APPLIANCE
- 2. Turn appliance off
- 3. Unplug the appliance or shut off at fuse or circuit breaker
- Liquids
- Cooking Items
- Cooking Utensils
- Metal Tray Turntable
- Thermometers
- Pacemakers
- State of California Proposition 65 Warnings
- Fan Motor Operation
- SAVE THESE INSTRUCTIONS.
- Causes of damage
- Protecting the environment
- Getting to know the appliance
- Before using the appliance for the first time
- 2. Enter the correct time using the number keys. Example: To set the clock to 12:41 type in 1 2 4 1.
- 2. Enter the numbers 3 5 0 with the number keys.
- 2. Check the temperature occasionally during that time.
- Microwave power levels
- Setting the microwave
- 1. Enter the desired cook time with the number keys. The timer display will fill in from right to left. Example: To set a microwave time of 20 minutes and 30 seconds, enter the numbers 2 0 3 0.
- 2. You can start microwave operation with the default power level 10 by touching Start/Enter, -or - you can set a different power level. Touch Power Level. ‚‹ and start/enter are blinking in the upper left section of the display.
- 3. Enter the desired power level using the number keys.
- 4. Touch Start/Enter to start microwave operation.
- Change power level
- 1. Touch Power Level.
- 1. Enter the desired cook time with the number keys. The timer display will fill in from right to left. Example: To set a microwave time of 20 minutes and 30 seconds, enter the numbers 2 0 3 0.
- Suggestions for best results
- Convection
- Broil
- Automatic programs
- 3. Enter the weight of the food you want to cook using the number keys. For example, to enter 3 lbs type 3 0 0. The weight and start/enter are blinking.
- Opening appliance door during operation
- Cancel operation
- Speed Chef Programs
- Notes
- Auto Defrost
- 4. Enter the weight of the food you want to defrost using the number keys. For example, to enter 2 lbs type 2 0 0. The weight and start/enter are blinking.
- Opening appliance door during operation
- Cancel operation
- Opening appliance door during operation
- Cancel operation
- Opening appliance door during operation
- Opening appliance door during operation
- Reheat cooking suggestions
- Opening appliance door during operation
- Cancel operation
- More Modes
- 3. Touch +Amount to change from broil intensity •‚ to –‹.
- 3. Touch +Amount to change the quantity.
- 3. Touch +Amount to change the quantity.
- 3. Touch +Amount to change the quantity.
- 3. Touch +Amount to change the quantity.
- 2. Enter the desired time using the number keys. Example: To set the kitchen timer to 3 hours and 5 minutes, enter 3 0 5.
- 3. Touch Start/Enter or Kitchen Timer.
- Note:
- Time has elapsed
- Canceling the kitchen timer
- Panel Lock
- Automatic Shutoff
- Basic settings
- Cooking Charts
- Cleaning and Maintenance
- Troubleshooting
- Bosch® Support
- STATEMENT OF LIMITED PRODUCT WARRANTY
- Table des MatièresNotice d’utilisation
- Produktinfo
- CONSIGNES DE SÉCURITÉ IMPORTANTES
- LISEZ TOUTES LES INSTRUCTIONS AVANT D'UTILISER L'APPAREIL
- 2. Éteindre l'appareil
- 3. Débrancher l’appareil ou sortir le fusible ou mettre le disjoncteur à l’arrêt.
- Liquides
- Articles de cuisson
- Utensiles de cuisson
- Plateau en metalle
- Thermomètres
- Pacemakers
- Avertissements de la Proposition 65 de l’État de la Californie
- Fonctionnement du moteur du ventilateur
- CONSERVEZ CES INSTRUCTIONS.
- Causes des dommages
- Protection de l'environnement
- Découvrir l'appareil
- Avant la première utilisation
- 2. Entrez le temps correct avec les touches numérotées. Exemple: Pour régler l’horloge à 12:41, tapez 1 2 4 1.
- 2. Entrez les chiffres 3 5 0 avec les touches numérotées.
- 2. Vérifiez régulièrement la température.
- Niveaux de puissance du micro-ondes
- Réglage du micro-ondes
- 1. Entrez le temps de cuisson souhaité avec les touches numérotées. L’écran de la minuterie se remplira de droite à gauche. Exemple : Pour régler un temps de micro-ondes de 20 minutes et 30 secondes, entrez les numéros 2 0 3 0.
- 2. Vous pouvez relancer le fonctionnement du micro-ondes avec le niveau de puissance par défaut de 10 en touchant Start/Enter, -ou - vous pouvez régler un autre niveau de puissance. Touchez Power Level (Niveau de puissance). ‚‹ et start/enter c...
- 3. Entrez le niveau de puissance souhaité avec les touches numérotées.
- 4. Touchez Start/Enter pour lancer le fonctionnement du micro-ondes.
- Modification du niveau de puissance
- 1. Touchez Power Level (Niveau de puissance).
- 1. Entrez le temps de cuisson souhaité avec les touches numérotées. L’écran de la minuterie se remplira de droite à gauche. Exemple : Pour régler un temps de micro-ondes de 20 minutes et 30 secondes, entrez les numéros 2 0 3 0.
- Suggestions pour les meilleurs résultats
- Convection
- Gril
- Programmes automatiques
- 3. Entrez le poids de l’aliment à cuire avec les touches numérotées. Par exemple, pour entrer 3 lbs (1,4 kg), touchez 3 0 0. Le poids et start/enter (démarrer/ entrer) clignoteront.
- Ouverture de la porte de l’appareil en cours de fonctionnement
- Annuler le fonctionnement
- Programmes Speed Chef
- Remarques
- Décongélation automatique
- 4. Entrez le poids de l’aliment à décongéler avec les touches numérotées. Par exemple, pour entrer 2 lb, tapez 2 0 0. Le poids et start/enter clignotent.
- Ouverture de la porte de l’appareil en cours de fonctionnement
- Annuler le fonctionnement
- Ouverture de la porte de l’appareil en cours de fonctionnement
- Annuler le fonctionnement
- Ouverture de la porte de l’appareil en cours de fonctionnement
- Réglage du mode Pizza pour la pizza au micro-ondes
- 1. Touchez Pizza.
- 2. Touchez la touche numérotée 3 ou touchez Pizza ou +Amount (+Montant) à répétition jusqu’à ce que Microwave pizza (Pizza micro-ondes) soit affiché.
- 3. Touchez Start/Enter (Démarrer/Entrer). Pour la pizza au micro-ondes, l’écran affiche use ceramic tray (Utiliser le plat céramique). start/enter clignote.
- Ouverture de la porte de l’appareil en cours de fonctionnement
- Popcorn
- 2. Touchez Popcorn ou +Amount (+Montant) à répétition jusqu’à ce que le poids souhaité s’affiche à l’écran.
- 2. Touchez Beverage otre fois, ou touchez +Amount (+Montant). ‚ tasse s'affichent à l'écran.
- 2. Touchez Start/Enter (Démarrer/Entrer). sensing (détection en cours) s'affiche. L’appareil est en marche prendant la détection.
- Suggestions pour le réchauffage des aliments
- Ouverture de la porte de l’appareil en cours de fonctionnement
- Annuler le fonctionnement
- Autres modes
- 3. Touchez +Amount (+Montant) pour passer de l’intensité de gril •‚ à –‹.
- 3. Touchez +Amount (+Montant) pour changer la quantité.
- 3. Touchez +Amount (+Montant) pour changer la quantité.
- 3. Touchez +Amount (+Montant) pour changer la quantité.
- 3. Touchez +Amount (+Montant) pour changer la quantité.
- 2. Entrez le temps souhaité à l’aide des touches numérotées. Exemple : Pour régler la minuterie de cuisine à 3 h et 5 min, entrez 3 0 5.
- 3. Touchez Start/Enter ou Kitchen Timer.
- Remarque :
- Une fois que le temps s'est écoulé
- Annuler la minuterie de cuisine
- Verrouillage du panneau de commande
- Extinction automatique
- Réglages de base
- Tableaux de cuisson
- Nettoyage et entretien
- Dépannage
- Soutien Bosch®
- ÉNONCÉ DE LA GARANTIE LIMITÉE
- ContenidoManual de instrucciones
- Produktinfo
- INSTRUCCIONES DE SEGURIDAD IMPORTANTES
- LEER TODAS LAS INSTRUCCIONES ANTES DE UTILIZAR EL APARATO
- 2. Apague el electrodoméstico
- 3. Desenchufe el electrodoméstico o corte la alimentación eléctrica desde el panel de fusibles o el disyuntor.
- Liquidos
- Artículos de cocina
- Utensilios de cocina
- Charola de metal
- Termómetros
- Marcapasos
- Advertencias en virtud de la Proposición 65 del estado de California
- Funcionamiento del motor del ventilador
- CONSERVE ESTAS INSTRUCCIONES.
- Causas para los daños
- Protección del medio ambiente
- Conozca el equipo
- Antes de usar el horno por primera vez
- 2. Ingresa la hora correcta con las teclas numéricas. Ejemplo: Para programar el reloj a 12:41, ingrese 1, 2, 4, 1.
- 2. Ingrese los números 3, 5, 0 con las teclas numéricas.
- 2. Comprobar la temperatura de vez en cuando.
- Niveles de potencia del microondas
- Programación del microondas
- 1. Ingrese el tiempo de cocción deseado con las teclas numéricas. El display del temporizador se llenará de derecha a izquierda. Ejemplo: para programar un tiempo de microondas de 20 minutos y 30 segundos, ingrese los números 2 0 3 0.
- 2. Puede comenzar la operación del microondas con el nivel 10 de potencia predeterminado pulsando Start/ Enter (Comenzar/Intro) o bien puede programar un nivel de potencia distinto. Pulse Power Level (Nivel de potencia). Titilan ‚‹ y start/ ente...
- 3. Ingrese el nivel de potencia deseado utilizando las teclas numéricas.
- 4. Pulse Start/Enter para iniciar el funcionamiento del microondas.
- Cambio del nivel de potencia
- 1. Pulse Power Level (Nivel de potencia).
- 1. Ingrese el tiempo de cocción deseado con las teclas numéricas. El display del temporizador se llenará de derecha a izquierda. Ejemplo: para programar un tiempo de microondas de 20 minutos y 30 segundos, ingrese los números 2 0 3 0.
- Sugerencias para obtener los mejores resultados
- Convección
- Asar con calor directo
- Programas automáticos
- 3. Introducir el peso de la comida que se quiera cocinar utilizando las teclas numéricas. Por ejemplo, para introducir 3 kg, pulsar 3 0 0. El peso y start/enter parpadean.
- Abertura de la puerta del aparato durante el funcionamiento
- Cancelación del funcionamiento
- Programas de cocción rápida
- Notas
- Auto Defrost (Descongelar automáticamente)
- 4. Ingrese el peso del alimento que desea decongelar usando las teclas numéricas. Por ejemplo, para ingresar 2 lb, pulse 2 0 0. Titlan el peso y start/enter.
- Abertura de la puerta del aparato durante el funcionamiento
- Cancelación del funcionamiento
- Abertura de la puerta del aparato durante el funcionamiento
- Cancelación del funcionamiento
- Pizza
- 2. Pulse Pizza o +Amount (+Cantidad) repetidas veces para desplazarse a través de todos los modos Pizza.
- 3. Pulse Start/Enter (Comenzar/Intro).Para pizza congelada o fresca, el display muestra bake on metal tray (Hornear en bandeja de metal). Se encienden la temperatura predeterminada y ; en el display.
- Abertura de la puerta del aparato durante el funcionamiento
- Programación del modo Pizza para pizza para microondas
- 1. Pulse Pizza.
- 2. Pulse la tecla numérica 3 o pulse Pizza o +Amount (+Cantidad) repetidas veces hasta que se muestre Microwave pizza (Pizza para microondas).
- 3. Pulse Start/Enter (Comenzar/Intro). Para pizza para microondas, el display muestra use ceramic tray (Utilice la bandeja de cerámica). Titila start/enter.
- Abertura de la puerta del aparato durante el funcionamiento
- Popcorn (Palomitas de maíz)
- 2. Pulse Popcorn o +Amount (+Cantidad) repetidas veces hasta que se muestre el peso deseado en el display.
- 2. Pulse las teclas Beverage otra vez, o pulse o +Amount (+Cantidad). Se muestra en el display ‚ taza.
- 2. Pulse Start/Enter (Comenzar/Intro). Se muestra sensing (sensor activo). El aparato está funcionando mientras la detección
- Sugerencias para recalentar
- Abertura de la puerta del aparato durante el funcionamiento
- Cancelación del funcionamiento
- More Modes (Más modos)
- 3. Pulse +Amount (+Cantidad) para cambiar la intensidad de la función Broil (Asar con calor directo) de •‚ (Alto) a –‹ (Bajo).
- 3. Pulse +Amount (+Cantidad) para cambiar la cantidad.
- 3. Pulse +Amount (+Cantidad) para cambiar la cantidad.
- 3. Pulse +Amount (+Cantidad) para cambiar la cantidad.
- 3. Pulse +Amount (+Cantidad) para cambiar la cantidad.
- 2. Ingrese el tiempo deseado con las teclas numéricas Ejemplo: Para programar el temporizador de la cocina a 3 horas y 5 minutos, ingrese 3 0 5.
- 3. Pulse Start/Enter o Kitchen Timer.
- Nota:
- Una vez transcurrido el tiempo
- Cancelación del temporizador de la cocina
- Bloqueo de panel
- Cierre automático
- Valores básicos
- Cuadros de cocción
- Limpieza y mantenimiento
- Resolución de problemas
- Soporte de Bosch®
- DECLARACIÓN DE GARANTÍA LIMITADA DEL PRODUCTO

27
Troubleshooting
If you encounter a problem, it often will merely be
something minor. Before you call customer service,
consider the suggestions and instructions below:
Part Recommendations
Oven cavity Keep inside (cavity) of the oven clean.
Food particles and spilled liquids can
stick to the oven walls, causing the
oven to work less efficiently.
Wipe up spills immediately. Use a
damp, clean cloth and mild soap.
DO NOT use harsh detergents or
abrasive cleaners.
To help loosen baked–on food parti-
cles or liquids, heat 2 cups of water
(add the juice of 1 lemon if you desire
to keep the oven fresh smelling) in a
4 cup measuring glass at High power
for 5 minutes or until boiling. Let stand
in oven cavity for 1 or 2 minutes.
For baked-on grease spatters, wash
with hot, soapy water, rinse and dry.
Wire rack Wash with soapy water. Rinse thor-
oughly and dry, or gently rub with
cleansing powder or soap-filled pads
as directed. The wire rack can also be
washed in the dishwasher.
Metal turntable
tray
Remove metal turntable tray from the
oven when cleaning the oven cavity
and tray.
Wash the metal turntable tray in warm
sudsy water or in the dishwasher.
Ceramic tray Clean with warm, soapy water or in
the dishwasher.
Door seal Wipe with damp cloth.
Door glass Wash with soap and water or glass
cleaner. Apply Fantastik® or Formula
409® to a clean sponge or paper
towel and wipe clean. Avoid using
powder cleaning agents, steel wool
pads and oven cleaners.
If steam accumulates inside or outside
the oven door, wipe with a soft cloth.
Steam can accumulate when operat-
ing the oven in high humidity and in
no way indicates microwave leakage.
Painted
surfaces
Clean with hot soapy water or apply
Fantastik® or Formula 409® to a
clean sponge or paper towel and wipe
clean. Avoid using powder cleaning
agents, steel wool pads and oven
cleaners.
Stainless steel
surfaces/
exterior
surfaces
Always wipe or rub in the direction of
the grain. Clean with a soapy sponge,
then rinse and dry, or wipe with Fan-
tastik® or Formula 409® spray on a
paper towel. Protect and polish with
Stainless Steel Magic® and a soft
cloth. Remove water spots with a cloth
dampened with white vinegar.
Plastic &
Controls
When cool, clean with soapy water,
rinse and dry.
Printed areas
(words &
numbers)
Do not use abrasive cleaners or
petroleum based solvents.
Part Recommendations
Problem Suggestion
Neither the microwave’s display
nor oven operates.
▯ Properly insert the plug into a grounded power outlet.
▯ Reset the household circuit breaker or replace any blown fuses.
The oven display works, but the
oven will not operate.
▯ Make sure the oven door is closed securely and completely.
▯ Check to see if packing material or other materials are stuck to the door seal.
▯ Check for damage to the oven door.
▯ Press the Clear/Off key twice and attempt to re–enter cooking instructions.