
Installation Guide

6 720 810 559 (2016/06) OptiFlow Professional
16 | Regulating the gas (only for authorised technicians)
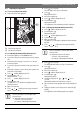
6.3.4 Adjusting pressure in the burner (Parameter P0)
▶ Enter the service mode by pressing and holding down the
, , and buttons simultaneously for 3
seconds (section 6.2).
Display will show "P2".
▶ Press until the display shows "P0".
▶ Press the button .
▶ Open a hot water tap.
With the pressure gauge connected, let the value measured
stabilise.
▶ Press or until the pressure gauge shows the
value indicated in tab. 8.
▶ Press for 3 seconds.
The displayed value flashes as a sign of confirmation
▶ Press to exit this function.
Display will show P0.
▶ Close the hot water tap.
The adjustment of the burner pressure is complete.
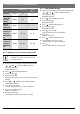
6.4 Factory default settings
▶ Enter the service mode by pressing and holding down the
, , and buttons simultaneously for 3
seconds (section 6.2).
Display will show"P2".
▶ Press until the display shows "P4".
▶ Press the button .
Display will show“E”.
▶ Press until the display shows "rP".
▶ Press the button .
Display will show "P1"
▶ Press for 3 seconds.
The value flashes as a sign of confirmation.
▶ Press .
Display will show "P1"
▶ Press until the display shows "P2".
▶ Press the button for 3 seconds.
The value flashes as a sign of confirmation.
▶ Press .
Factory default settings are now restored.
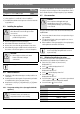
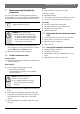
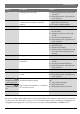
Natural gas H Universal
LP gas
Øinjector GWH12 1.7 1.3
Dynamic
connection
pressure
(mbar)
GWH12
11.3 27.5
Burner
pressure
(mbar) - P0
GWH12
1,2
Differential
pressure of
the burner
MAX (mbar) -
P1
GWH12
4.6 - 5.0 6.3 - 6.7
Differential
pressure of
the burner
MIN (mbar) -
P2
GWH12
0.5 - 0.8 0.5 - 0.8
Table 8 Pressure of the burner
Burner pressures adjustment is only
required if “L1” and “L2” cannot be achieved
according to table, 8.