
Operation Manual


English - 3
15 • F016 L70 375 • TMS • 21.10.05
Electrical Safety
Your machine requires an earth connection. The op-
erating voltage is 230 V AC, 50 Hz. (for non-EU
countries 220 V, 240 V as applicable). Only use ap-
proved extension cables. Contact your Bosch Serv-
ice Centre for details.
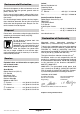
If you want to use an extension cable when operat-
ing your high pressure washer, only the following ca-
ble dimensions should be used:
1.5 mm
2
– max length 20 m
2.5 mm
2
– max length 50 m
Note: If an extension cable is used it must be
earthed and connected through the plug to the earth
cable of your supply network in accordance with pre-
scribed safety regulations.
If in doubt contact a qualified electrician or the near-
est Bosch Service Centre.
WARNING! Inadequate extension cables can be
dangerous. Extension cable, plug and socket
must be of watertight construction and intended
for outdoor use.
Cable connections should be kept dry and off
ground.
It is recommended for increased electrical safety to
use a Residual Current Device (RCD) with a tripping
current of not more than 30 mA. Always check your
RCD every time you use it.
For products not sold in GB: WARNING: For
safety, it is essential that the mains plug attached to
the product is fitted to the power supply cable . The
couplings of connection leads must be protected
against splashes and the coupling sockets on the
leads must be made of rubber or coated with rubber.
Fixing means for the connection leads must be
used.
If the supply cord is damaged, it must be replaced by
a Bosch Service Centre.
Products sold in GB only: Your product is fitted with
an approved 13 A (BS 1363/A) electric plug and is
protected by a 13 A fuse (ASTA Approved to
BS 1362).
If the fitted plug is not suitable for your socket out-
lets, it should be cut off and an appropriate plug fit-
ted in its place.
The severed plug must be disposed of to avoid a
possible shock hazard and should never be inserted
into a 13 A socket elsewhere.
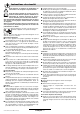
Before use
Assemble storage hook(s) 8 to handle. Push
firmly to ensure hook is secure.
Fit handle 5 to hose reel using supplied screw.
(Aquatak 150 PRO X/160 PRO X only)
Water connection
Screw inlet connector 16 onto machine water in-
let connection 13.
Attach water supply hose (not supplied) to the mains
water supply and machine.
Connecting high pressure water supply hose/
nozzle
/ Securely screw high pressure hose 3 onto
machine at connection 17 and to the power gun 7.
(AQUATAK 150 PRO)
Securely screw the high pressure hose 3 to the
power gun 7. (AQUATAK 150 PRO X/160 PRO X)
Inserting the vario-jet/fan power lance 9 into the
power gun 7. Depress and turn the vario-jet/fan
power lance 90° clockwise to lock in place. (AQUA-
TAK 150 PRO/150 PRO X)
Screw the vario jet-fan power lance 9 into the power
gun 7. (AQUATAK 160 PRO X)
Aquatak 150 PRO X/160 PRO X only
Unwind the pressure hose 3 off the hose drum 4.
Never use the pressure washer with the high pres-
sure hose 3 on the hose drum 4.
Vario-jet-fan power lance
AQUATAK 150 PRO/150 PRO X
Twist the front ring to adjust from a pencil to a fan
jet and vice versa.
To apply the detergent twist the rear ring as
shown from high pressure mode to low pressure
mode.
To adjust the spray pattern twist the front ring.
Also refer to Advice on using pressure washer re-
garding the detergent suction rate.
For Your Safety
Warning! Switch off, remove plug from mains
before adjusting, cleaning or if cable is cut,
damaged or entangled.
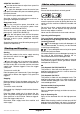
Assembly
Adjustments and using different
nozzles
A
B
C
D
E
E
G
F
H
I
F016 L70 375 - GB Seite 3 Montag, 14. November 2005 1:15 13