
Operation Manual


EURO • Printed in England • BA F016 L69 913 • ART 23/25 • GB • OSW 02.07
English - 3
Carefully remove the machine from its packaging
and check that you have all the following items:
– Line trimmer
– Cutting guard
– Adjustable handle (fitted)
Model ART 23 GFS/GFSV
Model ART 25 GSA/GSAV
– Operating instructions
When parts are missing or damaged, please contact your
dealer.
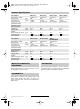
1 On/off switch
2 Handle
3 Adjustable handle (ART 23 GFS/GFSV)
(ART 25 GSA/GSAV)
4 Guide handle
5 Shaft
6 Trimmer head
7 Ventilation slots
8 Cutting guard
9 Release button (ART 23 GFSV)
(ART 25 GSAV)
(ART 25 ERGOPOWER)
10 Clamping lever (ART 23 GFS/GFSV)
(ART 25 GSA/GSAV)
11 Mains plug**
**Country specific
Not all of the accessories illustrated or described are
included as standard delivery.
Electrical Safety
Your machine is double insulated for safety and re-
quires no earth connection. The operating voltage is
230 V AC, 50 Hz. Only use approved extension ca-
bles. Contact your service agent for details.
It is recommended for increased electrical safety to
use a Residual Current Device (RCD) with a tripping
current of not more than 30 mA. Always check your
RCD every time you use it.
WARNING: For safety, it is essential that the mains
plug 11 attached to the machine is fitted to the power
supply cable 13. (see figure )
The couplings of connection leads must be pro-
tected against splashes and the coupling sockets on
the leads must be made of rubber or coated with rub-
ber.
Fixing means for the connection leads must be used.
The connection lead must be inspected for signs of
damage at regular intervals and may only be used if
in perfect condition.
If the supply cord is damaged, it must be replaced by
a Bosch Service Center.
Extension cords/leads should only be used if they
comply with H05VV-F or H05RN-F types.
Products sold in GB only: Your machine is fitted with
an approved 13 A (BS 1363/A) electric plug and is
protected by a 3 A fuse (ASTA Approved to
BS 1362).
If the fitted plug is not suitable for your socket out-
lets, it should be cut off and an appropriate plug fitted
in its place.
The severed plug must be disposed of to avoid a
possible shock hazard and should never be inserted
into a 13 A socket elsewhere.
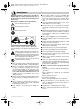
Do not connect the machine to the mains
socket before it is completely assembled.
Mounting the Cutting Guard
Place the cutting guard 8 on the trimmer head 6.
First locate front clip onto trimmer head and push un-
til secure fitting (click 1). Repeat fitting for rear
clip (click 2). (see figure )
Using Adjustable Handle
(Model ART 23 GFS/GFSV)
(Model ART 25 GSA/GSAV)
The adjustable handle 3 can be set in various posi-
tions: (see figure )
➊ To change the position unfold the clamping le-
ver 10 and turn the adjustable handle 3:
I = Park position for space saving storage.
II = Handle forward for horizontal trimming with op-
timum balance and control.
Delivered Items
Operating Controls
For Your Safety
Warning! Switch off, remove plug from mains
before adjusting, cleaning or if cable is cut,
damaged or entangled.
The cutting line continues to rotate for a few
seconds after the trimmer is switched off.
Caution – do not touch rotating cutting line.
Assembly
Adjustment
D
A
B
F016 L69 913.book Seite 3 Dienstag, 23. Juli 2002 11:37 11
15 • F016 L69 913 • TMS • 16.07.02