
Installation instructions
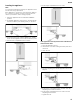
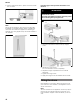


Table Of Contents
- en Table of contentsen Instructions for use
- IMPORTANT SAFETY INSTRUCTIONS
- Disposal information
- Scope of Delivery
- Installing the appliance
- Installation dimensions
- Door opening angle
- Connecting the appliance
- Fitting the doors
- Getting to know the appliance
- Switching on the appliance
- Setting the temperature
- Fast cooling function
- Fast freezing function
- Panel lock
- Alarm functions
- Temperature units
- Energy-saving mode
- Water filter symbol
- Usable capacity
- Fridge compartment
- Freezer compartment
- Max. freezing capacity
- Freezing food
- Purchasing and storing deep- frozen food
- Thawing frozen food
- Ice and water dispenser
- Water filter
- Performance Data Sheet
- Fittings
- Switching off and disconnecting the appliance
- Defrosting
- Cleaning the appliance
- Smells
- LED light
- Saving energy
- Operating noises
- Rectifying minor faults yourself
- Customer service
- fr Table des matièresen Instructions for use
- Consignes de sécurité et avertissements
- Renseignements relatifs à la mise au rebut
- Contenu de l'emballage
- Installation de l'appareil
- Mesures d'encombrement
- Angle d'ouverture de la porte
- Branchement de l'appareil
- Installation des portes
- Présentation de l'appareil
- Mise en marche de l'appareil
- Réglage de la température
- Fonction de refroidissement rapide
- Fonction de congélation rapide
- Verrouillage du bandeau de commande
- Fonctions d'alarme
- Unités de température
- Mode d'économie d’énergie
- Symbole de filtre à eau
- Capacité utile
- Compartiment réfrigérateur
- Compartiment congélateur
- Capacité de congélation maximale
- Congélation d'aliments
- Achat et stockage d'aliments surgelés
- Décongélation d'aliments surgelés
- Distributeur de glaçons et d'eau
- Filtre à eau
- Fiche technique de rendement
- Équipements
- Arrêt et débranchement de l’appareil
- Dégivrage
- Nettoyage de l’appareil
- Odeurs
- Éclairage DEL
- Économies d'énergie
- Bruits liés au fonctionnement
- Correction par soi-même de défaillances mineures
- Service clientèle
- es Índiceen Instructions for use
- Instrucciones de seguridad importantes
- Información sobre residuos
- Alcance del suministro
- Instalación del aparato
- Dimensiones de instalación
- Ángulo de apertura de la puerta
- Conectar el aparato
- Ajustar las puertas
- Familiarizarse con el aparato
- Encendido del aparato
- Configurar la temperatura
- Función de enfriamiento rápido
- Función de congelación rápida
- Bloqueo del panel
- Funciones de alarma
- Unidades de temperatura
- Modo de ahorro de energía
- Símbolo de filtro de agua
- Capacidad útil
- Compartimiento del refrigerador
- Compartimiento del congelador
- Capacidad de congelación máx.
- Congelar alimentos
- Adquisición y almacenado de alimentos ultracongelados
- Descongelamiento de alimentos congelados
- Dispensador de hielo y agua
- Filtro de agua
- Hoja de datos de rendimiento
- Accesorios
- Apagar y desconectar el aparato
- Descongelar
- Limpieza del aparato
- Olores
- Luz LED
- Ahorro de energía
- Ruidos de funcionamiento
- Solucionar fallas menores
- Servicio de asistencia al cliente

en-us
11
Leveling the appliance
Note:
To ensure that it functions properly, the appliance must
be set level using a spirit level.
If the appliance is not level, it could cause the water to
run out of the ice-maker, produce unevenly sized ice
cubes or prevent the doors closing properly.
1. Move the appliance into its intended installation
position.
2. So that the appliance cannot move, unscrew the two
front feet until they are standing firmly on the floor.
3. Screw the feet in/out until the appliance is exactly
level. Use the appliance doors as a reference point.
4. If the freezer compartment door is lower:
5. If the fridge compartment door is lower:
If the appliance is exactly level but one of the doors is
lower than the other:
1. Open the appliance doors.
2. Unscrew the 3 screws holding the base panel and
remove it.
3. Undo the nut.
4. Turn the adjusting nut until the appliance doors are
aligned.
5. If the freezer compartment door is lower: Turn the
adjusting nut counter-clockwise.
6. If the fridge compartment door is lower: Turn the
adjusting nut clockwise.
7. Tighten the nut.