
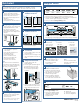
Quickstart Guide


8001151558
(9904)
en-us
1. Remove information material,
adhesive tape and protective foil.
2. Remove the power cord and
the equipment package from the
appliance.
3. Clean the appliance.
4. Roll appliance to its final location.
1. Press any button on the cool-fresh compartment controls.
2. Press and hold the unlock button of the cool-fresh compartment
controls, until the light bar lights up completely.
3. Press your desired storage setting button.
1. Install and activate the timer.
2. Insert both unopened sachets
into the inside housing holders.
3. Ax adhesive strip onto the
outside housing holder.
4. Place the Ethylene absorber
on the interior wall closest to
the middle of the cool-fresh bin.
1. Press menu button.
2. Press light settings button.
3. Press Y/X Settings button
repeatedly until the settings
display shows the desired
brightness level.
1. Download the
Home Connect
(America) app.
2. Scan the
QR code.
3. Follow the
instruc tions
in the app.
1. Fit the handles vertically and
horizontally onto the
pre-assembled bolts.
2. Use the included 2.5 mm
Allen wrench to tighten the
pre-assembled screws
clockwise in the handles.
First steps
Quickstart Helpful Hints
Setting cool-fresh compartment
Equipment Bar
Connect your appliance
Cleaning your appliance
Ethylene absorber installation
Lighting customization
Installing the handles
Align the vertical gap
between the doors
Align the horizontal gap
between the doors
Installing the equipment
Water and electrical
connection
Purge the water filter
Aligning the appliance
Note:
Note:
Note:
Note:
The holes in the door handles face
up and down (vertical handles) and
the holes in the drawer handles only
face down (horizontal handles).
Never use stainless steel
cleaners on the exterior of
the appliance.
(only applicable for appliances
with handles)
0 = lighting o
1 = minimum brightness
5 = maximum brightness
For important safety instructions, information on installation, use and
maintenance of the appliance, please refer to the entire user manual.
1. Using a wrench, screw down both
height adjustable feet, so that
they firmly touch the floor.
2. Adjust each separately, so that
the appliance is also aligned and
straight.
3. Use a level to confirm.
Install the loose equipment parts
as shown in the appliance
overview picture.
You can adjust the equipment bar vertically and move the
bin (hanging), shelf (hanging) and bottle shelf (hanging) sideways.
Clean the appliance with a
soft cloth, lukewarm water
and a little pH-neutral
cleaning liquid.
Connect water supply on the rear
of the appliance.
Insert the power cord plug on the
rear of the appliance and into an
outlet.
1. Hold the glass under the
water dispenser.
2. Push the glass upwards against
the dispenser lever or press
è button and dispense water
for 5 minutes, approximately
3 gallons.
3. Press " button to switch on ice
cube production and discard ice
cubes within the first 24 hours.
→ refer to "Getting to know your applian
ce" in the user manual, page 14
→ refer to "Installing the appliance"
in the user manual, page 8
→ refer to "Controls for cool-fresh compartment" in the user manual, page 16
→ refer to "Installing the appliance"
in the user manual, page 9
13
1
2
3
4
5
6
7
8
A
B
C
D
E
F