
Installation Manual


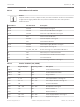

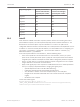


Table Of Contents
- Title Page
- Table of Contents
- Certifications, approvals, listings, and safety
- Introduction
- System overview
- Installation checklist
- Control panel installation
- Power supply
- Telephone communications
- IP communications
- Keypads, keyswitches, keyfobs and transmitters
- Keypads
- B915 Basic Keypad
- B920 Two-line Alphanumeric Keypad
- B921C Two-line Capacitive Keypad with Inputs
- B930 ATM Style Alphanumeric Keypad
- B942 Touch Screen Keypad
- Shortcuts and custom functions
- Address settings
- Supervision
- Installation and control panel wiring (keypads)
- Sensor loops overview and wiring (B921C/B942/B942W only)
- Output wiring (B942/B942W only)
- Troubleshooting
- Keyswitches
- RADION keyfobs and Inovonics pendant transmitters
- Keypads
- On-board outputs
- Off-board outputs
- On-board points
- Off-board points
- Wireless modules
- Access control
- Program and test the control panel
- Control panel board overview
- System wiring diagrams
- Approved applications
- Keypad Installer menu
- [1] Program menu
- [1] Reporting > [1] Phone menu parameters
- [1] Reporting > [2] Network menu parameters
- [1] Reporting > [3] Routing menu parameters
- [1] Reporting > [4] Personal Note menu parameters
- [2] Network > [1] Ethernet > (choose the bus module or on-board) > [1] Module Parameters menu
- [2] Network > [1] Ethernet > (choose the bus module or on-board) > [2] Address Parameters menu
- [2] Network > [1] Ethernet > (choose the bus module or on-board) > [3] DNS Parameters menu
- [2] Network > [2] Cellular > (choose the SDI2 cellular module or plug-in module)
- [3] RPS > [1] RPS Passcode menu parameters
- [3] RPS > [2] RPS Phone Number menu parameters
- [3] RPS > [3] RPS IP Address menu parameters
- [3] RPS > [4] RPS Port Number menu parameters
- [4] Area Options menu parameters
- [5] Keypad menu parameters
- [6] Users menu parameters
- [7] Points menu parameters
- [8] Disable Programming menu
- [2] Wireless menu
- [1] RF Point Menu> [1] Enroll Point RFID
- [1] RF Point Menu> [2] Replace Point RFID
- [1] RF Point Menu> [3] Remove Point RFID
- [2] RF Repeater Menu > [1] Add Repeater
- [2] RF Repeater Menu > [2] Replace Repeater
- [2] RF Repeater Menu > [3] Remove Repeater
- [3] RF Diagnostic Menu > [1] RF Points
- [3] RF Diagnostic Menu > [2] RF Repeater Menu
- [3] Diags menu
- [4] Serv Byp (Service Bypass) menu
- [5] Versions menu
- [6] Cloud menu
- [1] Program menu
- Specifications
- Appendix
- Back Page

Originating keypad Control panel firmware
version 2.04 and lower,
reported point number
Control panel firmware
version 3.01 and higher,
reported point number
Keypad 1 330 901
Keypad 2 340 902
Keypad 3 350 903
Keypad 4 360 904
Keypad 5 370 905
Keypad 6 380 906
Keypad 7 390 907
Keypad 8 400 908
AutoIP
When AutoIP is enabled on the RPS computer, within 2 minutes of connecting the control
panel and RPS computer, the control panel temporarily assumes address 169.254.1.1. The
RPS IP Direct connection option only uses 169.254.1.1 to connect. The option is not
configurable in RPS. If the RPS connection fails, the control panel has not adopted the correct
IP address. To check the control panel IP address, from the Installer menu on a keypad, go to
[1] Program > [2] Network > [1] Ethernet > (choose the bus module or on-board) > [2]
Address Parameters > [1] IP Address.
If the control panel address is not 169.254.1.1, take the following steps:
– If the control panel also uses the Ethernet for IP communication, ensure you cycled
power to the control panel. When power cycled, the control panel clears the IP address
assigned by the network and adopts the AutoIP address assigned by the RPS computer.
– Ensure no other device is connected to the RPS computer using Ethernet. The computer
assigns 169.254.1.1 to the first connected device.
– Apply a new registry key to the computer to enable AutoIP. Be sure to obtain permission
from your company IT department before changing the registry, then:
– Open Notepad and create a new file called AutoIP.reg.
– In Notepad, include the text shown below the instructions.
– Save the file to a location on the host computer that you can easily find.
– Navigate to the saved file and double-click on it to add it to the host computer’s
registry.
– Restart the host computer.
Text for the AutoIP.reg file:
Windows Registry Editor Version 5.00
[HKEY_LOCAL_MACHINE\SYSTEM\CurrentControlSet\Services\Tcpip\Parameters]
"IPAutoconfigurationEnabled"=dword:00000001
22.3
Control Panel Appendix | en 163
Bosch Security Systems, Inc. Installation and System Reference Guide 2016.05 | 14 | F.01U.287.180