Bosch Video Client en Operator’s manual
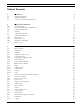
Bosch Video Client Table of Contents | en 3 Table of Contents 1 Introduction 6 1.1 System requirements 6 1.2 Software installation 6 1.3 Conventions used in the application 6 2 Start-up and configuration 8 2.1 System overview 8 2.1.1 Live viewing and Playback application 8 2.1.2 Configuration Manager 8 2.2 Start-up 8 2.3 Configuration wizard 9 2.4 Configuration Manager 11 2.4.1 Video Client 11 2.4.2 Installing licenses 13 2.4.3 Saving the configuration 13 2.
en | Table of Contents Bosch Video Client 3.7.2 Export job 25 4 Viewing live images 26 4.1 Selecting favorite views 26 4.1.1 Selecting views 26 4.2 Making quick views 26 4.2.1 Display mode 26 4.2.2 Populating the cameos 26 4.3 Camera status icons 27 5 Setting up favorite views 28 5.1 Making a view 28 6 Live recording 29 6.1 Recording live video to the PC hard disk 29 7 Saving snapshots 30 7.1 Capturing a still image 30 8 Instant playback 31 8.
Bosch Video Client Table of Contents | en 5 11.8 Playing stored files 43 11.8.1 Exported video clips 43 11.8.2 Archived snapshots 43 12 Searching for events 44 12.1 Event search pane 44 12.1.1 Setting the search period 44 12.1.2 Track selection 44 12.1.3 Event filter 44 12.1.4 Start search 45 12.1.5 Search results 45 13 IVA search 46 13.1 IVA search pane 46 13.1.1 Algorithm selection 46 13.1.2 Start search 46 13.1.
1 en | Introduction Bosch Video Client Introduction The Bosch Video Client is a PC application for live viewing, control, search and playback facilities for any camera connected to the network. Remote control functions include pan, tilt, and zoom control of cameras (including full AutoDome control). The on-line status of the connected units is provided and you can access the Configuration Manager to set up a unit or configure your system.
Bosch Video Client Introduction | en 7 Expand/collapse lists In the device tree or favorites panes, the tree structure shows a + or a - next to an icon. Click the + to expand the list; click the - to collapse the list. Multiple selection To select multiple items, select a single item, and then hold down the CTRL key whileyou click other items that you want to select. Bosch Security Systems Operator’s manual F.01U.247.166 | v1.2 | 2011.
en | Start-up and configuration Bosch Video Client 2 Start-up and configuration 2.1 System overview The Bosch Video Client consists of the following components: 2.1.1 – Live viewing and Playback application – Configuration Manager Live viewing and Playback application This application provides two windows; one for live viewing and camera control, and one for playback of recordings and exports. 2.1.
Bosch Video Client 2.3 Start-up and configuration | en 9 Configuration wizard The configuration wizard is a quick way of setting up the most important parameters for the system for a first-time installation. The parameters shown in the wizard are a subset of all the parameters that can be set in the System/Applications/Video Client menu of the Configuration Manager. When the wizard opens it guides you through the configuration process in eight steps. Click Next and Back to navigate through the wizard.
en | Start-up and configuration 4. Bosch Video Client Network Select Use DHCP if all devices support DHCP and you want to assign IP addresses automatically. Alternatively, enter an IP address range. This range must provide sufficient IP addresses for all the devices to be configured. 5. Date and Time Select whether the date and time are to be taken from the settings on your PC or from an SNTP server. If necessary, reset the system time and date on your PC or enter the IP address of an SNTP server.
Bosch Video Client 2.4 Start-up and configuration | en 11 Configuration Manager When the wizard finishes, the Configuration Manager opens. 1. Click the System tab. 2. Under Applications, click Video Client. This is where you can change the default settings for the Bosch Video Client. 2.4.1 Video Client Use the following menus are configure the Bosch Video Client: 1. In the User Management menu, set user accounts, user passwords, and access rights if required. 2.
en | Start-up and configuration Bosch Video Client Camera Access PTZ configuration The user can configure the PTZ settings PTZ control The user can control the camera View only The user can watch videos Access denied The user has no access to the camera Digital input access, Relay access Control allowed The user can control the component View only The user can see the component Access denied The user has no access to the component Selecting application paths and logging 1.
Bosch Video Client 2.4.2 Start-up and configuration | en 13 Installing licenses Follow these steps to install a license for the Bosch Video Client: 1. Order a license - you will receive an authorization code. 2. Go to the Licenses tab of the configuration manager to determine the host ID of your computer. 3. Log on to the Bosch license manager (https://activation.boschsecurity.com/) using your authorization code. 4. Fill-in and submit the license activation data (including your host ID). 5.
2.5 en | Start-up and configuration Bosch Video Client How to Log on After some time the Bosch Video Client log-on window appears. When the application is started, the Log on window appears. The user name and password boxes are blank. To log on: 1. Type a user name and password: 2. Click Log on. – Check with the administrator if access is denied to the unit.
Bosch Video Client 3 Live window overview | en 15 Live window overview The live window appears when you start the application.
3.1 en | Live window overview Bosch Video Client Basic overview The control areas of a basic live window are shown below. Figure 3.2 Basic live window Toolbar Contains icons for various functions (see below). Video display area Displays the video cameos. Task panel Click the tabs to open or close task panes for view designer, image capture, instant playback, and monitor wall.
Bosch Video Client 3.2 Live window overview | en 17 Toolbar icons Live viewing Switches the application window to the live view (yellow highlighting). Playback Switches the application window to the playback view (blue highlighting). User preferences Displays a dialog box for setting user preferences. Sequencing Starts a sequence of cameo views. Quick display modes Contains icons to select a cameo layout. Text viewer Opens the text viewer pane.
en | Live window overview 3.2.2 Bosch Video Client Setting user preferences To change the user preferences for the application, click to open a dialog box: Settings tab: 1. Place a check mark next to the items to be activated. – 2. The computer beeps on the specified alarms or maximizes the application window. Select a sequence dwell time between 5 and 60 seconds to determine how long a sequenced view remains displayed. 3. Select an instant playback time offset between 5 and 120 seconds.
Bosch Video Client 3.2.3 Live window overview | en 19 Sequencing views The sequence icon is enabled when a view with multiple cameos is selected or when multiple cameras or views are selected. To select the sequence mode: Select a view and click to start sequencing the cameras within that view in a single cameo display. Select multiple views and click to start sequencing between the views and not within the views. 3.2.
en | Live window overview 3.3 Bosch Video Client Favorite views and video device list panes Two side tabs are located on the top left of the application window: 3.3.1 – Click to open the favorite views pane. – Click to open the video device list pane. Favorite views pane Figure 3.3 Favorite views pane The favorites pane shows the various views that have been made in the view designer: – Double-click a view to see it in the live video area or drag one or more views to the live video area.
Bosch Video Client 3.3.2 Live window overview | en 21 Video device list pane Figure 3.4 Video device list pane The video device list pane shows all configured devices (these devices can be put into groups in the Configuration Manager): – Click + to expand a group and see the devices and cameras assigned to it; click - to collapse the group. – To see a device in the live video area, double-click it or drag the device to a cameo.
en | Live window overview 3.4 Bosch Video Client Relays and contacts pane Two side tabs are located on the bottom left of the application window: 3.4.1 – Click to open the relays pane. – Click to open the contacts pane. Output relays Connected relays are indicated by a green overlay dot. To activate or deactivate a connected relay: 3.4.2 Double-click a connected relay to toggle its state. – A closed relay icon – A open relay icon indicates an active output.
Bosch Video Client 3.5 Live window overview | en 23 Cameos A cameo is a single image area within the video display area. There can be one or many cameos in this area. – If you choose to make quick views, the display mode is selected with the display mode icons – in the toolbar. If a favorite view is selected, the number and layout of the cameos has already been defined. To assign a camera to a cameo: Drag a camera from the left side pane to a cameo position.
en | Live window overview 3.6 Bosch Video Client Text view pane The text view pane displays metadata from an text source associated with a camera connected to a DVR. The line number and date stamp are shown in front of the text. Figure 3.5 Text view pane 3.6.1 Exporting text To export text from the text pane: 3.6.2 1. Click to freeze the text in the text pane. 2. Click to copy the text to the clipboard, or click to save the text to a file.
Bosch Video Client 3.7 Live window overview | en 25 Status tabs The status tabs display messages about discovered devices, and video recording and export. Figure 3.6 Status area 3.7.1 Logbook The logbook pane lists status messages for device log-on actions and relay or input contact events. 3.7.2 To see the logbook, click . Export job The export job pane shows the progress of manual video recording and video export jobs. Bosch Security Systems To see the status of an export job, click 1.
en | Viewing live images 4 Bosch Video Client Viewing live images There are two ways of showing live images in the video area: – select a pre-defined view in the favorites pane to provide persistant video area layouts, or – drag cameras from the device tree into the quick (scratch) viewing layouts. Note: It is recommended that you take the time to set up a collection of favorite views. Refer to: – Section 5 Setting up favorite views, page 28 4.1 Selecting favorite views 4.1.
Bosch Video Client 4.3 Viewing live images | en 27 Camera status icons Various overlays in the video image provide important status information. The overlays provide the following information: Decoding error The frame might show artefacts due to decoding errors. If other frames reference this frame, they might also show decoding errors but won’t be marked with the icon. Alarm flag Shown on a media item to indicate an alarm.
en | Setting up favorite views Bosch Video Client 5 Setting up favorite views 5.1 Making a view A view is a collection of camera-to-cameo assignments that can be recalled for instant live viewing. Camera views can be grouped in a logical way; for example, all cameras showing an entrance to a building. To make a favorite view in the live window: 1. Click the view designer icon – . The view designer pane opens. Figure 5.1 Live video window - designing views 2.
Bosch Video Client Live recording | en 6 Live recording 6.1 Recording live video to the PC hard disk 29 To record a live video clip to your computer’s hard disk, proceed as follows: 1. Place the pointer over a cameo to select a camera. 2. Click the manual recording icon – 3. that appears. The export job pane is shown. To stop manual recording: Click in the cameo. -orClick in the export job pane.
en | Saving snapshots Bosch Video Client 7 Saving snapshots 7.1 Capturing a still image Capture still images from a camera and save them to the PC hard disk in a bitmap format. To save a still image to the PC hard disk: 1. Click a cameo to select a particular camera. 2. Click the image capture tab – 3. . The image capture pane opens with the still image displayed. To change the default location, click the drop-down arrow to select a different path on your PC. 4.
Bosch Video Client 8 Instant playback | en 31 Instant playback Use instant playback to view the previous 5 to 120 seconds of recorded video for a particular camera. The camera must, of course, have recording facilities. The offset time (5 to 120 seconds) is set in the user preferences. 8.1 Viewing recorded video To view the recorded video of a particular camera from 5 to 120 seconds earlier: 1. Click a cameo to make it active. 2. Click the instant playback tab .
9 en | Monitor wall Bosch Video Client Monitor wall The monitor wall is first set-up in the User preferences by dragging available monitors to a position in the wall. Figure 9.1 User preferences - monitor wall set-up When a wall has been set up, the monitor wall icon is shown in the task pane. 9.1 Adding cameras and views To populate the wall with cameras and views: 1. Click the monitor wall icon – . The monitor wall pane opens. Figure 9.2 Live video window - monitor wall 2.
Bosch Video Client Controlling cameras | en 10 Controlling cameras 10.1 Digital zoom 33 To zoom in and out digitally on any type of camera: 1. Click the cameo of the camera to make it active. 2. With the pointer in the cameo, scroll the mouse wheel forward to zoom in or click the + button on the control console to activate digital zoom. – A light grey box appears in the top left corner of the cameo.
en | Controlling cameras 10.2 Bosch Video Client PTZ cameras You can control controllable (PTZ) cameras by using the mouse on the cameo of the camera or by using the control console icons. 10.2.1 Mouse control Using the mouse to do in-window pan, tilt, and zoom 1. Click the cameo of the camera to make it active. – 2. – 3. 4. The pointer arrow indicates the direction in which the camera will move. Click and hold the left mouse button. – The camera moves in the direction indicated.
Bosch Video Client Controlling cameras | en 35 Moving a camera to a pre-position To move the active camera to a pre-position: 1. Enter a pre-position number using the keyboard. 2. Click Shot (or press enter). Click buttons one to six for immediate positioning to one of the first six pre-positions. To store the current position of the camera in a pre-position: 1. Position the camera. 2. Enter a pre-position number. 3. Click Set.
11 en | Playback window Bosch Video Client Playback window In the playback window you can: – select a single or a quad display mode – assign cameras to playback cameos to view recorded video – search for recordings – control playback – export recorded video clips to your PC – take a snapshot of the active playback cameo – view stored snapshots and video clips Note: If you are in the live mode, click to switch to the playback window. Figure 11.
Bosch Video Client 11.1 Playback window | en 37 Playback toolbar The toolbar is shown at the top of the playback window. 11.1.1 Selecting single or multiscreen views To switch the display mode, click a cameo view icon to change the layout configuration of the live viewing area: In the playback window: 11.1.2 1. Click the single 2. Click the quad button to view the recorded images from one camera. button to simultaneously view the recorded images of four cameras.
en | Playback window 11.2 Bosch Video Client Selecting camera recordings Video recodings created by cameras that have on-board storage (a memory card), or direct iSCSI or VRM storage, or Divar 700/XF can be viewed. Expand a camera to see if it has more than one track and then select the track you wish to view. VRM recordings can also have backups that can be selected for viewing Figure 11.
Bosch Video Client 11.3 Playback window | en 39 Timeline Click the timeline tab to view the timeline. A timeline with the recordings of the displayed cameras is shown with all camera tracks synchronized to the same playback time. Figure 11.3 Timeline The timeline shows the recorded sequence in light blue, motion recording in yellow, contact recording in red and text recording in orange. To change the timeline scale: Click the + or – box to adjust the timeline scale.
en | Playback window Bosch Video Client To export a selection: Select a time period in the timeline, right-click this selection and click Export. The Export dialog box opens. Make the appropriate settings. Refer to Section 11.5 Exporting recorded video clips to a PC hard disk, page 42. Note: When you click a context menu command that is not available for all cameras in the timeline, the command is executed only on the cameras that have this option available. 11.3.
Bosch Video Client 11.4 Playback window | en Playback controls Figure 11.4 11.4.1 41 Playback controls Using the playback controls Playback Click to play forward recorded video in the playback window. Playback speed and direction can be selected in three different ways: – with the jog dial – with the forward – with the forward and reverse speed slider Click and reverse buttons . to freeze the image. Step forward / Step backward The step buttons are only enabled when was clicked.
en | Playback window 11.5 Bosch Video Client Exporting recorded video clips to a PC hard disk To store recordings from a selected period on a PC hard disk: 1. 2. Drag one or multiple cameras from the left side pane to a cameo. Click export button – 3. on playback control panel. The export window appears. To change the default location, browse to the location in the PC file system where the archive file is to be stored. 4. 5. Type a new name for the file to change the file name.
Bosch Video Client 11.8 Playback window | en 43 Playing stored files Exported video files and exported snapshots that are stored on your PC are played back in the playback window. 11.8.1 Exported video clips To play back exported video clips: 1. Click – 2. 3. to open the exported video clip pane. A list of exported files is displayed. To see the tracks stored in a file, click +. To display a file or a track, double-click it or drag it to a cameo. – The timeline of this recording is displayed.
en | Searching for events 12 Bosch Video Client Searching for events Click the event search tab 12.1 of the playback window to set up a search filter for events. Event search pane Figure 12.1 Playback window - Event search pane 12.1.1 Setting the search period Enter the date and time in the From and To boxes to define the period to search: – The To box shows the time and date of the latest (newest) recording and the From box the earliest (oldest) recording by default. 12.1.
Bosch Video Client Searching for events | en – 45 Text: recorded video for text events for the selected tracks is searched for within the defined period. – Video Loss: recorded video for video loss events for the selected tracks is searched for within the defined period. – System Events: recorded video for system events for the selected tracks is searched for within the defined period. – 12.1.4 Alarms only: the search is restricted to alarm events only. Start search Click 12.1.
en | IVA search 13 Bosch Video Client IVA search Click the IVA search tab of the playback window to set up an IVA search. To select a time period for IVA search, select it in the timeline using the hairline. 13.1 IVA search pane Figure 13.1 Playback window - IVA search pane 13.1.1 Algorithm selection In the drop-down box, select an IVA algorithm to be used in the search. – A window opens with the pameters of the IVA algorithm. – Change the desired parameters.
Bosch Video Client 14 Searching for text | en 47 Searching for text Click the text search tab of the playback window to set up a search filter for text. Note: Text search is only supported on DVR 700 cameras with an appropriate licence installed. 14.1 Text search pane Figure 14.1 14.1.
en | Searching for text 14.1.4 Bosch Video Client Start search Click 14.1.5 to start the search. Search results When the search is completed, a list of video clips that match the filter criteria is displayed. This list shows the latest recordings at the top, the earliest at the bottom. 1. Click on a column header to sort the list according to that column item. Click a second time to sort the list in reverse order. 2. 3. Use the scroll bar to examine the full list.
Bosch Video Client 15 Command line start | en 49 Command line start The program can also be started from the command line with additional parameters. For example, the command C:\Program Files\Bosch\Video Client\videoclient.exe -? opens a help window with more information about the parameters that can be used. Bosch Security Systems Operator’s manual F.01U.247.166 | v1.2 | 2011.
en | Command line start 15.1 Bosch Video Client Sites parameter If you use the sites parameter, you must specify the path to an xml file which describes the DVRs at the different sites. For example, the command C:\Program Files\Bosch\Video Client\videoclient.exe -sites D:\sites_file.xml 15.1.1 XML file structure The xml file has a simple structure as is shown in the following example: F.01U.247.166 | v1.2 | 2011.
Bosch Video Client 15.1.2 Command line start | en 51 Sites views pane The sites pane shows the DVRs that have been listed in the start-up xml file. Figure 15.1 Bosch Security Systems Sites views pane – If required, enter text in the filter area to reduce the number of sites listed. – Select a device and enter its user name and password. – Click to log on to the device and obtain the list of cameras connected to it. Operator’s manual F.01U.247.166 | v1.2 | 2011.
en | Command line start F.01U.247.166 | v1.2 | 2011.
Bosch Security Systems Werner-von-Siemens-Ring 10 85630 Grasbrunn Germany www.boschsecurity.