Microwave CMA585MSI [en] Instruction manual
en Table of contents [ en] I nst r uct i on manual 8 Intended use . . . . . . . . . . . . . . . . . . . . . . . . . . . . . 4 ( Important safety information . . . . . . . . . . . . . . . 4 O Setting the time-setting options . . . . . . . . . . . . 20 General information . . . . . . . . . . . . . . . . . . . . . . . . . . . 4 Microwave . . . . . . . . . . . . . . . . . . . . . . . . . . . . . . . . . . 5 Checking the time settings . Setting the timer . . . . . . . . . Setting a cooking time . . . .
en Intended use 8Intended use Read these instructions carefully. Only then will you be able to operate your appliance safely and correctly. Retain the instruction manual and installation instructions for future use or for subsequent owners. This appliance is only intended to be fully fitted in a kitchen. Observe the special installation instructions. Check the appliance for damage after unpacking it. Do not connect the appliance if it has been damaged in transport.
Important safety information Risk Penetrating of electric shock! moisture may cause electric shock. Never subject the appliance to intense heat or humidity. Only use this appliance indoors. Risk electric shock! ■ A of defective appliance may cause electric shock. Never switch on a defective appliance. Unplug the appliance from the mains or switch off the circuit breaker in the fuse box. Contact the after-sales service. Risk of electric shock! ■ The appliance is a high-voltage appliance.
en Important safety information : Warning – Risk of burns! : Warning – Risk of scalding! ■ ■ Foods with peel or skin may burst or explode during, or even after, heating. Never cook eggs in their shells or reheat hard-boiled eggs. Never cook shellfish or crustaceans. Always prick the yolk when baking or poaching eggs. The skin of foods that have a peel or skin, such as apples, tomatoes, potatoes and sausages, may burst. Before heating, prick the peel or skin.
Causes of damage : Warning – Risk of serious damage to health! ■ The surface of the appliance may become damaged if it is not cleaned properly. Microwave energy may escape. Clean the appliance on a regular basis, and remove any food residue immediately. Always keep the cooking compartment, door seal, door and door stop clean. ~ "Cleaning" on page 23 Risk of serious damage health! ■ Microwave energy to may escape if the cooking compartment door or the door seal is damaged.
en Environmental protection Microwave Caution! ■ Creation of sparks: Metal e.g. a spoon in a glass must be kept at least 2 cm from the oven walls and the inside of the door. Sparks could irreparably damage the glass on the inside of the door. ■ Operating the microwave without food: Operating the appliance without food in the cooking compartment may lead to overloading. Never switch on the appliance unless there is food in the cooking compartment.
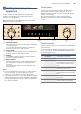
Getting to know your appliance Control panel *Getting to know your appliance Use the function and rotary selector, as well as the touch fields, to set the various functions for your appliance via the control unit. The current settings are shown in the display. The overview shows the control panel when the appliance is switched on with a selected operating mode. In this chapter, we will explain the indicators and controls. You will also find out about the various functions of your appliance.
en Getting to know your appliance Touch fields and display You can use the touch fields to set various additional functions for your appliance. You can see the values for these in the display. Touch fields Here you can find a short explanation of the various buttons and touch fields.
Getting to know your appliance Operating modes Your appliance has various operating modes, which make your appliance easier to use. You can find more detailed descriptions of these in the corresponding sections. Operating mode Heating functions ~ "Operating the appliance" on page 13 Microwave ~ "Microwave" on page 15 Microwave combined operation Basic settings ~ "Basic settings" on page 22 Use There are various finely tuned heating functions that will allow you to cook your food to perfection.
en Accessories _Accessories Below, you will find an overview of the accessories included and information on how to use them correctly. Ac es or i es Caution! When removing dishes, make sure that the turntable does not move. Make sure that the turntable is properly locked. The turntable can turn left or right. Accessories included Turntable Food that requires a lot of heat from below can be cooked directly on the turntable. Note: The turntable can turn clockwise or anti-clockwise.
Operating the appliance Changing the time on the clock Note: To change the time on the clock, you will need to switch off the appliance. en 1Operating the appliance You have already learnt about the controls and how they work. Now we will explain how to set your appliance. You will learn about what happens when you switch the appliance on and off, and how to select the operating mode. Oper at i ng t he ap l i ance 1. Touch the 0 button twice. The 0 symbol and the clock time will appear on the display.
en Operating the appliance Setting the heating function and temperature Example: Hot air < at 200 °C 1. Use the function selector to set the Hot air < heating function. A default temperature of 160 °C will appear on the display. Stopping the appliance from heating Turn the function selector to the "Off" position. The appliance will stop heating and all the settings will be cleared. Note: The fan may continue to run after the appliance has been paused or stopped.
Microwave ^Microwave You can use the microwave to cook, heat up or defrost food quickly. You can use the microwave on its own or in combination with the grill. To ensure optimum use of the microwave, please observe the notes on cookware and familiarise yourself with the data in the application tables at the end of the instruction manual. Mi cr owave en Microwave power settings The microwave power settings are levels and do not always correspond to the exact wattage that the appliance uses.
en Microwave Setting the microwave Example: Microwave setting 600 W, cooking time 5 minutes. 1. Use the function selector to select the microwave function !. The appliance is now ready to use. The maximum microwave power output ! will be displayed as the default value on the display. You can change this at any time. 2. Touch the microwave setting field to select the power setting you require. Notes Touching it several times switches the power levels from the highest to the lowest level.
Automatic programmes The cooking time has elapsed A signal sounds and the start l stop symbol stops lighting up. Combination mode has finished. Touch any field to end the acoustic signal. Changing the microwave power output Touch ! until the required level is selected in the display. Notes Touching it several times switches the power levels from the highest to the lowest level. ■ If the microwave function is only added after the start, the appliance pauses.
en Automatic programmes 4. Use the rotary selector to set the weight to 1 kg. The appliance automatically sets the right cooking time for that weight. 5. Touch start l stop. The programme will start. The cooking time visibly counts down and the temperature bar and the start l stop LED light up. Notes Before starting you can use % and h to switch between programmes and weight. ■ Once you have started the programme, the programme number and weight cannot be changed.
Automatic programmes en Programme table Programme no. Food Weight range in kg Cookware/accessories, shelf position Notes Shallow cookware without lid on the low-profile wire rack Shallow cookware without lid on the low-profile wire rack After turning, remove any minced meat that has already defrosted. Do not use boil-in-the-bag rice. Rice foams a lot during cooking. Enter the uncooked weight (without liquid). Add liquid to the rice in a ratio of two to two and a half parts liquid to one part rice.
en Setting the time-setting options OSetting the time-setting options Your appliance has various time-setting options. You can use the 0 touch field to call up the menu and switch between the individual functions. The symbols for the available functions light up in the display and the function that you just selected is highlighted. Set i ng t he t i me- set i ng opt i ons Time-setting option Use t Timer The timer functions like an egg timer.
Childproof lock Cancelling the cooking time If the timer function has been set, first touch the 0 button. You will now be able to adjust the cooking time. Use the rotary selector to reset the cooking time to ‹‹:‹‹.After a few seconds, the change will be applied. Initial use After connecting the electricity supply or after a power cut, the display prompts you to set the time. It may take a few seconds for the instruction to appear. Setting the time During initial use, the time display is highlighted.
en Basic settings QBasic settings There are various settings available to you in order to help use your appliance effectively and simply. You can change these settings as required. List of basic settings Depending on the features of your appliance, not all basic settings will be available. Basi c set i ngs ™‹‚ Changing the basic settings The appliance must be switched off. 1. Touch the 0 button for a few seconds. The first basic setting will appear on the display. 2.
Cleaning DCleaning With good care and cleaning, your appliance will retain its appearance and remain fully functioning for a long time to come. We will explain here how you should correctly care for and clean your appliance. Cl eani ng : Warning – Risk of burns! The appliance becomes very hot. Never touch the interior surfaces of the cooking compartment or the heating elements. Always allow the appliance to cool down. Keep children at a safe distance.
en Trouble shooting 3Trouble shooting If a fault occurs, there is often a simple explanation. Before calling the after-sales service, please refer to the fault table and attempt to correct the fault yourself. Tr oubl e sho t i ng : Warning – Risk of electric shock! Incorrect repairs are dangerous. Repairs may only be carried out and damaged power cables replaced by one of our trained after-sales technicians.
Customer service 4Customer service Our after-sales service is there for you if your appliance needs to be repaired. We will always find an appropriate solution, also in order to avoid after-sales personnel having to make unnecessary visits. Cust omer ser vi ce Acrylamide in foodstuffs Which foods are affected? Acrylamide is mainly produced in grain and potato products that are heated to high temperatures, such as crisps, chips, toast, bread rolls, bread, fine baked goods (biscuits, gingerbread, cookies).
en Tested for you in our cooking studio Defrosting, heating up and cooking with the microwave JTested for you in our cooking studio In the tables below, you will find a selection of dishes and the ideal settings for them. They tell you which heating function and which temperature or microwave power setting is best suited to your dish. You will find information on suitable cooking accessories and the position at which they should be placed in the oven.
Tested for you in our cooking studio Defrost Weight Butter, defrosting 125 g 250 g 500 g 1 kg 500 g 750 g Microwave power setting in watts, cooking time in minutes 180 W, 1 mins + 90 W, 2-4 mins 360 W, 1 min + 90 W, 2-4 mins 180 W, 6 mins + 90 W, 5-10 mins 180 W, 12 mins + 90 W, 15-25 mins 90 W, 15-20 mins 180 W, 5 mins + 90 W, 10-15 mins 500 g 750 g 180 W, 5 mins + 90 W, 10-15 mins 180 W, 7 mins + 90 W, 10-15 mins Loaf of bread Cakes, dry, e.g. sponge cake Cakes, moist, e.g.
en Tested for you in our cooking studio Heating food : Warning – Risk of scalding! There is a possibility of delayed boiling when a liquid is heated. This means that the liquid reaches boiling temperature without the usual steam bubbles rising to the surface. Even if the container only moves a little, the hot liquid can suddenly boil over and spatter. When heating liquids, always place a spoon in the container. This will prevent delayed boiling. Caution! Metal e.g.
Tested for you in our cooking studio Cooking food ■ Notes ■ Food which lies flat will cook more quickly than food which is piled high. You should therefore distribute the food so that it is as flat as possible in the ovenware. Different foodstuffs should not be placed in layers on top of one another. ■ ■ ■ Cooking food Weight Whole chicken, fresh, no giblets 1.5 kg Fish fillet, fresh 400 g Fresh vegetables 250 g 500 g Potatoes 250 g 500 g 750 g Rice 125 g 250 g Sweet foods, e.g.
en Tested for you in our cooking studio Cakes and pastries ■ About the tables ■ Notes ■ The times given apply to food placed in a cold oven. ■ The temperature and baking time depend on the consistency and amount of the mixture. This is why temperature ranges are given in the tables. Begin with the lower temperature and, if necessary, use a higher setting the next time, since a lower temperature results in more even browning.
Tested for you in our cooking studio en Baking tips You want to bake according to your own recipe. Use baking tins made of silicone, glass, plastic or ceramic materials. How to establish whether sponge cake is baked through. The cake collapses. Use similar items in the baking tables as a guide. The baking tin must be heat-resistant up to 250 °C. Cakes in these baking tins will be less brown. When using the microwave, the cooking time will be shorter than the time shown in the table.
en Tested for you in our cooking studio Beef Notes ■ Turn pot-roasted beef after Y and Z of the cooking time.Finally, allow to stand for a further 10 minutes approximately. Beef Accessories Pot-roasted beef, approx. 1 kg Fillet of beef, medium, approx. 1 kg Sirloin, medium, approx. 1 kg Steak, medium, 3 cm thick ■ ■ Turn fillets of beef and sirloin steaks halfway through the cooking time. Finally, allow to stand for a further 10 minutes approximately. Turn steaks after Z of the cooking time.
Tested for you in our cooking studio en Miscellaneous Notes ■ Finally, allow the meat loaf to stand for a further 10 minutes approximately. ■ Turn the sausages after Z of the cooking time. Miscellaneous Accessories Meat loaf, approx. 1 kg* Cookware without lid Heating Temperature in function °C, grill setting 4 180-200 Sausages for grilling, x 4 - 6 Approx.150 g each** * Low wire rack ** Tall wire rack - š 3 Poultry ■ Notes Place whole chickens and chicken breasts breastside down.
en Tested for you in our cooking studio Tips for roasting and grilling The table does not contain information for the weight of the joint. For small roasts, select a higher temperature and a shorter cooking time. For larger roasts, select a lower temperature and a longer cooking time. How to tell when the roast is ready. Use a meat thermometer (available from specialist shops) or carry out a “spoon test”. Press down on the roast with a spoon. If it feels firm, it is ready.
Tested for you in our cooking studio en Test dishes The quality and function of microwave combination appliances are tested by testing institutes using the following dishes. In accordance with the standards EN 60705, IEC 60705 or DIN 44547 and EN 60350 (2009) Defrosting with the microwave Dish Microwave power setting in watts, cooking Note time in minutes Meat 180 W, 5 mins + 90 W, 10-15 mins Place the Pyrex dish with a 22 cm diameter on the lower wire rack. After approx.
Robert Bosch Hausgeräte GmbH Carl-Wery-Straße 34 81739 München, GERMANY www.bosch-home.