Conettix ITS-D6686-INTL Installation Guide EN Ethernet Network Adapter
Conettix ITS-D6686-INTL | Installation Guide | Contents Contents 1.0 1.1 1.2 1.3 2.0 2.1 2.2 3.0 3.1 3.2 3.3 3.4 3.5 4.0 2 Introduction ...................................................... 3 Network Interface................................................. 3 Serial Interface..................................................... 3 LEDs .................................................................... 3 Installation ........................................................ 4 Mounting the D6686 ........
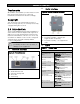
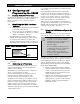
Conettix ITS-D6686-INTL | Installation Guide | 1.0 Introduction . Trademarks All hardware and software product names used in this document are likely to be registered trademarks and must be treated accordingly. 1.2 Serial Interface Figure 2: D6686 Network Interface Copyright This document is the intellectual property of Bosch Security Systems, Inc. and is protected by copyright. All rights reserved. 1.
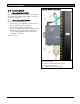
Conettix ITS-D6686-INTL | Installation Guide | 2.0 Installation 2.0 Installation 2.1 Figure 3: D6686 Connections Mounting the D6686 Mount the D6686 on a rail or other user-supplied spot behind the D6600 that it will be connected to. Refer to Figure 3. 2.
Conettix ITS-D6686-INTL | Installation Guide | 3.0 Configuring and Programming the D6686 . 3.0 Configuring and Programming the D6686 3.1 Factory Default IP Address By default, the D6686 uses DHCP to obtain an IP Address. The unit requires a static IP Address. Refer to Sections 3.2, 3.3, and 3.4 for more information. 3.2 Identifying the MAC Hardware Address 1. Verify that the D6686 is properly installed, connected, and powered. Refer to Section 2.0 Installation on page 4. 2.
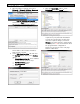
Conettix ITS-D6686-INTL | Installation Guide | 3.0 Configuring and Programming the D6686 3. Open the D6200 software and select Network – Network Utilities - Network Device Setup as shown below 7. Click the Open XML button, select D6686.xml, and click Open. 4. Select List All Conettix IP Devices tab and click the Start button. The program will scan the network for the device. 5. The D6686 will be shown in the list with the IP address. Record the IP address that is listed is shown. 6.
Conettix ITS-D6686-INTL | Installation Guide | 3.0 Configuring and Programming the D6686 . Bosch Security Systems, Inc.
Conettix ITS-D6686-INTL | Installation Guide | 3.0 Configuring and Programming the D6686 9. Click on the Save XML As button to save the changes made and enter a name for these configuration settings. 10. Click on the Send XML button to send these changes to the D6686. The device will save the changes and reboot with the new configuration. 11. Disconnect the Ethernet cable connecting the PC and the D66868 and connect the D6686 to the network switch or router as required.
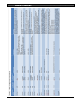
Conettix ITS-D6686-INTL | Installation Guide | 4.0 Specifications . 4.0 Specifications Table 2: Specifications Supported Protocols Connectors ARP, UDP/IP, TCP/IP, Telnet, ICMP, SNMP, DHCP, BOOTP, TFTP, and FTP Serial: 2 - DB9M DTE serial ports Network: 1 - RJ45 10Base-T/100Base-TX Ethernet port Cables Ethernet: Data Rates Serial Line Formats CAT5 or better unshielded twisted pair Max Length: 6 m (20 ft) and installed in same enclosure/rack as D6600.
Bosch Security Systems, Inc. 130 Perinton Parkway Fairport, NY 14450-9199 (800) 289-0096 © 2012 Bosch Security Systems, Inc.