Bosch Diagnostics: KTS 570 Installation Guide Congratulations for making a decision to invest in Vetronix-Bosch products, the world-wide leader in Automotive Diagnostics! F00E900050 KTS 570 / ESI[tronic] INSTALLATION GUIDE
Bosch Diagnostics: KTS 570 Installation Guide !!! Attention !!! Thank you for purchasing one of the finest diagnostic tools available. Please take the time to read this guide to assist you in the initial setup and usage of this tool. The Quick Start Guide will assist you in the initial setup and configuration to make sure that your initial experience will be as smooth as possible. If you find that the kit is missing any components, please call Customer Support.
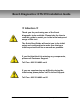
KTS 570 ESI[tronic] Software Installation Instructions Before you get started: • • • • Save the Packing Slip that came with your KTS 570 as it has account information you will need during the release process.
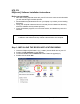
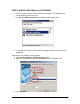
5. Double click RBSetup. 6. In the upper right corner, confirm language is set to English (or to the language of your Windows operating system). Use the up and down arrows to make your selection. 7. Press F12 on your keyboard or double click the icon next to F12 on the screen to continue. 8. Read the installation agreement and click Accept. 9. Read the liability statement and click Accept. 10. The Setup Completed message appears. Leave the DVD in the DVD drive and click OK or press Enter.
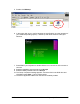
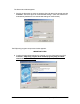
STEP 2: INSTALLING ESI[tronic] SOFTWARE 1. After the system restarts, connect the KTS 570 to the PC via USB cable and supply external power to the KTS. 2. Double click Software Installation in the Bosch Applications Menu. 3. In the Welcome window, confirm that the language setting is correct and Click Continue. The Kind/type of installation window appears. 4. Select Local installation (standalone) radio button. 5. Select by highlighting (clicking on) User Defined as the Installation type. 6.
The Directories window appears. 7. Specify the directories in which the program files and data will be stored and click Continue. See below figure for recommended settings. (Note: the software will automatically default to the recommended settings as shown below). The ESI[tronic] program components window appears. IMPORTANT STEP! 8. Confirm the appropriate settings are checked, as in the figure below and Click Continue.
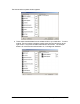
The Data-download update window appears. 9. These steps download data from the software DVD to your hard-drive. To add a module, use your mouse to drag the module name from the left column to the right column. Only those modules subscribed to will function. The example below is for customers who subscribed to A, C12 Diagnostic Software.
The example below is for customers who subscribed to modules A, C, M, P – both Diagnostic Software and Information Software subscriptions. NOTE: The 3000+ MB of data in the Archive DVD can be loaded on to your hard drive (provided there is space) or accessed directly from the DVD when needed. If you wish to load the Archive information to your hard drive, drag it from the left column to the right column at this time.
FIRMWARE UPDATE: During the software installation ESI[tronic] will attempt to update the firmware in the KTS 570. If the KTS 570 was connected to the PC via USB as instructed previously, the Firmware Update will be successful. If a Firmware Update Error Message appears, verify the KTS 570 is connected to the PC via USB and is powered up (verify by blinking green light on end of unit). Click OK and click green check mark if provided.
UPDATING ESI[tronic] SOFTWARE NOTE: If your KTS 570 came with an update DVD (it would be labeled U 200x/2, 200x/3, or 200x/4), it must be loaded at this time. If your KTS 570 did not come with an update DVD, go to the Obtaining a Release Code section. WARNING: If the most recent update you have received is U 2006/3, make sure the DVD has a blue “U*” with an asterisk and there is a red box with the word “wireless” in it. If you do not have this DVD, contact Customer Support at: 800-3214889 x 4 immediately.
To update the software, do the following: 1. Ensure the KTS 570 is connected to the PC via USB and supply power to the KTS. 2. Insert the U (update) DVD into your DVD drive. 3. On the Bosch Applications Menu Double Click Software Installation. The Update – installation type window appears. NOTE: At this point you may select Yes, update automatically. HOWEVER it is recommended you follow the instructions below as they allow you to confirm the original installation was done correctly.
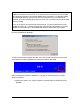
4. Select the radio button No, perform user-defined update and Click Continue. The Data-download window will appear. 5.
If your subscription is for Diagnostic Software and Information Software (A, C, M, P) your update screen should look like this: 6. Verify the correct modules are in the right column and Click Continue. The ESI[tronic] update software will now begin loading. NOTE: During this portion of the installation, the software will “uninstall” the older version of the KTS and load the newer version. This is a necessary step, do not stop the download – let the process continue.
The next window will look like this: When the software update installation is complete you will be asked to restart your computer. ESI[tronic] Software is now loaded on the PC. Follow the instructions below for Bluetooth® installation and then go to section OBTAINING A RELEASE CODE to “unlock” the secured software.
KTS 570 BLUETOOTH® INSTALLATION & SETUP To utilize the Bluetooth wireless functionality, follow the instructions below: WARNING: Prior to installing the Bluetooth® application you must disable any Bluetooth® drivers that are already installed on your laptop / PC. For instructions please consult your laptop / PC instructions or contact the manufacturer. 1. Ensure the KTS 570 is connected to the PC via USB and external power is supplied to the KTS. 2. Ensure that any internal Bluetooth devices are disabled.
5. With Automatic configuration selected, Click Configure USB link. 6. The USB link to the KTS 570 will now be confirmed: 7.
8. Click New to Start the Bluetooth wireless configuration 9.
10. Click Yes to install the Bluetooth driver software. 11. Select English and Click OK 12. Click Next to install the Bluetooth Stack.
13. Click the Radio Button to accept the license agreement and then Click Next 14. Click Next to start the Bluetooth Stack installation. 15. Click Yes to start the Install process.
16. Plug The KTS Bluetooth Dongle into the USB port at this time. Click OK to continue. 17. Click Yes to restart the computer. Note: Leave the Bluetooth dongle plugged into the USB Port 18. After the system reboots you should have the Bluetooth Manager Icon displayed on your desktop. Note: This icon will only be displayed when the Bluetooth dongle is plugged in. 19. Go to the Control Panel and Double Click the Bosch DDC Control Panel Icon.
20. Click the New button to add the new Bluetooth connection. 21. Click Yes to install the Bluetooth link. NOTE: Confirm the USB cable is still plugged into the KTS 570.
. The Bluetooth device will now assign a Bluetooth address to the KTS 570 through the USB cable. 23. Remove the USB cable from the KTS 570 Module. Click OK 24. The KTS 570 Bluetooth activation process will now be completed.
25. Click Accept and then OK to complete the installation. Congratulations, you have successfully set up the wireless Bluetooth installation.
FIRMWARE UPDATE If your KTS 570 was not connected to the PC during software and firmware installation you will need to do a Firmware Update as described below. 1. Connect the KTS 570 with the PC via USB and supply external power to the KTS. Verify power with blinking green light on end of unit. Firmware Update will not work wirelessly – unit must be connected via USB. 2. Open the Bosch Diagnostic Device Configuration (DDC) from the Control Panel 3. Double Click the DDC icon. 4.
5. The firmware will now be updated.
OBTAINING A RELEASE CODE – 3 METHODS To Release / Enable / Activate the ESI[tronic] software, follow the instructions below. Method 1 – Internet (fastest) 1. On the web go to: https://www.bosch-esitronic.com NOTE: Ensure the web address is entered exactly as it is written above as this is a “secure” site as signified by “https”. Any PC can be used to generate a release code – it does NOT have to be the KTS 570 PC. 2. At the top of the page select English from the Language menu. 3. Click Register. 4.
8. Enter the ID No. from the ESItronic software. To access this number, do the following: 9. Open ESI[tronic] by Double Clicking ESI[tronic] from the Bosch Applications Menu: 10.
11. The ID no. is now displayed (the ID no. below is an example. Use the ID no. exactly how it appears on your PC). 13. On the website, Type the ID no. and Click Generate Release Code at the bottom right. NOTE: When entering the ID. No. into the given space on the ESI[tronic] website do NOT add spaces or decimal points – only enter the alpha-numeric ID number. 14. The release code will be generated and emailed to the address entered during registration.
15. Cut and Paste or Type the release code into the area provided in ESI[tronic] (release code below is an example). Enter your Customer No. Click OK. 16. Modules subscribed to and released will be displayed. The information units displayed will vary depending on the software subscribed to.
Method 2 – Email Send an email to: esitronic@bosch-serviceline.com Include: • ESI[tronic] Customer Number (from packing slip) • ID No. from ESI[tronic] (see steps 10-11 above) • Company name, address, phone number (with area code) • Contact Name An email will be sent to the sender with a release code typically within 1 business day. Enter the release code in ESI[tronic] as described above. Method 3 – Fax Send a fax to the ESI[tronic] Serviceline in Germany.
LOCKING IN A RELEASE CODE If you have a Network, high speed internet, or if your laptop has a wireless LAN card, it is highly recommended that you follow the steps below so your ESI[tronic] Release Code is recognized on-network and off-network. These steps should be done after the software is released on the PC. 1. Insert the DVD 200X/1 (e.g., 2006/1) into the DVD drive. 2. Double click My Computer on the Desktop. 3. Locate and double click the DVD drive in the Folders list (typically D). 4.
26. Double click Mac_New.reg. 27. Click Yes when prompted: 28. Click OK when prompted. Process is now complete.
Start the training! Getting Started DVD • The Getting Started Guide puts you on a path to effectively utilizing all the functionality of your diagnostic tool. • The training is an animated and narrated guide that walks you through all of the basic functions and settings of your new tool. Launch The Getting Started Application! • • • • Insert the DVD and let it “autorun” (If DVD will not “autorun” then open the DVD and click on the file called “training.exe”).
Bluetooth® is a registered trademark of Bluetooth SIG, Inc. Robert Bosch Corp.