User Manual


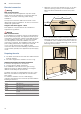
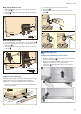
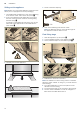
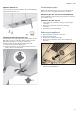
Table Of Contents
- [en] Instructions for installation and use
- Table of contents
- [en] Instructions for installation and use
- ( Important safety information
- Important safety information
- : Warning
- : Warning
- : Warning
- : Warning
- : Warning
- : Warning
- Causes of damage
- Saving energy
- Environmentally-friendly disposal
- Exhaust air mode
- Air recirculation
- Control panel
- Setting the fan
- Intensive setting
- Fan run-on time
- Lighting
- Cleaning agents
- Cleaning the metal mesh grease filters
- Removing metal grease filter
- Installing the metal mesh grease filter
- Malfunction table
- Replacing bulbs
- LED lights
- Accessories
- ( Important safety information
- Important safety information
- : Warning
- : Warning
- : Warning
- : Warning
- : Warning
- : Warning
- : Warning
- : Warning
- K General information
- Exhaust air mode
- Exhaust duct
- Electrical connection
- Preparing the units
- Appliance dimensions and safety clearances
- 1. Make the cut-out for the exhaust air pipe. To do this, make an opening in the top or back panel of the fitted unit with an additional recess for the power cord.
- 2. If the cabinet base is in place, remove it. Mark the fastening points on the inside of the cabinet and use a bradawl to make indentations where the holes are to be. To help you mark the fastening points, use the fastening piece provided.
- Body wall thickness: 16 mm
- Body wall thickness: 19 mm
- Appliance dimensions and safety clearances
- Preparing the appliance
- Sliding the appliance up into place
- Sliding out the appliance
- Note:
- 1. Use a flat-blade screwdriver to push in the fastening bolt, and turn it 90° until it locks into place. ¨
- 2. Push in the fastening bolt gently with your fingers, and turn it until it comes out of the housing along with the spring.©
- 3. Carefully remove the appliance.
- 4. Screw in the filler strip fully.
- 5. Push in the fastening bolt and turn it 90°.
- Note:
- Note:
- Final fitting stage
- Connecting the pipes
- Removing the appliance