Extractor hood [en] Instructions for installation and use
en Table of contents INSTRUCTION MANUAL.......................................................... 2 s no i t c u r t s n I ] ne [ rof 8 Intended use................................................................... 2 ( Important safety information ........................................ 3 7 Environmental protection ............................................. 4 Ç Operating modes ........................................................... 4 1 Operating the appliance....................................
Important safety information en (Important safety information : Warning no i t amro f n i y t e f as t na t ropmI Danger of suffocation! Packaging material is dangerous to children. Never allow children to play with packaging material. : Warning Danger of death! Risk of poisoning from flue gases that are drawn back in. Always ensure adequate fresh air in the room if the appliance is being operated in exhaust air mode at the same time as room airdependent heat-producing appliance is being operated.
en Environmental protection : Warning Risk of burns! The accessible parts become very hot when in operation. Never touch hot parts. Keep children at a safe distance. : Warning Risk of injury! ■ Components inside the appliance may have sharp edges. Wear protective gloves. Risk of injury! ■ Items placed on the appliance may fall down. Do not place any objects on the appliance. Risk of injury! ■ The light emitted by LED lights is very dazzling, and can damage the eyes (risk group 1).
Operating the appliance ■ ■ Before conveying the exhaust air into a nonfunctioning smoke or exhaust gas flue, obtain the consent of the heating engineer responsible. If the exhaust air is conveyed through the outer wall, a telescopic wall box should be used. Air recirculation The air which is drawn in is cleaned by the grease filters and an activated carbon filter, and is conveyed back into the kitchen. Note: To bind odours in air recirculation mode, you must install an activated carbon filter.
en Cleaning and maintenance Cleaning agents By hand: Observe the information in the table to ensure that the different surfaces are not damaged by using the wrong type of cleaning agent. Do not use Note: You can use a special grease solvent for stubborn dirt. It can be ordered via the Online Shop. ■ ■ ■ ■ harsh or abrasive cleaning agents, cleaning agents with a high concentration of alcohol, hard scouring pads or sponges, high-pressure cleaners or steam cleaners.
Trouble shooting On appliances with a glass plate in the filter pull-out: ■ ■ The glass plate can be removed easily and can be cleaned in the dishwasher. To remove it, carefully lift the glass plate. en Replacing bulbs These instructions apply to several appliance variants. It is possible that individual features are described which do not apply to your appliance. : Warning Risk of burns! Halogen bulbs become very hot when switched on.
en Customer service 4Customer service Accessories When calling us, please give the product number (E no.) and the production number (FD no.) so that we can provide you with the correct advice. The rating plate with these numbers can be found inside the appliance (remove the metal mesh grease filter to gain access). You can make a note of the numbers of your appliance and the telephone number of the after-sales service in the space below to save time should it be required.
Customer service en INSTALLATION INSTRUCTIONS Installation instructions These instructions apply to several appliance variants. It is possible that individual features are described which do not apply to your appliance. ■ ■ ■ Appliance width 60 cm: This appliance is installed in a upper cabinet. Follow the enclosed installation instructions for additional special accessories (e.g. for circulating-air mode). The surfaces of the appliance are sensitive. Avoid damaging them during installation.
en Important safety information (Important safety information Read these instructions carefully. Only then will you be able to operate your appliance safely and correctly. Retain the instruction manual and installation instructions for future use or for subsequent owners. The appliance can only be used safely if it is correctly installed according to the safety instructions. The installer is responsible for ensuring that the appliance works perfectly at its installation location.
General information : Warning Risk of fire! Grease deposits in the grease filter may catch fire. The specified safety distances must be observed in order to prevent an accumulation of heat. Observe the specifications for your cooking appliance. If gas and electric hobs are operated together, the largest specified distance applies. Only one side of the appliance may be installed directly next to a high-sided unit or a wall.
General information en Electrical connection : Warning Risk of electric shock! Components inside the appliance may have sharp edges. These may damage the connecting cable. Do not kink or pinch the connecting cable during installation. The required connection data can be found on the rating plate inside the appliance; to do this, remove the metal mesh grease filter. Length of the cable: approx. 1.30 m This appliance complies with the EC interference suppression regulations. 1.
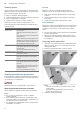
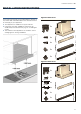
Installation Body wall thickness: 16 mm 1. Screw the mounting pieces to the body on the left and right. ¨ 2. Remove the tabs from the bottom of the mounting pieces. © en 1. Use the screws provided to secure the handle strip to the filter-pull-out. ¨ 2. Connect the power cord provided to the appliance. © $ PP % [ Body wall thickness: 19 mm 1. Fold out the tabs on both of the mounting pieces. ¨ 2. Screw the mounting pieces to the body on the left and right. © 3.
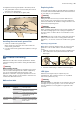
en Installation 4. Screw in the filler strip fully. Sliding out the appliance Note: Before you remove the appliance, protect the hob with a piece of polystyrene from the packaging. 1. Use a flat-blade screwdriver to push in the fastening bolt, and turn it 90° until it locks into place. ¨ 2. Push in the fastening bolt gently with your fingers, and turn it until it comes out of the housing along with the spring. When doing this, grip the bottom of the appliance with the other hand.
Installation Appliance width 90 cm: You must also screw the appliance to the wall-hanging cupboards either side of it. en Connecting the pipes Note: If an aluminium pipe is used, smooth the area where it is to be connected before you connect it. Exhaust air pipe, dia. 150 mm (recommended size) Fit the exhaust air pipe directly to the air-pipe connector and seal the joint. Exhaust air pipe, dia. 120 mm 1. Fit the reducing connector directly to the air-pipe connector. 2.
Robert Bosch Hausgeräte GmbH Carl-Wery-Straße 34 81739 München Germany www.bosch-home.