
Installation Manual
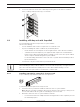

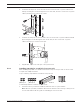

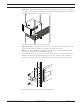


Table Of Contents
- Table of contents
- 1 Safety
- 2 Before you begin
- 3 System overview
- 4 Installation
- 5 Connection
- 6 Turning on/off AC power
- 7 Configuring the storage system
- 8 Maintenance
- Blank Page
- Blank Page
- Blank Page

26 en | Installation DSA E-Series (E2800 60-bay)
2018.02 | V1 | DOC Installation manual Bosch Sicherheitssysteme GmbH
4.3 Installing the drives
Notice!
To avoid damaging the hardware, never move a unit if drives are installed. Remove all drives
before moving the unit.
To install the drives:
1. Put on the ESD wristband to protect the drives from static electricity.
2. Release the levers on the top drive drawer. Then, slide the drawer out by using the levers.
3. Raise the handle on the drive to vertical.
4. Starting with the leftmost slot at the front, align the two raised buttons on the drive with
the notches on the drawer. Then, pressing gently on the top of the drive, rotate the drive
handle down until the drive snaps into place.
5. Install the remaining drives. Observe the following if you are installing fewer than 60
drives, SSD drives or drives with different capacities:
Install drives in the front four slots of each drawer (a minimum of 20 drives in each unit)
to maintain adequate airflow for cooling.
– Distribute any remaining drives across the drawers. If possible, install an equal
number of each type of drive in each drawer to allow for the creation of Drawer Loss
Protected volume groups or disk pools.
– Distribute any SSD drives evenly across the drawers.
6. Slide the drawer back in by sliding it from the center and closing both levers gently.
7. Attach the bezel to the front of the unit.
4.4 Installing the front bezel and end caps
A front bezel covers the front of the controller unit and the expansion unit, while left and right
end caps cover the mounting flanges on each unit.
To install the front bezel:
1. Position the front bezel in front of the controller unit or the expansion unit so that the
holes at each end align with the fasteners on the unit.
2. Snap the bezel into place.
To install the end caps:
1. Position the left end cap in front of the controller unit or the expansion unit so that the
holes in the end cap align with the fasteners on the left side of the unit.
2. Snap the end cap into place.
3. Repeat these steps for the right end cap.