
Installation Manual
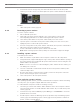
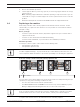
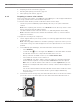
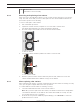
Table Of Contents
- Table of contents
- 1 Safety
- 2 Before you begin
- 3 System overview
- 4 Installation
- 5 Connection
- 6 Turning on/off AC power
- 7 Configuring the storage system
- 8 Maintenance
- Blank Page
- Blank Page
- Blank Page

DSA E-Series (E2800 60-bay) Maintenance | en 41
Bosch Sicherheitssysteme GmbH Installation manual 2018.02 | V1 | DOC
– The other power canister in the unit has Optimal status.
Note: While you perform the procedure, the second power canister supplies power to
both fans to ensure that the equipment does not overheat.
– The OK to remove field in the Details area of the Recovery Guru in SANtricity System
Manager displays Yes, indicating that it is safe to remove this component.
Notice!
If the second power canister in the unit does not have Optimal status or if the Recovery Guru
indicates that it is not OK to remove the power canister, contact your technical support..
To replace a power canister observe the instructions in the following chapters:
1. Preparing to remove a power canister, page 41
2. Removing a power canister, page 42
3. Installing a power canister, page 42
4. After replacing a power canister, page 42
8.2.1 Preparing to remove a power canister
Before you remove a power canister, use SANtricity System Manager to collect support data
about your storage system and to locate the failed component.
You can determine whether you have a failed power canister in these ways:
– The Recovery Guru in SANtricity System Manager directs you to replace a failed power
canister. Before replacing a power canister, select Recheck from the Recovery Guru to
ensure that no other items must be addressed first.
– The amber Attention LED on the power canister is on, indicating that the component is
faulty.
Note: If both power canisters in the shelf have their Attention LEDs on, contact technical
support for assistance.
To prepare the removing of the component:
1. Collect support data for your storage system (see Collecting support data for the storage
system, page 50).
Note: Collecting support data before and after replacing a component ensures you can
send a full set of logs to technical support in case the replacement does not resolve the
problem.
2. From SANtricity System Manager, determine which power canister has failed.
– Select Hardware.
– Look at the power icon to the right of the Shelf lists to determine which shelf
has the failed power canister. If a component has failed, this icon will be red.
– When you find the shelf with a red icon, select Show back of shelf.
– Select either power canister or the red power icon.
– On the Power Supplies tab, look at the statuses of the power canisters to determine
which power canister must be replaced. A component with a Failed status must be
replaced.
Note: If the second power canister in the shelf does not have Optimal status, do not
attempt to hot-swap the failed power canister. Instead, contact technical support for
assistance.
You can also find information about the failed power canister in the Details area of
the Recovery Guru, or you can review the information displayed for the shelf, or you
can review the Event Log under Support and filter by Component Type.