
User Manual


Getting Started
English 8
CAUTION
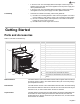
Always verify that top rack is installed correctly after reassembly. The
back edges of the top rack must be under the rack guide on the bottom
rack. DO NOT simply rest the top rack on top of the bottom one.
1. To reassemble rack, hold top rack diagonally across bottom rack.
2. Insert one side of top rack to closed position.
3. Rotate the other side toward the back of the rack until it passes the stop (ball).
4. Push top rack the rest of the way in. See “Reassembly” on page 8
Cleaning
Clean rack with hot sudsy water. Dry thoroughly. For stubborn dirt, use a soap
filled steel wool pad. DO NOT clean the rack in the self-cleaning oven.
Oven Bottom Do not place food directly on oven bottom. Do not use aluminum foil or protective
liners to line any part of an appliance, especially surface unit drip bowls or oven
bottom. Installation of these liners may result in a risk of electric shock or fire.
Oven Vent The oven vent is located below the display above the rear left cooktop element. It
is normal to see steam escaping from the vent and condensation may collect on
the backguard and cooktop. This area may become hot when the oven is in use.
Do not block the vent as it is important for air circulation.
Automatic Shutoff The oven will automatically shut off after 12 hours (24 hours if the time format is
set for 24 hour in the Select Function section).
Self-Cleaning The oven features a self-cleaning function that eliminates the manual labor
involved with cleaning your oven.
Indicators and Other Features Beep - Signals that more information must be entered or confirms the receipt of
an entry. A Beep also signals the end of a program or an oven error.
End-of-Cycle Indicator - To indicate when a mode is finished, 3 consecutive
beeps will sound.
Default Settings - The cooking modes automatically select the default tempera-
ture. These can be changed when a different one is needed.
Flashing Symbol or Number - Signals an incomplete setting and calls for
another step or START to be pressed.
Figure 5: Reassembly
Closed Position
Back of Rack
Front of Rack
Stop (Ball)