
Installation Guide


Maintenance | 9
6 720 801 072 (2015/02)Tronic 3000T
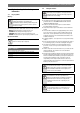
Fig. 9
5 Maintenance
Periodic maintenance
5.1 Removing the cover
▶ Pry off the round cover plate (Fig. 9, [V]) from its right hand edge
(Fig. 9, [W]) with a small flat-head screwdriver.
▶ Remove the Phillips screw revealed beneath the round cover plate.
▶ The cover (Fig. 9, [C]) can now be removed by pulling out its left-
hand edge. When reassembling, work in the opposite way being
careful to insert the tongue of the cover into the slot.
5.2 Draining the heater
If the heater has been installed with flexible hoses:
▶ Shut off the power supply.
▶ Turn the heater upside down over a sink to drain the water out of it.
-or-
it can also be emptied by:
▶ Siphon through the inlet side hose.
▶ Keep a hot water faucet open while siphoning.
-or-
If the heater has been installed with rigid piping:
▶ Siphon the water out through any (lower) service valve on the (inlet
side).
▶ Keep a hot water faucet open while siphoning the water out.
5.3 Inspecting the anode rod
The purpose of the anode rod (Fig. 12, [N]) is to protect the tank against
corrosion. It is critical that the anode rod be inspected once a year to
determine whether it requires replacement. To access the anode rod,
the heating element must be removed (see Section 5.4 Removing the
heating element). Upon inspection, the anode rod surface should
appear smooth. If the rod surface appears pitted, bumpy, rusty, or if the
rod is missing completely, then it must be replaced.
To access the anode rod:
▶ Remove the heating element (see Section 5.4 Removing the heating
element).
Original anode rod sizes
• ES2.5, ES4: length 6½ ”, diameter 5/8”
• ES8:length 8¼ ”, diameter 5/8”
Certain installations may require more frequent replacement of the
anode rod:
• recirculation applications;
• poor water quality;
• galvanic/electrolytic corrosion
• high flow applications
In the event of poor water quality, Bosch recommends consulting a local
water treatment professional for water treatment options. Always
ensure the water heater is grounded. Models ES2.5 and ES4 must be
connected only to a properly grounded outlet. Damage resulting from
poor water quality or failure to replace the anode rod is not covered
under the manufacturer’s warranty. For additional questions, please
call Bosch Technical Service.
5.4 Removing the heating element
▶ Turn off power supply and drain the heater (see previous section).
▶ Remove the front cover plate, disconnect terminals X, Y and T (Fig.
10).
▶ Unscrew the 4 heating element retaining nuts F (Fig. 10).
▶ Remove thermostat temperature sensor from well [B] located on the
element assembly (Fig. 10).
▶ Remove the element G (Fig. 11).
Fig. 10
CAUTION:
Do not attempt to repair this water heater yourself. Call
a service person for assistance. Always turn off the
power supply to the heater prior to servicing or draining
the heater.
For most of these operations, the water will have to be
drained from the heater. For all of these operations the
cord should be disconnected (ES2.5 and ES4 only) and
the front cover removed.
MAX
MIN
OFF
IDEAL
V W
C
M
6720801072-08.1V
6720801072-09.1V
G
Z
F
X
Y
T
A
E
H
B