Page 1 GEX 125-1 A Professional GEX 125-1 AE Professional pt-BR Manual de instruções es Instrucciones de servicio en Operating instructions
Page 2 Certificado de Garantia* GEX (3 601 C87 0..) / GEX 125-1AE(3 601 C87 5..) Nome do comprador Série nº Endereço Tipo nº Data da venda Nota fiscal Nome do vendedor Carimbo da firma Prescrições de garantia 1. As ferramentas elétricas são garantidas contra eventuais defeitos de montagem ou de fabricação devidamente comprovados. 2.
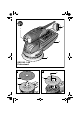
5 Page 3 6 2 1 3 4 GEX 125-1 AE Professional A 5 B 6 4 4 F 000 622 258 . 10.11.
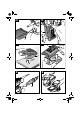
Page 4 C1 C2 3 3 7 C3 C4 8 3 D E 9 7 4 F 000 622 258 . 10.11.
Page 19 General Power Tool Safety Warnings WARNING Read all safety warnings and all instructions. Failure to follow the warnings and instructions may result in electric shock, fire and/or serious injury. Save all warnings and instructions for future reference. The term “power tool” in the warnings refers to your mains-operated (corded) power tool or battery-operated (cordless) power tool. 1) Work area safety a) Keep work area clean and well lit. Cluttered or dark areas invite accidents.
Page 20 d) Store idle power tools out of the reach of children and do not allow persons unfamiliar with the power tool or these instructions to operate the power tool. Power tools are dangerous in the hands of untrained users. e) Maintain power tools. Check for misalignment or binding of moving parts, breakage of parts and any other condition that may affect the power tool’s operation. If damaged, have the power tool repaired before use. Many accidents are caused by poorly maintained power tools.
Page 21 Technical Data Random Orbital Sander Article number Rated power input Preselection of orbital stroke rate No-load speed Orbital stroke rate Orbit diameter Sanding plate diameter Weight according to EPTA-Procedure 01/2003 Protection class W rpm opm mm mm kg GEX 125-1 A Professional 3 601 C87 0.. 250 – 12000 24000 2.5 125 1.3 /II GEX 125-1 AE Professional 3 601 C87 5.. 250 z 7500–12000 15000–24000 2.5 125 1.3 /II The values given are valid for nominal voltages [U] of 230/240 V.
Page 22 For easy adjustment of the sanding sheet 5 to the sanding plate 4, use the adjustment aid in the tool case as shown in the following figure. Place the sanding sheet into the adjustment aid with the Velcro facing upward and firmly push on the machine with the sanding plate.
Page 23 Replacing the Sanding Plate (see figure B) Switching On and Off To start the machine, tilt the On/Off switch 1 toward the right to the “I” position. Note: Replace a damaged sanding plate 4 immediately. To switch off the machine, tilt the On/Off switch 1 toward the left to the “0” position. Pull off the sanding sheet or the polishing accessory. Unscrew the four screws 6 completely and remove the sanding plate 4. Attach the new sanding plate 4 and tighten the screws again.
Page 24 Rough Sanding Attach a sanding sheet with coarse grain. Apply only light pressure to the machine so that it runs at high speed and high material removal is achieved. WARNING! Important instructions for connecting a new 3-pin plug to the 2-wire cable. The wires in the cable are coloured according to the following code: Fine Sanding Attach a sanding sheet with fine grain.