
Operating Guide


-17-
Laser Viewing Glasses (Accessory)
DO NOT use the laser
viewing glasses as safety
goggles. The laser viewing glasses are used
for improved visualization of the laser beam, but
they do not protect against laser radiation.
DO NOT use the laser viewing glasses as
sun glasses or in traffic. The laser viewing
glasses do not afford complete UV protection
and reduce color perception.
The laser viewing glasses filter out the ambient
light. This makes the red light of the laser
appear brighter for the eyes.
• Do not use the laser viewing glasses as
safety goggles. The laser viewing glasses
are used for improved visualization of the
laser beam, but they do not protect against
laser radiation.
• Do not use the laser viewing glasses as sun
glasses or in traffic. The laser viewing glasses
do not afford complete UV protection and
reduce color perception.
Working with the Laser Receiver
(Accessory)
Have your measuring tool
serviced by a qualified
repair person using only identical
replacement parts. This will ensure that the
safety of the tool is maintained.
Read and strictly observe the safety
warnings in the operating instructions of
the rotational laser.
Under unfavorable light conditions (bright
environment, direct sunlight) and for larger
distances, use the laser receiver for improved
finding of the laser beam
23 and 13.
When working with the laser receiver, select
rotational operation with the highest
rotational speed.
Before working with the laser receiver, read and
observe the laser receiver
operating instructions.
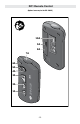
Working with the Remote Control
(Accessory)
While pressing the operator buttons, the laser
tool can be brought out of alignment so that the
rotation is briefly stopped. This effect is avoided
when using the remote control
20.
Reception lenses
7 for the remote control are
located on three sides of the laser tool (GRL
240 HV has a single reception lens located
on the front of the laser tool), among other
locations above the control panel on the front
side.
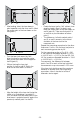
Working with the Tripod (Accessory)
The laser tool is equipped with a 5/8” tripod
mount for horizontal operation on a tripod.
Place the laser tool via the tripod mount
16
onto the 5/8” male thread of the tripod and
screw the locking screw of the tripod tight.
On a tripod 21 with a measuring scale on the
elevator column, the height difference can be
adjusted directly.
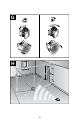
Working with Wall Mount/Alignment Unit
(Accessory) (see figure A)
You can also mount the laser tool to the wall
mount with alignment unit
25. For this, screw
the 5/8” screw
28 of the wall mount into the
tripod mount
16 of the laser tool.
Mounting to a wall: Mounting to a wall is
recommended, e.g., for work above the
elevation height of tripods or for work on
unstable surfaces and without tripod. For this,
fasten the wall mount
25, with the laser tool
mounted, as vertical as possible to a wall.
For mounting to the wall, you can either fasten
the wall mount 25 with fastening screw 26 to
a lath (width maximal 8 mm) or hang it up with
two hooks.
Mounting on a tripod: The wall mount 25 can
also be screwed onto a tripod with the tripod
mount on the back side. This method of
fastening is especially recommended for work
where the rotational plane is to be aligned with
a reference line.
With the alignment unit, the mounted laser
tool can be moved vertically (when mounted
to the wall) or horizontally (when mounted to
a tripod) within a range of approx. 16 cm. For
this, loosen screw
27 on the alignment unit,
move the laser tool to the desired position, and
retighten screw
27 again.
Working with the Ceiling Measurement Plate
(see figure A)
As an example, the ceiling measurement plate
29 can be used for easy height adjustment of
drop ceilings. Fasten the ceiling measurement
plate with the magnetic holder, e.g., to
a beam.
The reflecting half of the ceiling measurement
plate improves the visibility of the laser beam
in unfavorable conditions; the laser beam can
also be seen from the rear side through the
transparent half.
Use with Accessories
!
WARNING
!
WARNING