
Operation Manual


14 | English
1 609 92A 0VX | (22.7.15) Bosch Power Tools
Sanding Sheets without Velcro Backing
(see figures C – E)
Unlock both sanding-sheet clamps 11 and swivel them
downwards.
Insert the sanding sheet 9 under the rear clamping
bracket 10. Ensure that the sanding sheet 9 is not too
short and that it is correctly clamped. Swivel the sand-
ing-sheet clamp 11 back into the starting position and
lock it there.
Place the sanding paper taut around the sanding plate 6.
Clamp the front part of the sanding sheet under the front
clamping bracket 12. Ensure that the sanding sheet 9 is
not too short and that it is correctly clamped. Swivel the
sanding-sheet clamp 11 back into the starting position
and lock it there.
Sanding sheets without holes, e. g. from rolls or by the metre,
can be punctured with the perforating tool 13. For this, push
the power tool with the sanding sheet mounted onto the per-
forating tool (see figure F).
To remove the sanding sheet 9, unlock both sanding-sheet
clamps 11 and pull the sanding sheet out of its holder.
Selecting the Sanding Sheet
Depending on the material to be worked and the required rate
of material removal, different sanding sheets are available:
Dust/Chip Extraction
Dust from materials such as lead-containing coatings,
some wood types, minerals and metal can be harmful to
one’s health. Touching or breathing-in the dust can cause
allergic reactions and/or lead to respiratory infections of
the user or bystanders.
Certain dust, such as oak or beech dust, is considered car-
cinogenic, especially in connection with wood-treatment
additives (chromate, wood preservative). Materials con-
taining asbestos may only be worked by specialists.
– As far as possible, use a dust extraction system suitable
for the material.
– Provide for good ventilation of the working place.
– It is recommended to wear a P2 filter-class respirator.
Observe the relevant regulations in your country for the
materials to be worked.
Prevent dust accumulation at the workplace. Dust can
easily ignite.
Integrated Dust Extraction with Dust Box
(see figure G–J)
Slide the dust box 2 onto the extraction outlet 14.
The filling level of the dust box 2 can easily be checked
through the transparent container.
To empty the dust box 2, pull it off toward the rear with a slight
twisting motion.
Unscrew the filter element 15 from the dust box 2. Empty the
dust box.
To loosen the dust, gently strike or tap the filter element 15
against a firm surface. Clean the lamellas of the filter element
15 with a soft brush.
Note: To ensure optimum dust extraction, empty the dust box
2 in good time and clean the filter element 15 at regular inter-
vals.
When working vertical surfaces, hold the power tool in such a
manner that the dust box 2 faces downward.
External Dust Extraction (see figure K)
Attach the vacuum hose 16 (accessory) to the extraction out-
let 14. Connect the vacuum hose 16 to a vacuum cleaner (ac-
cessory).
The vacuum cleaner must be suitable for the material being
worked.
When vacuuming dry dust that is especially detrimental to
health or carcinogenic, use a special vacuum cleaner.
When working vertical surfaces, hold the power tool in such a
manner that the vacuum hose faces downward.
Operation
Starting Operation
Observe correct mains voltage! The voltage of the pow-
er source must agree with the voltage specified on the
nameplate of the machine. Power tools marked with
230 V can also be operated with 220 V.
Switching On and Off
To start the machine, tilt the On/Off switch 1 toward the right
to the “I” position.
To switch off the machine, tilt the On/Off switch 1 toward the
left to the “0” position.
To save energy, only switch the power tool on when using it.
Working Advice
Wait until the machine has come to a standstill before
placing it down.
Before any work on the machine itself, pull the mains
plug.
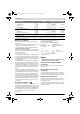
Grain size
For the working of all wooden mate-
rials
40 – 240
For coarse-sanding, e. g. of rough,
unplaned beams and boards coarse 40, 60
For face sanding and planing small
irregularities medium 80, 120
For finish and fine sanding of hard
woods fine 180, 240
For the working of paint/enamel
coats or primers and fillers
40 – 240
For sanding off paint coarse 40, 60
For sanding primer medium 80, 120
For final sanding of primers before
coating fine 180, 240
OBJ_BUCH-2247-001.book Page 14 Wednesday, July 22, 2015 3:01 PM