
Specifications

6 720 608 036
Troubleshooting
19
6 Troubleshooting
6.1 Introduction
Many of the questions customers ask regarding
operation of this unit can be answered by following the
troubleshooting steps as outlined below. Visit our web
site at www.boschpro.com for more detailed
troubleshooting bulletins. For best results, perform each
step before proceeding to the next. The suggested
solutions may require that the cover be taken off. (See
chapter 3.5).
6.2 No spark at pilot with water flow
Refer to service bulletin CT-09
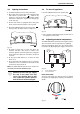
• 1. Ensure that the On/Off button on control box is
pushed to the "On" position. .
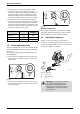
• 2. Ensure that cold water supply is attached to rear
of water valve and hot water outlet is on the left.
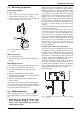
• 3. Measure voltage at hydrogenerator. Disconnect
the wire connector at hydrogenerator and measure
voltage on hydrogenerator side of connector.
– a. If the wires from the hydrogenerator are black
and red, the voltage should be at least 1.3VDC.
– b. If the wires from the hydrogenerator are blue
and brown, the voltage should be at least 2.8VAC.
If the voltage is inadequate, refer to bulletin CT-29
to clean the hydrogenerator.
• 4. Check for crossover:
– a. Turn off cold water supply to heater only. If no
shut off valve is present, install before continuing.
– b. Turn on each hot water fixture to hot only.
– c. Wait 5 minutes.
– d. If any water is flowing, even a trickle, there is a
crossover or the scald protection in a shower valve
is adjusted incorrectly. Consult plumber or faucet
valve manufacturer for repair or adjustment.
• 5. Rotate flow control (right knob) to full clockwise
position for the lowest activation rate of about .6 gal-
lon per minute. As the knob is turned counter-clock-
wise, the activation rate will rise to about 1.1 gallons
per minute.
• 6. Check for obstructions to water flow. Clean inlet
filter screen in water valve, whole house filters,
showerheads and faucet aerators. Obstructions
such as dirt, debris or mineral deposits will decrease
the water flow through the heater below the
activation rate.
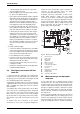
• 7. Check for tight and clean wire connections in
heater:
– a. wire from ignition unit to spark electrode
– b. wires to flue gas sensor on draft diverter
– c. wires to overheat sensor on outlet pipe
– d. wires to overheat sensor on heat exchanger
– e. wires to microswitch
– f. ground wire connection between ignition unit
and fixing screw
• 8. If a powervent and spill switch are installed, check
the reset button on the spill switch (installed on the
draft diverter). Consult powervent manual for more
details.
– a. If the button clicks when pushed, the switch
was tripped. Check venting for restrictions and
exhaust hood damper for correct operation.
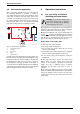
• 9. Check microswitch on bottom of gas valve. Dis-
connect wire connector at microswitch and jump
connector on wiring cable. Run water through heater.
– a. If heater sparks, check continuity through micro-
switch connector with water flow. If circuit does
not close one of the following may be the cause;
microswitch is faulty, water valve needs mainte-
nance or flow is inadequate.
• 10. If heater still does not spark, contact Bosch tech-
nical support.
6.3 Spark appears when hot water is
turned on, but pilot and burners
will not ignite
Refer to service bulletin CT-10
If there is a spark from the spark electrode with water
flow, but the pilot does not ignite:
• With water flowing and heater sparking, apply flame
from a match or lighter to the rear of the pilot burner.
Avoid applying flame to flame sensor.
If main burners only light, repeat procedure and watch
for brief flame from pilot burner:
• 1. If pilot does not light:
– a. Measure voltage between pilot electrovalve wire
connection and ground when heater is sparking
(Do not disconnect wire); Voltage must be at least
1.1VDC. If less, contact Bosch Tech Support.
– b. Clean or replace pilot orifice. See Bulletin CT-
22.
– c. If heater has never fired, check for correct gas
type on rating label on right side of cover. If incor-
rect, exchange heater for correct gas type. It is not
practical to convert a heater to a different gas
type.
– d. If heater has never fired or gas lines have
recently been serviced, there may be air in the gas
line. Turn water on, wait until sparking has
stopped, turn water off and back on again. Repeat
until pilot lights or have gas technician bleed the
gas line.