
Operation Manual


English | 231 609 929 K94 • 20.12.06
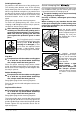
Grinding/Cutting Disc
Pay attention to the dimensions of the grinding tools.
The mounting hole diameter must fit the mounting
flange without play. Do not use reducers or adapters.
When using diamond cutting discs, pay attention that
the direction-of-rotation arrow on the diamond cutting
disc and the direction of rotation of the machine (see
direction-of-rotation arrow on the machine head)
agree.
See graphics page for the mounting sequence.
To fasten the grinding/cutting disc, screw on the
clamping nut 9 and tighten with the two-pin spanner;
see Section “Quick-clamping Nut ”.
f After mounting the grinding tool and before
switching on, check that the grinding tool is
correctly mounted and that it can turn freely.
Make sure that the grinding tool does not
graze against the protection guard or other
parts.
An O-ring (plastic part) is inserted
in the mounting flange 7 around the
centring collar. If the O-ring is
missing or is damaged, it must
in all cases be replaced (article
number 1 600 210 039) before
the mounting flange 7 is mounted.
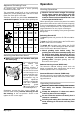
Flap Disc
f For operations with the rubber sanding plate
15 or with the cup brush/wheel brush/flap
disc, always mount the hand guard 14.
Place the special mounting flange (article number
2 605 703 028) and the flap disc on the grinder spin-
dle 5. Screw on the clamping nut 9 and tighten with
the two-pin spanner.
Rubber Sanding Plate
f For operations with the rubber sanding plate
15 or with the cup brush/wheel brush/flap
disc, always mount the hand guard 14.
See graphics page for the mounting sequence.
Screw on the round nut 17 and tighten with the two-
pin spanner.
Cup Brush/Disc Brush
f For operations with the rubber sanding plate
15 or with the cup brush/wheel brush/flap
disc, always mount the hand guard 14.
See graphics page for the mounting sequence.
The cup brush/disc brush must be able to be screwed
onto the grinder spindle until it rests firmly against the
grinder spindle flange at the end of the grinder spindle
threads. Tighten the cup brush/disc brush with an
open-end spanner.
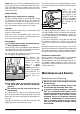
Quick-clamping Nut
For convenient changing of grinding tools without the
use of additional tools, you can use the quick-clamp-
ing nut 10 instead of the clamping nut 9.
f The quick-clamping nut 10 may be used only
for grinding or cutting discs.
Use only a flawless, undamaged quick-clamp-
ing nut 10.
When screwing on, pay attention that the side
of the quick-clamping nut 10 with printing does
not face the grinding disc; the arrow must point
to the index mark 21.
Lock the grinder spindle
with the spindle lock but-
ton 2. To tighten the quick-
clamping nut, firmly turn
the grinding disc in clock-
wise direction.
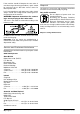
A properly attached,
undamaged quick-clamp-
ing nut can be loosened
by hand when turning the
knurled ring in anticlock-
wise direction.
Never loosen a tight
quick-clamping nut
with pliers. Always use
the two-pin spanner.
Insert the two-pin spanner
as shown in the illustra-
tion.
21
OBJ_BUCH-310-001.book Page 23 Wednesday, December 20, 2006 9:31 AM