Register your new devic e on MyBosch now and get free b enefits: bosch-h ome.com / welcome Oven HBA574E.
en Safety Table of contents USER MANUAL 1 Safety .................................................................... 2 2 Preventing material damage ............................... 4 3 Environmental protection and saving energy ....................................................................... 5 4 Familiarising yourself with your appliance ........ 6 5 Accessories.......................................................... 8 6 Before using for the first time ...........................
Safety Opening the appliance door creates a draught. Greaseproof paper may come into contact with the heating element and catch fire. ▶ Never place greaseproof paper loosely over accessories when preheating the appliance and while cooking. ▶ Always cut greaseproof paper to size and use a plate or baking tin to hold it down. WARNING ‒ Risk of burns! The appliance and its parts that can be touched become hot during use. ▶ Caution should be exercised here in order to avoid touching heating elements.
en Preventing material damage ▶ Do not let children play with packaging material. Children may breathe in or swallow small parts, causing them to suffocate. ▶ Keep small parts away from children. ▶ Do not let children play with small parts. ▶ Keep children at a safe distance. If the door seal is damaged, a large amount of heat is generated around the door. ▶ Do not scrub or remove the seal. ▶ Never operate the appliance if the seal is damaged or missing. 1.
Environmental protection and saving energy ▶ Do not store food in the cooking compartment. Leaving the appliance to cool down with the door open will damage the front of neighbouring kitchen units over time. ▶ Always allow the cooking compartment to cool down with the door closed after cooking at high temperatures. ▶ Take care not to trap anything in the appliance door. ▶ Only leave the cooking compartment to dry with the door open if a lot of moisture was produced during operation.
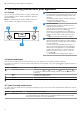
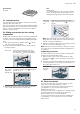
en Familiarising yourself with your appliance 4 Familiarising yourself with your appliance 4.1 Controls 1 You can use the control panel to configure all functions of your appliance and to obtain information about the operating status. Note: On certain models, specific details such as colour and shape may differ from those pictured. 2 2 3 3 1 Buttons and display The buttons are touch-sensitive surfaces. To select a function, simply press lightly on the relevant field.
Familiarising yourself with your appliance Symbol Type of heating Gentle hot air Pizza setting Bottom heating Full-surface grill Hot air grilling Top/bottom heating en What it's used for/how it works Cook selected dishes gently on one level without preheating. The fan distributes the heat from the ring-shaped heating element in the back wall evenly around the cooking compartment. The food is cooked in phases using residual heat. Select a temperature of between 120 °C and 230 °C.
en Accessories Heat-up indicator The appliance indicates when it is heating up. When the appliance is heating, the symbol lights up on the display. When you are preheating the appliance, the optimal time to place your food in the cooking compartment is when the symbol first goes out. Notes ¡ The heat-up indicator only appears for types of heating for which a temperature is set. It does not appear for grill settings, for example.
Accessories Accessories Grill tray en Use Grilling food. To prevent splashes in the cooking compartment, use the grill tray when grilling food. Always place the grill tray in the universal pan. 5.1 Locking function The locking function prevents the accessories from tilting when they are pulled out. You can pull out the accessories approximately halfway without them tipping. The accessories must be inserted into the cooking compartment correctly for the tilt protection to work properly.
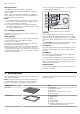
en Before using for the first time 6 Before using for the first time Configure the settings for initial start-up. Clean the appliance and accessories. 6.2 Cleaning the appliance before using it for the first time 6.1 Initial use Clean the cooking compartment and accessories before using the appliance to prepare food for the first time. 1. Remove any accessories and leftover packaging, such as polystyrene pellets, from the cooking compartment. 2.
Time-setting options 8.1 Setting rapid heating To ensure an even cooking result, do not place the food in the cooking compartment until rapid heating has come to an end. 1. Use the function selector to select rapid heating . 2. Use the temperature selector to set the required temperature. en a Rapid heating starts after a few seconds. a When the rapid heating process ends, an audible signal sounds and the heating indicator goes out. 3. Use the function selector to set a suitable type of heating. 4.
en Programme Cancelling the cooking time Changing the end time You can cancel the cooking time at any time. Requirement: is highlighted on the display. ▶ Reset the cooking time to zero using the button. a After a few seconds, the appliance applies the change and continues to heat without a cooking time. In order to achieve a good cooking result, you can only change the set end time before operation starts and the cooking time starts counting down. Requirement: is highlighted on the display.
Programme No.
en Childproof lock 10.3 Preparing food for the programme Use fresh and, ideally, chilled food. 1. Weigh the food. The weight of the food is required in order to correctly set the programme. 2. Add the food to the cookware. 3. Place the cookware onto the wire rack. Always place the cookware into the cooking compartment while it is cold. 10.4 Setting a programme The appliance selects the optimal type of heating, temperature and cooking time. All you need to do is set the weight.
Cleaning and servicing Display Basic setting Time display Childproof lock can be adjusted Interior lighting during operation Cooling fan run-on time Telescopic shelves retrofitted2 Reset all values to factory settings 1 2 en Selection = hide the time = display the time1 = no = yes1 = yes, with locked door = no = yes1 = short = medium1 = long = extra-long = no 1 (for rails and 1-level pull-out) = yes (for 2- and 3-level pull-out) = no1 = yes Factory setting (may vary according to model)
en Cleaning and servicing Appliance front Surface Stainless steel Plastic or painted surfaces E.g. control panel Suitable cleaning agents ¡ Hot soapy water ¡ Special stainless steel cleaning products suitable for hot surfaces ¡ Hot soapy water Notes To prevent corrosion, remove any limescale, grease, starch or albumin (e.g. egg white) stains on stainless steel fronts immediately. Apply a thin layer of the stainless steel cleaning product with a soft cloth. Do not use glass cleaner or a glass scraper.
Pyrolytic self-cleaning 13.2 Cleaning the appliance In order to avoid damaging the appliance, you must clean your appliance only as specified, and with suitable cleaning products. WARNING ‒ Risk of burns! The appliance and its parts that can be touched become hot during use. ▶ Caution should be exercised here in order to avoid touching heating elements. ▶ Young children under 8 years of age must be kept away from the appliance.
en Cleaning assistance 2. Use the temperature selector to set the cleaning set- ting. Cleaning setting 1 2 3 Cleaning level Lightly soiled Medium High Duration in hours Approx. 1:15 Approx. 1:30 Approx. 2:00 Select a higher cleaning setting for very heavy or older soiling. The duration cannot be changed. a The cleaning function starts after a few seconds and the time counts down.
Shelf supports en 16 Shelf supports To clean the rails and the cooking compartment, or to replace the rails, you can remove these. 16.1 Detaching the shelf supports WARNING ‒ Risk of burns! The shelf supports get very hot ▶ Never touch the shelf supports when hot. ▶ Always allow the appliance to cool down. ▶ Keep children at a safe distance. 1. Lift the rail forwards slightly and detach it . 2. Pull the whole rail to the front and remove it. 16.
en Appliance door 2. WARNING ‒ Risk of injury! When the hinges are not secured, they can snap shut with great force. ▶ Make sure that the locking levers are always either fully closed or (when detaching the oven door) fully open. Open the locking levers on the left- and right-hand hinges. 1. Note: Ensure that the appliance door slides onto the hinges without any resistance. If you feel any resistance, check whether you are sliding it in at the correct opening.
Appliance door 1. Open the appliance door slightly. 2. Push on the left- and right-hand side of the door cover from the outside 3. Remove the door cover until it is released. . en 12. Dry the door panes and refit them. → "Fitting the door panes", Page 21 17.4 Fitting the door panes WARNING ‒ Risk of injury! The hinges on the appliance door move when the door is opened and closed, which could trap your fingers. ▶ Keep your hands away from the hinges.
en Troubleshooting 7. Open the appliance door slightly and remove the tea towel. 8. Screw both screws back in on the left and right of the appliance door. 9. Put the door cover in position and push down on it until you hear it click into place. 10. Close the appliance door. Note: Do not use the cooking compartment again until the door panes have been correctly fitted. 18 Troubleshooting You can rectify minor faults on your appliance yourself.
Disposal en Fault flashes in the display and the appliance will not start. Cause and troubleshooting The cooking compartment is too hot for the selected operation. 1. Switch off the appliance and allow it to cool down. 2. Restart the operation. appears in the display. The maximum cooking time has been reached. To prevent an unwanted permanent operation, the appliance automatically stops heating after several hours if the settings are unchanged. ▶ Switch off the appliance.
en Customer Service This appliance is labelled in accordance with European Directive 2012/19/EU concerning used electrical and electronic appliances (waste electrical and electronic equipment - WEEE). The guideline determines the framework for the return and recycling of used appliances as applicable throughout the EU. 20 Customer Service If you have any queries on use, are unable to rectify faults on the appliance yourself or if your appliance needs to be repaired, contact Customer Service.
How it works ¡ Turn the poultry, meat or fish after approx. 1/2 to 2/3 of the time listed. ¡ Add a little liquid to the poultry in the cookware. Cover the bottom of the cookware with approx. 1– 2 cm of liquid. ¡ When you turn poultry, ensure that the breast side or skin side is underneath to begin with. Roasting and grilling on the wire rack Roasting on the wire rack works particularly well for large poultry or for multiple pieces at the same time.
en How it works Food Accessories/cookware Pavlova Baking sheet on wire rack 12-cup tin Baking tray Round pizza tray 4 pcs Ø 20 cm cake tin Baking sheet on wire rack Cookware without lid Cookware without lid Cookware without lid Yorkshire pudding Pizza, home-made Pizza, home-made, thin base Victoria sponge cake, 2 levels Biscuits, 2 or 3 levels Beef, top side/top rump Lamb leg (on the bone) Pork belly Chicken, whole Turkey, crown Turkey, whole, 4–8 kg Fish, braised, whole 300 g, e. g.
How it works en Yoghurt Food Accessories/cookware Shelf position Yoghurt Individual moulds Type of heating Cooking compartment floor 21.6 Test dishes These overviews have been produced for test institutes to facilitate appliance testing in accordance with EN 60350-1. Baking Observe this information when baking test dishes. General information ¡ The settings apply to food that is placed into a cold cooking compartment. ¡ Observe the notes about preheating in the tables.
en Installation instructions Food Accessories/cookware Shelf pos- Type of ition heating Hot water sponge cake Springform cake tin, 2 diameter 26 cm Hot water sponge cake, 2 levels Springform cake tin, 3+1 diameter 26 cm 1 Preheat the appliance for five minutes. Do not use the rapid heating function. 2 Preheat the appliance. Do not use the rapid heating function.
Installation instructions 22.2 Appliance dimensions You will find the dimensions of the appliance here en ¡ If the tall unit has another back panel in addition to the element back panels, this must be removed. ¡ Only fit the appliance up to a height which allows accessories to be easily removed. 22.5 Corner installation Observe the installation dimensions and the installation instructions when installing in a corner. 22.
en Installation instructions Electrically connecting an appliance without a protective contact plug Note: Only a licensed professional may connect the appliance. Damage caused by incorrect connection is not covered under the warranty. An all-pole isolating switch must be integrated into the permanent electrical installation according to the installation regulations. 1. Identify the phase and neutral conductors in the socket. The appliance may be damaged if it is not connected correctly. 2.
Thank you for buying a Bosch Home Appliance! Register your new device on MyBosch now and profit directly from: • • • • • Expert tips & tricks for your appliance Warranty extension options Discounts for accessories & spare-parts Digital manual and all appliance data at hand Easy access to Bosch Home Appliances Service Free and easy registration – also on mobile phones: www.bosch-home.com/welcome Looking for help? You'll find it here.