
Installation and Operation Guide
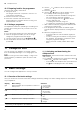
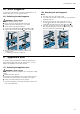
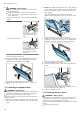
Table Of Contents
- Oven
- en
- Table of contents
- 1 Safety
- 2 Preventing material damage
- 3 Environmental protection and saving energy
- 4 Familiarising yourself with your appliance
- 5 Accessories
- 6 Before using for the first time
- 7 Basic operation
- 8 Rapid heating
- 9 Time-setting options
- 10 Programme
- 11 Childproof lock
- 12 Basic settings
- 13 Cleaning and servicing
- 14 Pyrolytic self-cleaning
- 15 Cleaning assistance
- 16 Shelf supports
- 17 Appliance door
- 18 Troubleshooting
- 19 Disposal
- 20 Customer Service
- 21 How it works
- 22 Installation instructions

Shelf supports en
19
16 Shelf supports
To clean the rails and the cooking compartment, or to
replace the rails, you can remove these.
16.1 Detaching the shelf supports
WARNING‒Risk of burns!
The shelf supports get very hot
▶
Never touch the shelf supports when hot.
▶
Always allow the appliance to cool down.
▶
Keep children at a safe distance.
1.
Lift the rail forwards slightly and detach it .
2.
Pull the whole rail to the front and remove it.
3.
Clean the rail.
→"Cleaning products", Page15
16.2 Attaching the shelf supports
Notes
¡ The rails only fit on the right or left.
¡ For both pull-out rails, ensure that you can pull them
forwards and out.
1.
First, push the rail into the middle of the rear
socket until the rail rests against the cooking
compartment wall, and then push this back .
2.
Push the rail into the front socket until the rail
also rests against the cooking compartment wall,
and then press this downwards .
3
4
17 Appliance door
To ensure that your appliance retains its appearance
and remains fully functioning for a long time, you can
detach the appliance door and clean it.
17.1 Detaching the appliance door
WARNING‒Risk of injury!
Components inside the appliance door may have sharp
edges.
▶
Wear protective gloves.
The hinges on the appliance door move when the door
is opened and closed, which could trap your fingers.
▶
Keep your hands away from the hinges.
1.
Open the appliance door fully and push in the direc-
tion of the appliance.