
Interactive User Manual


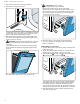
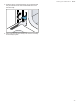

Table Of Contents
- Oven
- en-us
- Table of contents
- 1 IMPORTANT SAFETY INSTRUCTIONS
- 2 Preventing material damage
- 3 Environmental protection and energy-saving
- 4 Familiarizing yourself with your appliance
- 5 Accessories
- 6 Before using for the first time
- 7 Basic Operation
- 7.1 Setting the heating mode and temperature - 500 Series double ovens
- 7.2 Setting the heating mode and temperature - 500 Series single ovens
- 7.3 Setting the heating mode and temperature - 800 and Benchmark® Series
- 7.4 Temperature range by heating mode
- 7.5 Heating time limitation
- 7.6 Fast preheat
- 7.7 Meat probe
- 7.8 Turning the panel lock on or off
- 8 Timer functions
- 9 Basic settings
- 10 Home Connect™
- 11 Getting the most out of your appliance
- 11.1 Rack positions
- 11.2 Getting the best results
- 11.3 General tips for heating modes
- 11.3.1 How to use Bake mode
- 11.3.2 How to use Conv Bake mode
- 11.3.3 How to use Conv Multi Rack mode
- 11.3.4 How to use Pizza mode
- 11.3.5 How to use Roast mode
- 11.3.6 How to use Conv Roast mode
- 11.3.7 How to use Broil (high/low) mode
- 11.3.8 How to use Conv Broil mode
- 11.3.9 How to use Frozen Foods mode
- 11.3.10 How to use Air Fry mode
- 11.3.11 How to use Proof mode
- 11.3.12 How to use Warm mode
- 11.3.13 How to use EcoChef™ mode
- 12 Cleaning and maintenance
- 13 Troubleshooting
- 14 Cooking charts
- 15 Disposal
- 16 Customer Service
- 17 STATEMENT OF LIMITED PRODUCT WARRANTY
- fr-ca
- Table des matières
- 1 IMPORTANTES CONSIGNES DE SÉCURITÉ
- 1.1 Définitions des termes de sécurité
- 1.2 Informations générales
- 1.3 Utilisation prévue
- 1.4 Restriction sur le groupe d'utilisateurs
- 1.5 Utilisation sécuritaire
- 1.6 Sécurité des enfants
- 1.7 Fonction de nettoyage
- 1.8 Installation et entretien appropriés
- 1.9 Fonctionnement à distance
- 1.10 Mises en garde conformément à la proposition 65 de l'État de Californie
- 2 Prévenir les bris matériels
- 3 Protection de l'environnement et économies
- 4 Description de l'appareil
- 5 Accessoires
- 6 Avant d'utiliser pour la première fois
- 7 Opération de base
- 7.1 Réglage du mode de chauffage et de la température - fours doubles série 500
- 7.2 Réglage du mode de chauffage et de la température - fours simples série 500
- 7.3 Réglage du mode de chauffage et de la température - 800 et Benchmark™ série
- 7.4 Plage de température par mode de chauffage
- 7.5 Limitation du temps de chauffage
- 7.6 Préchauffage rapide
- 7.7 Sonde thermométrique
- 7.8 Activer ou désactiver le verrouillage du panneau
- 8 Fonctions de minuterie
- 8.1 Minuterie de cuisine
- 8.2 Minuterie du four
- 8.3 Cuisson différée
- 8.4 Mode sabbat
- 9 Réglages de base
- 10 Home Connect™
- 11 Tirer le meilleur parti de l’électroménager
- 11.1 Positions des grilles
- 11.2 Obtenir les meilleurs résultats
- 11.3 Conseils généraux pour les modes de chauffage
- 11.3.1 Comment utiliser le mode Bake
- 11.3.2 Comment utiliser le mode Conv Bake
- 11.3.3 Comment utiliser le mode Conv Multi Rack
- 11.3.4 Comment utiliser le mode Pizza
- 11.3.5 Comment utiliser le mode Roast
- 11.3.6 Comment utiliser le mode Conv Roast
- 11.3.7 Comment utiliser le mode Broil (high/low)
- 11.3.8 Comment utiliser le mode Conv Broil
- 11.3.9 Comment utiliser le mode Frozen Foods
- 11.3.10 Comment utiliser le mode Air Fry
- 11.3.11 Comment utiliser le mode Proof
- 11.3.12 Comment utiliser le mode Warm
- 11.3.13 Comment utiliser le mode EcoChef™
- 12 Nettoyage et entretien
- 12.1 Produits de nettoyage
- 12.2 Fonction autonettoyante
- 12.3 Entretien
- 13 Dépannage
- 14 Tableaux de cuisson
- 15 Élimination
- 16 Service à la clientèle
- 17 ÉNONCÉ DE LA GARANTIE LIMITÉE DU PRODUIT

Cleaning and maintenance en-us
33
3. Turn the glass cover counterclockwise to remove it .
4. Remove the old bulb by grasping and sliding the bulb
straight back until the two prongs have cleared the ce-
ramic holder .
5. Do not touch the glass of the new replacement bulb di-
rectly as oil from your fingers may cause the bulb to fail
prematurely. Instead, grasp the replacement bulb with a
clean dry cloth. Locate the two prongs in the ceramic
holder, gently poking until the two prongs locate in the
ceramic socket .
6. Press in to seat the bulb.
7. Screw the glass cover back on.
8. Turn on the circuit breaker.
Replacing a G9base oven light with rectangular glass
cover
Note:The graphics are representative. Your appliance
may have different graphic appearances.
Requirements
¡ Refer to the oven light bulb chart for the oven light spec-
ification of your oven.
¡ Follow the safety instructions on replacing a light bulb.
→
Page32
1. Turn off the power to the oven at the main power supply
(fuse or breaker box).
2. Remove the oven racks.
3. Slide the tip of a flat blade screw driver between the
holder clip and the lamp housing.
1
2
4. Support the glass lens cover with fingers along the bot-
tom edge to prevent the cover from falling to the bottom
of the oven. Gently twist the flat blade screw driver to
loosen the glass lens cover .
5. Remove the glass lens cover.
6. Remove the bulb by grasping and sliding the bulb
straight back until the two prongs have cleared the ce-
ramic holder
7. DO NOT touch the glass of the new replacement bulb
with your fingers. It may cause the bulb to fail when it
first lights. Grasp the replacement bulb with a clean dry
cloth. Locate the two prongs in the ceramic holder, gen-
tly poking until the two prongs locate in the ceramic
socket .
3
4
8. Press down to seat the bulb.
9. Slide the protective lens into the holder clip and push
the other end until the fixing clip snaps back into the
housing .
10. Turn on the circuit breaker.
Removing the oven door from bottom hinge
conventional ovens
For ease of cleaning you can remove the oven door of bot-
tom hinge ovens.
WARNING
Failure to follow these instructions when removing the
oven door may lead to personal injury or product damage.
▶
Make sure oven is cool and power to the oven has been
turned off before removing the door. Failure to do so
could result in electrical shock or burns.
▶
The oven door is heavy and parts of it are fragile. Use
both hands to remove the oven door.
▶
The door front is glass. Handle it carefully to avoid
breakage.
▶
Grasp only the side of the oven door. Do not grasp the
handle. It may swing in your hand and cause damage or
injury. Failure to grasp the oven door firmly and properly
could result in personal injury or product damage.
▶
To avoid injury from hinge bracket snapping closed, be
sure both levers are securely in place before removing
the door.
▶
Do not force the door open or closed. The hinge could
be damaged and cause damage or injury.
▶
Do not lay the removed door on sharp or pointed ob-
jects as this could break the glass. Lay it on a flat,
smooth surface, positioned so that the door cannot fall
over.