
Installation Guide


16
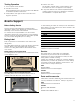
Proceed to lift the oven following the guidelines below
with the door removed:
▯ Lift points (1) on the front of the unit are for lifting from
the sides of the unit. Lift point (3) on the front of the
unit is for a third person to help lift the unit.
▯ Lift point (2) on the back of the unit shows the location
of the opposite hand for the helpers lifting from the
sides of the unit. Adjust the location as needed to
facilitate the lift.
Placing Oven Into Cabinet Opening
1.
The unit and its bottom packaging (pallet) should be
positioned close to and in front of the cabinet opening
prior to beginning to lift the unit into place.
2.
Lift or slide unit into the cabinet cutout without allowing
the unit base to contact the flooring.
3.
Guide the unit straight back into the cabinet cutout.
Push the unit straight in until the oven trim is about
2 inches from being flush with cabinet wall.
Note: Be careful not to crimp the flexible conduit
between the oven and the cabinet back wall. If
necessary, guide the flexible conduit into the wall of
cabinet access hole so it doesn’t prevent the unit from
being pushed all the way into the cabinet opening. The
oven should be straight and level.
4.
Push the unit all the way back into the cabinet cutout
until the front edge of the unit is flush with the front of
the cabinet.
5.
Install the supplied screws through the tap holes in the
trim (2 screws for single ovens, 4 screws for
combination ovens). It is recommended to drill pilot
holes for the trim screws.
To ensure the door and oven function properly, the
screws should be installed on the face of the side trim
6.
Replace the oven door accordingly. See “Re-Install the
Oven Door”.
How to Replace the Oven Door
1.
Holding the door firmly in both hands, grip it on either
side, not by the handle.
2.
Tilt the door back slightly towards you until it opens
about 7 inches at the top.
3.
Slide the hinges into the slots as far as they will go and
then lower the door straight down. The angle of the
door may need to be adjusted slightly to allow the
hinges to engage properly and the door to lower into
place. The door should lower about 3/4” and stop. If
not, the hinges have not engaged properly and the
door could fall if it is released.
4.
Once both hinges are fully engaged as described in
Step 3, gently open the door until it is fully open.
5.
Push the levers on both the hinges up and forward
until they are locked into the slot and flush with the
front of the oven body.
6.
Close and open the door slowly to be sure it is
correctly and securely in place.
Single Oven Combination Oven
"
#