
Installation Guide
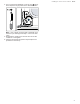

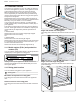

Table Of Contents
- Built-in Single, Double and Combination Ovens
- en-us
- Table of contents
- 1 IMPORTANT SAFETY INSTRUCTIONS
- 2 Before you begin
- 3 Package removal
- 4 Installation requirements
- 5 30" Single oven dimensions
- 6 30" Double oven dimensions
- 7 30" Combination oven dimensions
- 8 27" Single oven dimensions
- 9 27" Double oven dimensions
- 10 Prior to installation
- 11 Installing the ovens into the cabinet
- 12 Electrical connection
- 13 Testing the operation
- 14 Customer Service
- fr-ca
- Table des matières
- 1 IMPORTANTES CONSIGNES DE SÉCURITÉ
- 2 Avant de commencer
- 3 Élimination de l'emballage
- 4 Exigences d'installation
- 5 Dimensions pour les fours simples de 30 po
- 6 Dimensions du four double de 30 po
- 7 Dimensions du four combiné de 30 po
- 8 Dimensions du four simple de 27 po
- 9 Dimensions du four double de 27 po
- 10 Avant l'installation
- 11 Installation des fours dans l'armoire
- 12 Raccordement électrique
- 13 Opération d’essai
- 14 Service à la clientèle
- es-mx
- Tabla de contenidos
- 1 INSTRUCCIONES DE SEGURIDAD IMPORTANTES
- 2 Antes de empezar
- 3 Eliminación del embalaje
- 4 Requisitos de instalación
- 5 Medidas para hornos individuales de 30"
- 6 Medidas para el horno doble de 30"
- 7 Medidas para hornos de combinación de 30"
- 8 Medidas para hornos individuales de 27"
- 9 Medidas para el horno doble de 27"
- 10 Antes de la instalación
- 10.1 Elevación del aparato
- 10.2 Conexión del tubo del horno rápido o del horno de aire caliente y vapor al horno inferior
- 10.3 Conexión del microondas al horno inferior
- 10.4 Ensamblaje de las dos unidades del horno de combinación
- 10.5 Extracción de la puerta del horno (en modelos convencionales con bisagra inferior)
- 11 Instalación de los hornos en el gabinete
- 12 Conexión eléctrica
- 13 Comprobación del funcionamiento
- 14 Servicio de atención al cliente

en-us Customer Service
24
Customer Service
14 Customer Service
Customer Service
If you have any questions on use, are unable to eliminate
an issue in the appliance yourself, or the appliance needs
to be repaired, please contact our Customer Service.
With any warranty repair, we will make sure your appli-
ance is repaired by an authorized service provider using
genuine replacement parts. We use only genuine replace-
ment parts for all repairs.
Detailed information on the warranty period and terms of
warranty can be found in the Statement of Limited Product
Warranty, from your retailer, or on our website.
If you contact the Customer Service, you will need the
model number (E-Nr.) and the production number (FD) of
your appliance.
This product contains light sources from energy efficiency
class G. These light sources are available as a spare part
and should only be replaced by trained specialist staff.
USA:
1-800-944-2904
www.bosch-home.com/us/owner-support/get-support
www.bosch-home.com/us/shop
CA:
1-800-944-2904
www.bosch-home.ca/en/service/get-support
www.bosch-home.ca/en/service/cleaners-and-accessories
For assistance with connecting to HomeConnect™, you
can also view instructions here:
www.home-connect.com/us/en/help-support/set-up
14.1 Model number (E-Nr.) and production
number (FD)
You can find the model number (E-Nr.) and the production
number (FD) on the appliance's rating plate.
Making a note of your appliance's details and the Cus-
tomer Service telephone number will enable you to find
them again quickly.
14.2 Rating plate location
You can find the rating plate of your appliance:
Rating plate
Microwave and speed oven rating plate
The rating plate is located at the inside of the appliance
door.
Steam convection oven rating plate
The rating plate is located at the left hand side of the door
trim.
Single and double oven rating plate
The rating plate is located at the left hand side of the door
trim.
Single oven side hinge rating plate
The rating plate is located at the side of the door trim op-
posite the hinges.