
Use and Care Manual
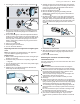


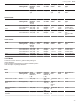
Table Of Contents
- Oven
- en-us
- Table of contents
- 1 IMPORTANT SAFETY INSTRUCTIONS
- 2 Preventing material damage
- 3 Environmental protection and energy-saving
- 4 Familiarizing yourself with your appliance
- 5 Accessories
- 6 Before using for the first time
- 7 Basic Operation
- 7.1 Setting the heating mode and temperature - 500 Series double ovens
- 7.2 Setting the heating mode and temperature - 500 Series single ovens
- 7.3 Setting the heating mode and temperature - 800 and Benchmark® Series
- 7.4 Temperature range by heating mode
- 7.5 Heating time limitation
- 7.6 Fast preheat
- 7.7 Meat probe
- 7.8 Turning the panel lock on or off
- 8 Timer functions
- 9 Basic settings
- 10 Home Connect™
- 11 Getting the most out of your appliance
- 11.1 Rack positions
- 11.2 Getting the best results
- 11.3 General tips for heating modes
- 11.3.1 How to use Bake mode
- 11.3.2 How to use Conv Bake mode
- 11.3.3 How to use Conv Multi Rack mode
- 11.3.4 How to use Pizza mode
- 11.3.5 How to use Roast mode
- 11.3.6 How to use Conv Roast mode
- 11.3.7 How to use Broil (high/low) mode
- 11.3.8 How to use Conv Broil mode
- 11.3.9 How to use Frozen Foods mode
- 11.3.10 How to use Air Fry mode
- 11.3.11 How to use Proof mode
- 11.3.12 How to use Warm mode
- 11.3.13 How to use EcoChef™ mode
- 12 Cleaning and maintenance
- 13 Troubleshooting
- 14 Cooking charts
- 15 Disposal
- 16 Customer Service
- 17 STATEMENT OF LIMITED PRODUCT WARRANTY
- fr-ca
- Table des matières
- 1 IMPORTANTES CONSIGNES DE SÉCURITÉ
- 1.1 Définitions des termes de sécurité
- 1.2 Informations générales
- 1.3 Utilisation prévue
- 1.4 Restriction sur le groupe d'utilisateurs
- 1.5 Utilisation sécuritaire
- 1.6 Sécurité des enfants
- 1.7 Fonction de nettoyage
- 1.8 Installation et entretien appropriés
- 1.9 Fonctionnement à distance
- 1.10 Mises en garde conformément à la proposition 65 de l'État de Californie
- 2 Prévenir les bris matériels
- 3 Protection de l'environnement et économies
- 4 Description de l'appareil
- 5 Accessoires
- 6 Avant d'utiliser pour la première fois
- 7 Opération de base
- 7.1 Réglage du mode de chauffage et de la température - fours doubles série 500
- 7.2 Réglage du mode de chauffage et de la température - fours simples série 500
- 7.3 Réglage du mode de chauffage et de la température - 800 et Benchmark™ série
- 7.4 Plage de température par mode de chauffage
- 7.5 Limitation du temps de chauffage
- 7.6 Préchauffage rapide
- 7.7 Sonde thermométrique
- 7.8 Activer ou désactiver le verrouillage du panneau
- 8 Fonctions de minuterie
- 8.1 Minuterie de cuisine
- 8.2 Minuterie du four
- 8.3 Cuisson différée
- 8.4 Mode sabbat
- 9 Réglages de base
- 10 Home Connect™
- 11 Tirer le meilleur parti de l’électroménager
- 11.1 Positions des grilles
- 11.2 Obtenir les meilleurs résultats
- 11.3 Conseils généraux pour les modes de chauffage
- 11.3.1 Comment utiliser le mode Bake
- 11.3.2 Comment utiliser le mode Conv Bake
- 11.3.3 Comment utiliser le mode Conv Multi Rack
- 11.3.4 Comment utiliser le mode Pizza
- 11.3.5 Comment utiliser le mode Roast
- 11.3.6 Comment utiliser le mode Conv Roast
- 11.3.7 Comment utiliser le mode Broil (high/low)
- 11.3.8 Comment utiliser le mode Conv Broil
- 11.3.9 Comment utiliser le mode Frozen Foods
- 11.3.10 Comment utiliser le mode Air Fry
- 11.3.11 Comment utiliser le mode Proof
- 11.3.12 Comment utiliser le mode Warm
- 11.3.13 Comment utiliser le mode EcoChef™
- 12 Nettoyage et entretien
- 12.1 Produits de nettoyage
- 12.2 Fonction autonettoyante
- 12.3 Entretien
- 13 Dépannage
- 14 Tableaux de cuisson
- 15 Élimination
- 16 Service à la clientèle
- 17 ÉNONCÉ DE LA GARANTIE LIMITÉE DU PRODUIT

en-us Cleaning and maintenance
32
a The oven door locks. blinks on the display and then
remains lit until the oven has cooled down after self
clean is finished.
a "SELF CLEAN" lights up on the display.
a The timer starts to count down.
a When self clean is finished, the display shows 0:00. The
oven remains locked until it has cooled down suffi-
ciently. "COOLING DOWN" is displayed.
a When the oven has cooled down the door unlocks and
"SELF CLEAN FINISHED" is displayed.
5. Press Oven Clear/Off.
6. Wipe the remaining ash from the oven with a moist
cloth.
Canceling self clean - 800Series
1. Press Oven Clear/Off.
a "COOLING DOWN" is displayed.
a The door remains locked.
a When the oven has cooled down the door unlocks and
"SELF CLEAN FINISHED" is displayed.
2. Press Oven Clear/Off.
3. Wipe the remaining ash from the oven with a moist
cloth.
Starting self clean - Benchmark® Series
Requirements
¡ All heating modes or timers are canceled.
¡ You have carried out the steps for preparing the oven
for self clean.
→
"Preparing self clean", Page31
1. For double ovens: Select the oven cavity you want to
clean.
2. Press More Modes.
a "Self Clean" lights up on the display.
a The default self clean time "3:00" blinks on the timer
display.
3. You can set a self clean time between 2 and 4hours
and set a delayed start for running self clean. Press the
relevant soft key under the display.
Tip:Use a longer setting for a heavily soiled oven.
You can set a self clean timer for 2, 3 or 4hours.
4. Press Enter.
a The oven door locks.
a "SELF CLEAN" lights up on the display.
a The timer starts to count down.
a When self clean is finished, the display shows 0:00. The
oven remains locked until it has cooled down suffi-
ciently. "COOLING DOWN" is displayed.
a When the oven has cooled down the door unlocks and
"SELF CLEAN FINISHED" is displayed.
5. Press Clear/Off.
6. Wipe the remaining ash from the oven with a moist
cloth.
Canceling self clean - Benchmark® Series
1. Press Clear/Off.
a "COOLING DOWN" is displayed.
a The door remains locked.
a When the oven has cooled down the door unlocks and
"SELF CLEAN FINISHED" is displayed.
2. Press Clear/Off.
3. Wipe the remaining ash from the oven with a moist
cloth.
12.3 Maintenance
Replacing an oven light bulb
When the oven light fails you can replace the light bulbs.
WARNING
Light socket is live when door is open if main power supply
is not turned off.
▶
Turn off main power supply at the service panel before
changing the light bulbs.
WARNING
Make sure the appliance and lights are cool and power to
the appliance has been turned off before replacing the
light bulb(s). Failure to do so could result in electrical
shock or burns.
▶
The lenses must be in place when using the appliance.
▶
The lenses serve to protect the light bulb from breaking.
▶
The lenses are made of glass. Handle carefully to avoid
breaking. Broken glass can cause an injury.
Light bulb specifications
Refer to this chart for information on the light bulb you
have to use for your oven model.
Bulb description Bulb image
25Watt, halogen bulb,
G9base, 120Volts
Replacing a G9 base oven light with round glass cover
Note:The graphics are representative. Your appliance
may have different graphic appearances.
Requirements
¡ Refer to the oven light bulb chart for the oven light spec-
ification of your oven.
¡ Follow the safety instructions on replacing a light bulb.
→
Page32
1. Turn off the power to the oven at the main power supply
(fuse or breaker box).
2. Remove the oven racks.