
Installation Guide


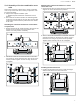
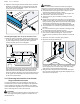
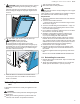
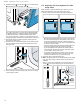
Table Of Contents
- Built-in Single, Double and Combination Ovens
- en-us
- Table of contents
- 1 IMPORTANT SAFETY INSTRUCTIONS
- 2 Before you begin
- 3 Package removal
- 4 Installation requirements
- 5 30" Single oven dimensions
- 6 30" Double oven dimensions
- 7 30" Combination oven dimensions
- 8 27" Single oven dimensions
- 9 27" Double oven dimensions
- 10 Prior to installation
- 11 Installing the ovens into the cabinet
- 12 Electrical connection
- 13 Testing the operation
- 14 Customer Service
- fr-ca
- Table des matières
- 1 IMPORTANTES CONSIGNES DE SÉCURITÉ
- 2 Avant de commencer
- 3 Élimination de l'emballage
- 4 Exigences d'installation
- 5 Dimensions pour les fours simples de 30 po
- 6 Dimensions du four double de 30 po
- 7 Dimensions du four combiné de 30 po
- 8 Dimensions du four simple de 27 po
- 9 Dimensions du four double de 27 po
- 10 Avant l'installation
- 11 Installation des fours dans l'armoire
- 12 Raccordement électrique
- 13 Opération d’essai
- 14 Service à la clientèle
- es-mx
- Tabla de contenidos
- 1 INSTRUCCIONES DE SEGURIDAD IMPORTANTES
- 2 Antes de empezar
- 3 Eliminación del embalaje
- 4 Requisitos de instalación
- 5 Medidas para hornos individuales de 30"
- 6 Medidas para el horno doble de 30"
- 7 Medidas para hornos de combinación de 30"
- 8 Medidas para hornos individuales de 27"
- 9 Medidas para el horno doble de 27"
- 10 Antes de la instalación
- 10.1 Elevación del aparato
- 10.2 Conexión del tubo del horno rápido o del horno de aire caliente y vapor al horno inferior
- 10.3 Conexión del microondas al horno inferior
- 10.4 Ensamblaje de las dos unidades del horno de combinación
- 10.5 Extracción de la puerta del horno (en modelos convencionales con bisagra inferior)
- 11 Instalación de los hornos en el gabinete
- 12 Conexión eléctrica
- 13 Comprobación del funcionamiento
- 14 Servicio de atención al cliente

en-us Prior to installation
18
2. Align the outer flanges with the outside of the universal
brackets. Fasten with one (1) screw each into the end
hole of each universal bracket. Tighten the screws se-
curely, but do not overtighten.
Securing the upper unit on top of the lower oven
▶
Place the steam convection, speed or microwave oven
on top of the universal connector brackets and fasten it
in place using three (3) screws per side. Tighten the
screws securely, but do not overtighten.
The existing screws in the upper unit's base help with
alignment. When lowering the upper unit into place on
the universal connector brackets, allow these screw
heads to slide into the slots. The screw nearest the front
of the upper unit should slide into the base of the slope
at the front of the bracket.
10.5 Removing the oven door from bottom
hinge conventional ovens
It is recommended to remove the bottom hinge door of
conventional ovens to reduce the weight of the appliance
and to facilitate its handling and installation. For double
ovens with bottom hinge doors you can remove both oven
doors. Side hinge doors cannot be removed.
CAUTION
Do not try to remove the speed, steam or microwave oven
door. This might damage the appliance and lead to mal-
function later on.
WARNING
Failure to follow these instructions when removing the
oven door may lead to personal injury or product damage.
▶
Make sure oven is cool and power to the oven has been
turned off before removing the door. Failure to do so
could result in electrical shock or burns.
▶
The oven door is heavy and parts of it are fragile. Use
both hands to remove the oven door.
▶
The door front is glass. Handle it carefully to avoid
breakage.
▶
Grasp only the side of the oven door. Do not grasp the
handle. It may swing in your hand and cause damage or
injury. Failure to grasp the oven door firmly and properly
could result in personal injury or product damage.
▶
To avoid injury from hinge bracket snapping closed, be
sure both levers are securely in place before removing
the door.
▶
Do not force the door open or closed. The hinge could
be damaged and cause damage or injury.
▶
Do not lay the removed door on sharp or pointed ob-
jects as this could break the glass. Lay it on a flat,
smooth surface, positioned so that the door cannot fall
over.
1. Open the oven door to its fully open position.
2. Flip levers on hinges toward you.
If necessary, use a tool, such as a screwdriver, to gently
pry the upper part of the lever away from the housing.
Take care to avoid scratching the housing.
3. Bring both door hinge levers to their fullest down posi-
tion. The left and right door hinges differ slightly but op-
erate in the same manner.