HBN 43M 550 A Installing and Operating Instructions Internet: http://www.bosch-hausgeraete.de Bosch Info-Team: de Tel. 01 80/5 30 40 50 (E 0,12/Min.
a Making cooking as much fun as eating Please read this instruction manual. This will ensure that you make use of all the technical benefits the cooker has to offer. It will provide you with important safety information. You will then be familiarised with the individual components of your new cooker. And we will show you how to make settings step by step. It is quite simple. The tables list the settings and shelf positions for numerous well-known dishes. All these dishes are tested in our cooking studio.
Table of contents Important information . . . . . . . . . . . . . . . . . . . . . . 6 Before installation . . . . . . . . . . . . . . . . . . . . . . . . . . 6 Safety information . . . . . . . . . . . . . . . . . . . . . . . . . . 6 Reasons for damage . . . . . . . . . . . . . . . . . . . . . . . . 7 Your new cooker . . . . . . . . . . . . . . . . . . . . . . . . . . 8 The control panel . . . . . . . . . . . . . . . . . . . . . . . . . . 8 Function selector – Main oven . . . . . . . . . . . . .
Table of contents 4 Time . . . . . . . . . . . . . . . . . . . . . . . . . . . . . . . . . . . . 24 Setting procedure . . . . . . . . . . . . . . . . . . . . . . . . . . 24 Timer . . . . . . . . . . . . . . . . . . . . . . . . . . . . . . . . . . . 25 Setting procedure . . . . . . . . . . . . . . . . . . . . . . . . . . 25 Basic settings – Main oven . . . . . . . . . . . . . . . . . 26 Changing the basic settings . . . . . . . . . . . . . . . . . . 27 Childproof lock . . . . . . . . . . . . .
Table of contents Preserving – Main oven . . . . . . . . . . . . . . . . . . . . . . 47 Energy saving tips . . . . . . . . . . . . . . . . . . . . . . . . . . 49 Acrylamide in food . . . . . . . . . . . . . . . . . . . . . . . . 49 What can you do? . . . . . . . . . . . . . . . . . . . . . . . . . 50 Test dishes . . . . . . . . . . . . . . . . . . . . . . . . . . . . . . 51 Assembly instructions . . . . . . . . . . . . . . . . . . . . . 52 For the installer and kitchen expert . . . . . . . . . .
Important information Read this instruction manual carefully. Only then will you be able to operate your cooker safely and correctly. Please keep the instruction and installation manual in a safe place. Please pass on the instruction manual to the new owner if you sell the appliance. Before installation Transport damage Check the appliance after unpacking it. Do not connect the appliance if it has been damaged in transport.
Repairs Incorrectly done repairs are dangerous. There is a risk of electrocution. Repairs may only be carried out by after–sales service technicians who have been fully trained by BSH. If there is a fault, switch off the oven fuse at the fuse box. Call the after–sales service. Reasons for damage Baking tray, aluminium foil or dishes on the oven floor Do not place the baking tray on the oven floor. Do not cover it with aluminium foil. Do not place dishes on the oven floor.
Your new cooker Here you will learn more about your new oven. The control panel and its switches and indicators are explained here. The heating modes and the accessories included with your oven will be explained here. The control panel Details vary according to the appliance model.
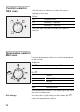
Function selector Main oven Use the function selector to select the type of heating for the oven. Settings / ˜ . , ) U Top/bottom heating 3D-hot air* Bottom heating Hot air grilling Radiant grill Rapid heating * Type of heating with energy efficiency class determined in accordance with EN50304. The oven light switches on when you select a function. Temperature selector Main oven Use the temperature selector to set the temperature or grill setting.
Function selector Mini oven Use the function selector to select the type of heating for the oven. Settings / ) Conventional heat V Radiant grill – small area Radiant grill – large area The oven light switches on when you select a function. Temperature selector Mini oven Use the temperature selector to set the temperature or grill setting.
Control buttons and display panel Timer button 8 Use this button to set the timer Clock button 6 Use this button to set the time of day, the cooking time * and the completion time + Minus button – Use this button to reduce the values set. Plus button + Use this button to increase the values set. Key button E Use this button to switch the childproof lock on and off. The values set can be seen in the display panel. Push-in control knobs The control knobs can be pushed in.
Types of heating Main oven Different types of oven heating are available. You can therefore select the best method for cooking any dish. Top and bottom heating This ensures the even distribution of heat onto the cake or roast from the top and bottom of the oven. This type of heating is best for cake mixtures in tins or for bakes. Top and bottom heating is also suitable for cooking lean roasts of beef, veal and game. To keep food warm /+ s: You can keep food warm in the 65–100 ºC temperature range.
Bottom heat You can reheat or brown meals using bottom heating. It is also the most suitable type of heating for preserving food. Hot air grilling This type of heating involves the grill element and the fan switching on and off alternately. During the pause in heating, the fan circulates the heat generated by the grill around the food. This ensures that pieces of meat are crisped and brown on all sides. Radiant grill – large area The entire area under the grill element becomes hot.
Types of heating Mini oven Different types of oven heating are available. You can therefore select the best method for cooking any dish. Top and bottom heating This ensures the even distribution of heat onto the cake or roast from the top and bottom of the oven. This type of heating is best for cake mixtures in tins or for bakes. Top and bottom heating is also suitable for cooking lean roasts of beef, veal and game. Radiant grill – large area The entire area under the grill element becomes hot.
Oven and shelving accessories Mini oven Your oven features 2 shelf positions. The shelf positions are counted from bottom to top. The numbers are marked in the oven. Main oven The shelf can be inserted at 5 different heights in the oven. You can remove the shelf two thirds of the way without it tipping. This makes it easier to take food out of the oven. Accessories Accessories may be purchased at a later date from the after-sales service or from specialist shops. Please specify the HEZ number.
Enamel baking tray HEZ 331000 for cakes and biscuits. Push the baking tray with the sloping edge facing towards the oven door. Grill pan HEZ 325000 Can be used for grilling instead of the wire grill or as a spray guard to protect the oven against dirt. Only use the grill pan in the universal pan. To grill using the grill pan: use the same shelf height as for the wire grill. Using the grill pan as a spray guard: insert the universal pan with the grill pan under the wire grill.
Glass pan HEZ 336000 A deep baking tray made from glass. Can also be used as a serving dish. Pizza tray HEZ 317000 Ideal for pizza, frozen foods and large round cakes, for example. You can use the pizza tray instead of the universal pan. Place the tray on the wire grill. Observe the information provided in the tables. Baking tin HEZ 6001 You can bake especially moist cakes using the leak-proof baking tin. The extra wide rim prevents leakage and your cooker stays clean.
Lid for the Profi extra-deep pan HEZ 333001 Converts the Profi extra-deep pan into the Profi roasting dish. 3 tier telescopic shelf HEZ 338301 The ledges at heights 2, 3 and 4 allow you to pull the shelf out further without it tipping.
Cooling fan The oven is fitted with a cooling fan. It switches itself on and off as necessary. The warm air escapes above the door. Before using for the first time This section will tell you everything you need to do before using the cooker for the first time. Heat the oven and clean the accessories. Read the safety instructions in the „Important information“ section. Firstly, check to see if the 6 symbol and three zeros are flashing in the display.
Setting the oven You have various options for setting the oven. Switching off the oven manually When your meal is ready, switch off the oven yourself. The main oven switches off automatically You can leave the kitchen for a long period. The main oven switches on and off automatically You can put your meal in the oven in the morning, for example, and set the oven so that your meal is ready at midday. Tables and tips The correct settings for many dishes can be found in the Tables and tips section.
Switching off Switch off the function selector when the meal is ready. Changing the setting You may change the temperature or grill setting at any time. If the oven is to switch off automatically – Main oven Make settings as described in steps 1 and 2. Set the cooking time (duration) for your meal. Example: Cooking time of 45 minutes 3. Press the 6 clock button. The cooking time symbol * will flash. 4. Set the cooking time using the + or - button. + button default value = 30 minutes.
If the oven is to switch on and off automatically – Main oven Please remember that easily spoiled foods must not be allowed to remain in the oven for too long. Perform the settings as described in items 1 to 4. The oven starts. Example: Imagine – it’s 10:45 a.m. The meal will take 45 minutes to cook and must be ready at 12:45 pm. 5. Press the 6 clock button until the + end symbol flashes. In the display you will see the time when the meal will be ready. 6. Use the + button to set a later end time.
Rapid heating Main oven This allows you to heat up the oven particularly quickly. Setting procedure 1. Switch the function selector to rapid heating U. 2. Use the temperature selector to set the required temperature. The oven switches on after a few seconds. The red signal lamp lights up in the display. The rapid heating process is complete The red signal lamp disappears. Put your meal in the oven and set the oven.
Time When the oven is first connected, or following a power cut, the 6 symbol and three zeros flash in the display. Set the time. The function selector must be switched off. Setting procedure Example: 13:00 1. Press the 6 clock button. 12.00 appears in the display and the flashes. 6 symbol 2. Set the time using the + or – button. The time selected is adopted after a few seconds. Changing the time e.g.
Timer You can use the timer as a kitchen timer. It operates independently of the oven. The timer has a special signal. This means that you can tell whether the set timer period has elapsed or the cooking time is complete. You can also set the timer if the childproof lock is active. Setting procedure Example: 20 minutes 1. Press the 8 timer button. The 8 symbol will flash. 2. Set the timer period using the + or – button. + button default value = 10 minutes.
The timer and cooking time count down simultaneously The symbols light up. The timer period counts down visibly in the display. To call up remaining cooking time ?, end time ! or time 6: Press the 6 clock button until the symbol in question flashes. The value called up will then appear in the display for a few seconds. Basic settings Main oven 26 Your oven has several basic settings. You may change the basic settings for time, the signal duration and the reset time for a setting.
Changing the basic settings – Main oven There must be no program set. Example: Hiding the time 1. Press the 6 clock button and the + button at the same time until a 1 appears in the display. This is the basic setting for the time in the foreground. 2. Change the basic setting using the + or – button. 3. Conform with the 6 clock button. A 2 will appear in the display for the basic setting for the signal duration. Change the basic setting as described in step 2 and confirm with the 6 clock button.
Childproof lock – for the main oven The oven has a childproof lock to prevent children switching it on accidentally. Locking the oven Press the E key button until the E symbol appears in the display. This will take approximately 4 seconds. Unlocking Press the E key button until the Esymbol goes out. Notes You can set the timer and the clock even when the oven is locked. The childproof lock setting will be lost if there is a power cut Care and cleaning Do not use high–pressure cleaners or steam jets.
Appliances with stainless steel fronts Always remove any flecks of limescale, grease, cornflour and egg white immediately. Corrosion can form under such flecks. Use stainless steel care products. Follow the manufacturer’s instructions. Try out the product on a small area first, before using on the whole surface. Appliances with aluminium fronts Use a mild window-cleaning detergent.
Cleaning the catalytic surfaces of the oven The rear wall, top and side walls of the oven are coated with self-cleaning enamel. The surfaces clean themselves while the oven is in operation. Large splashes may only disappear after the oven has been used several times. Never use oven cleaner on self-cleaning surfaces. If the self-cleaning surfaces of the oven are no longer cleaning themselves sufficiently, they can be regenerated using the cleaning function.
Cleaning function Main and Mini oven The cleaning function is a regeneration program. If the self-cleaning components of the oven are no longer cleaning themselves sufficiently, they can be regenerated using this function. They are then fully operational again. Remove accessories and ovenware from the oven. Caution Before you do this, you must clean the oven surfaces which are not self-cleaning. Otherwise stains may appear that cannot be removed. Setting procedure Main oven 1. 2. 3. 4.
Cleaning the glass panels Main and Mini oven The glass panel on the oven door can be removed to assist in cleaning. Removal 1. Remove the oven door and lay it down on a cloth with the handle underneath. 2. Unscrew the cover on top of the oven door. Turn the screws clockwise or anti-clockwise with a coin to do this. (Fig. A). 3. Slide out the top panel. (Fig. B).
Main oven 4. Unscrew the clips on the right and left and remove them (Fig. C). Remove the panel. Clean the glass panels with glass cleaner and a soft cloth. Installation Make sure that the message „Right above“ is upside down at the bottom left of both panels. 1. Push the glass panel back at an angle. (Fig. D). 2. Fit the clips and screw them in again. (Fig E). 3. Push the top panel back in. Make sure that the smooth surface is facing outwards. 4. Replace the cover and screw it back on. 5.
Mini oven Removal 1. Press in the retaining clip with your thumb on one side and disengage the inner door glass e.g. with the spatula, then repeat on the other side. (Fig. C). Installation Installation after cleaning: 1. Insert inner door glass into the holder. First engage the right side and then the other side. (Fig. D) 2. Push the top panel back in. Make sure that the smooth surface is facing outwards. 3. Replace the cover and screw it back on. 4. Refit the oven door.
Cleaning the rails The rails can be removed for cleaning. To unhook the rails: 1. Lift the rail at the front in an upwards direction 2. and unhook it. 3. Then pull the whole rail forward and take it out. Clean the rails using either washing-up liquid and a sponge or a brush. To hook rails back into position: When installing the rails, do not twist them, otherwise the shelf positions for the accessories will not correspond.
Troubleshooting Should a malfunction occur, it is often only due to a minor fault. Please read the following instructions before calling the after-sales service: Problem Possible cause Comments/remedy The oven does not work. Blown fuse Look in the fuse box and check that the fuse is in working order. The clock display flashes. Power cut Reset the time. Repairs may only be carried out by fully trained after-sales service technicians. Improper repairs may constitute serious hazards to the user.
Replacing the glass cover The glass cover on the oven light must be replaced if it is damaged. Replacement glass covers may be obtained from the after-sales service. To this end, please specify the E number and FD number of your appliance. After-sales service Our after-sales service is there for you if your oven needs repairing.You will find the address and telephone number of your nearest after-sales service centre in the phone book.
Packaging and old appliances Your new appliance was protected by suitable packaging while it was on its way to you. All materials used for this purpose are environmentally friendly and can be recycled. Please make a contribution to protecting the environment by disposing of the packaging appropriately. Old appliances are not worthless rubbish. Environmentally-conscious recycling can reclaim valuable raw materials.
Tables and tips This table contains a selection of dishes and the optimum settings at which to cook them. You can find out which type of heating and temperature is best for your dish, which accessories to use, and at which oven level the dish should be inserted. You will find a variety of tips about ovenware and preparation, and a small troubleshooting section in case anything should go wrong. Cakes and pastries Baking on one level If you are baking cakes on one level, you should use top/bottom heating t.
Main oven Conventional heat Food Dish Shelf position Cooking method Temp. °C Time, minutes Victoria sandwich 20 cm tin 2 170 20-30 Light fruit cake 20 cm tin 2 160 75-85 Fruit crumble Glass dish 3 180 35-45 Jam tarts* 12 hole bun tin 2 200 15-20 Yeast cookery* (f. ex.
Main oven Conventional baking Food Dish Shelf position Cooking method Temp. °C Time, minutes Bread loaf tin (900 g or 2 x 450 g) 1 t 220 25-35 Scones* baking tray 1 210 15-20 Yorkshire Pudding* 12 hole bun tin 2 t t 200 30-40 * Preheat oven Main oven 3D-Hot air Baking on 2 or 3 levels Food Dish Shelf position Cooking method Temp.
Baking tips You wish to cook to your own recipe. Refer to the instructions in the tables for similar types of food. How to check that a sponge cake is cooked properly. Approximately 10 minutes before the end of the baking time given in the recipe, pierce the tallest point of the cake with a cocktail stick. The cake is done if the cocktail stick comes out clean. The cake collapses. Next time, use less liquid or decrease the oven temperature by 10 degrees. Observe the cooking times in the recipe.
Meat, poultry, fish Ovenware You may use any heat-resistant dishes. The universal pan is also suitable for larger roasts. Always place the dishes in the centre of the wire grill. Hot glass dishes should be placed on a dry kitchen towel after being removed from the oven. The glass could crack if placed on a cold or wet surface. Advice on roasting The roasting result depends on the type and quality of meat.
Main oven Roasting Food Shelf Cooking position method Beef rare 1 Beef medium 1 Beef well done 1 Beef filet 1 Lamb medium 1 Lamb well done 1 Pork 1 Chicken, Duck, Goose and Turkey up to 5 kilo 1 Large Turkey 1 Chops and chicken joints 2 Temperature °C Cooking time mins per 1 lb , , , , , , , , 210-230 10+15 210-230 15+20 210-230 20+25 220-230 15+20 160-180 20+20 160-180 25+25 190-210 30+30 140-180 20+20 , , 160-180 13+13 180-200 25 Grilling Food Shelf Cooking po
Tips for roasting and grilling The table does not contain information for the weight of the roast. Select the next lowest weight from the instructions and extend the time. How can you tell when the roast is ready? Use a meat thermometer (available from specialist shops) or carry out a „spoon test“. Press down on the roast with a spoon. If it feels firm, it is ready. If the spoon can be pressed in, it needs to be cooked for a little longer. The roast is too dark and the crackling is partly burnt.
Defrosting Main oven Remove the food from its packaging and place it in a suitable dish on the wire grill. Please observe the instructions on the packaging. The defrosting times depend on the type and amount of food. Meal Accessories Level Type of Temperature heating in °C Frozen foods* Wire rack e.g. cream gateaux, cream cakes, cakes with chocolate or icing, fruit, chicken, sausages and meat, bread, rolls, pastries and other baked goods.
Preserving Main oven Preparation The jars and rubber sealing rings must be clean and intact. Use jars of the same size if possible. The instructions in the table refer to round 1-litre jars. Caution Do not use larger or taller jars. The lid could crack. Only use perfectly fresh fruit and vegetables. Wash them thoroughly. Pour the fruit or vegetables into the jars. Wipe clean the tops of the jars again if necessary. They must be clean.
Preserving fruit As soon as the contents of the jars begins to simmer, that is when small bubbles appear at short intervals – after about 40 to 50 minutes – turn off the function selector. The jars should be removed from the oven after being reheated for 25 to 35 minutes. If the food is left to cool in the oven for longer, bacteria might form, causing the preserved fruit to spoil prematurely. Fruit in 1-litre jars After bubbling Reheating Apples, red/blackcurrants, strawberries turn off approx.
Energy saving tips Only preheat the oven if it specifies in the recipe or in the table in the instruction manual that you should do so. Use non-stick, black painted or enamelled tins. They absorb the heat especially well. If you have several cakes to bake it is best to bake them one after the other. The oven is still warm. This shortens the baking time for the second cake. You can also put two baking tins in one after the other.
What sort of foods are afected? Acrylamide forms mostly in grain and potato products that are prepared at high temperatures, e.g.: crisps, chips, toast, rolls, bread, baked goods made from shortcrust pastry (speciality biscuits and cakes). What can you do? You can avoid high levels of acrylamide when baking, frying and grilling. The following recommendations were published by AID1 and BMVEL2 to help you minimise acrylamide levels: In general Keep cooking times as short as possible.
Test dishes for the main oven refering to EN 60350. Baking Food Dish and notes Shelf position Cooking method Temp.
Assembly Instructions For the installer and kitchen expert! Important installation notes Properly dispose of packaging materials. Do not use oven door handle for transporting or handling the unit during installation. WARNING: Connection and first start of the appliance may only be performed by an authorised specialist. Connection must be made using an H 0 5 R R - F 3 G 1,5 mains connection cable. Rated consumption, rated voltage and type no.
Installation of the built-in oven Push the oven into the cabinet aperature and align the unit until it is in a level position. Open the oven door and, using one screw on each side, fasten the built-in oven to the side strips of the conversion cabinet. The two screws (supplied with the built-in oven) must be started slightly outward. Verify that the built-in oven is positioned securely and in a level position, and that the required installation dimensions have been maintained.
Notes 54
Notes 55
Robert Bosch Hausgeräte GmbH 9000 065 754 Printed in Germany 0405 Es.