
Use and Care Manual


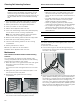
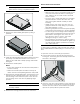
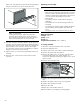
Table Of Contents
- Free-standing range
- Table of Contents Use and care manual
- 9 Safety DefinitionsSafety Definitions
- IMPORTANT SAFETY INSTRUCTIONS
- READ AND SAVE THESE INSTRUCTIONS
- Gas Appliance Safety
- WARNING
- WARNING
- TIP OVER HAZARD
- Fire Safety
- WARNING
- to reduce the risk of a grease fire:
- a. Never leave surface units unattended at high settings. Boilovers cause smoking and greasy spillovers that may ignite. Heat oils slowly on low or medium settings.
- b. Always turn hood ON when cooking at high heat or when flambéing food (i.e. Crepes Suzette, Cherries Jubilee, Peppercorn Beef Flambé).
- c. Clean ventilating fans frequently. Grease should not be allowed to accumulate on fan or filter.
- d. Use proper pan size. Always use cookware appropriate for the size of the surface element.
- WARNING
- TO REDUCE THE RISK OF INJURY TO PERSONS IN THE EVENT OF A GREASE FIRE, OBSERVE THE FOLLOWING:
- a. SMOTHER FLAMES with a close-fitting lid, cookie sheet, or metal tray, then turn off the burner. BE CAREFUL TO PREVENT BURNS. If the flames do not go out immediately, EVACUATE AND CALL THE FIRE DEPARTMENT.
- b. NEVER PICK UP A FLAMING PAN – You may be burned.
- c. DO NOT USE WATER, including wet dishcloths or towels – a violent steam explosion will result.
- d. DO NOT USE WATER ON GREASE FIRES. Smother fire or flame or use dry chemical or foam-type extinguisher.
- e. Use an extinguisher ONLY if:
- Gas Safety
- Burn Prevention
- Child Safety
- Cleaning Safety
- Cookware Safety
- Proper Installation and Maintenance
- Proposition 65 Warning:
- Conversion to Propane Gas
- High Altitude Installation
- Getting Started
- Parts and Accessories
- Burner Cap Placement
- Inserting Racks
- Telescopic Rail
- To insert Telescopic Rail into Oven:
- Operating the cooktop
- Notes Regarding Cookware
- Cleaning and Maintenance-Cooktop
- Operating the Oven
- Before Using the Appliance for the First Time
- Setting the time
- Prepping the oven
- Baking out the oven
- Pre-cleaning the oven
- 1. Remove the accessories and the hook-in racks from the cooking compartment.
- 2. Completely remove any leftover packaging, e.g. small pieces of polystyrene, from the cooking compartment.
- 3. Some parts are covered with a protective film. Remove this scratch protection film.
- 4. Clean the outside of the appliance with a soft, damp cloth.
- 5. Clean the cooking compartment with hot soapy water.
- 1. Remove the accessories and the hook-in racks from the cooking compartment.
- Initial start up
- Re-cleaning the oven
- Cleaning the accessories
- Fitting the telescopic rack set
- Oven Control Panel
- Control knobs
- Oven Features
- Cooling Fan
- Temperature Indicator
- Oven light
- Surfaces in the oven cavity
- Self-cleaning surfaces
- Setting the electronic clock
- Setting the short-term timer
- Switching off the signal tone
- Setting the cooking time
- The cooking time has elapsed
- Setting the end time
- The cooking time has elapsed
- 1. To switch the signal off, press any button or open the appliance door.
- Setting the Core Temperature
- 1. Insert the probe into the meat as described below.
- 2. Connect the probe to the socket in the upper left of the cooking compartment.
- 3. Close the oven door.
- 4. Turn the function selector to “bake”, “conv bake”, “multi rack” or “conv roast”.
- 5. Set the cooking temperature with @ or A.
- 6. Press D to switch to the meat probe target temperature.
- 7. Set the meat probe target temperature with @ or A (70 °F (20 °C) - 195 °F (90 °C)).
- Note:
- 1. Insert the probe into the meat as described below.
- Tips:
- Insert the core temperature probe in the food to be cooked
- Activating the panel lock
- Deactivating the panel lock
- General Tips
- Aluminum Foil
- Preheating the oven
- Baking Pans and Dishes
- Opening the oven door
- High Altitude Baking
- Condensation
- Bake
- Tips
- Convection Bake
- Tips
- Multi-Rack
- Tips
- Proof
- Pizza
- Tips
- Convection Roast
- Tips
- Convection Broil
- Tips
- Broil
- Tips
- List of basic settings
- Changing the basic settings
- 1. Press and hold the v button for approx. 4 seconds.
- 2. Press the v button again to change the selected basic setting.
- 3. Use the A or @ button to change the basic setting.
- 4. Press the v button again to save the basic setting.
- 5. Use the @ button to navigate to the next basic setting.
- 6. Use the A or @ button to continue going through all of the basic settings as described above and use the v button to select and change the settings if necessary.
- 7. When you have finished, press and hold the v button again for approx. 4 seconds to confirm the settings.
- Note:
- 1. Press and hold the v button for approx. 4 seconds.
- Cleaning and Maintenance-Oven
- Cleaning the Oven
- Avoid These Cleaners
- Oven cleaning guide
- Cleaning Self-cleaning Surfaces
- 9 CAUTION
- 1. Use a microfiber cloth with soapy water to clean the upper and lower part of the self-cleaning surfaces.
- Maintenance
- Cleaning Self-cleaning Surfaces
- How to Remove the Rack Guides and Self-cleaning Surfaces
- How to Remove the Oven Door Glass
- 9 WARNING
- 9 CAUTION
- 1. Open the oven door fully.
- 2. Lock the two hinges on the left and right using the locking pin.The locking pins must be fully inserted into the holes in the hinges.
- 3. Remove the internal glass pane by pulling the rear part gently upwards, following the movement indicated by the arrows (1). This way, the first 2 pins attached to the rear of the glass detach from their housings in the oven door. Then, push the gl...
- 9 CAUTION
- 9 CAUTION
- How to Remove the Oven Door
- 9 WARNING
- 1. Open the oven door to its fully open position.
- 2. Lock the two hinges on the left and right using the locking pin. The locking pins must be fully inserted into the holes in the hinges.
- 3. Close the oven door until it catches on the hinge stop levers, locking the hinges at the correct angle for door removal. The door can be removed when it is pulled up from the open position by about 8 inches (203 mm). This takes the tension off the...
- 9 CAUTION
- Risk of pinching
- 4. The door is heavy. Use both hands to firmly grip it by the sides. Do not grip the door by the handle. Keeping the angle of the door the same, lift the door straight up approximately 3/4" (19 mm) to unhook the hinges from the slots, and then pull i...
- 5. Place the door in a convenient and stable location for cleaning.
- 6. Refit the door in the reverse order in which it was removed.
- Risk of pinching
- Replacing an Cven Light
- 9 CAUTION
- 1. Allow the cooking compartment to cool down.
- 2. Open the appliance door.
- 3. Place a cloth in the oven cavity to prevent damage.
- 4. Remove the racks and rack guides.
- 5. Remove the glass cover. To do this, open the glass cover at the front with your hand. Should you experience difficulties removing the glass cover, use a spoon to help.
- 6. Remove the oven light bulb.
- 7. Replace the oven light bulb with a bulb of the same type.
- 8. Replace the glass cover for the oven light bulb.
- 9. Replace rack guides and racks.
- 10. Remove the cloth.
- 11. Switch the circuit breaker back on.
- 12. Check that the oven lighting is working again.
- Cooking Charts
- Customer Service
- STATEMENT OF LIMITED PRODUCT WARRANTY
- READ AND SAVE THESE INSTRUCTIONS
- Table des Matières Notice d’utilisation
- 9 Définitions de sécuritéDéfinitions de sécurité
- CONSIGNES DE SÉCURITÉ IMPORTANTES
- LIRE ET CONSERVER CES INSTRUCTIONS
- Sécurité en matière de gaz
- AVERTISSEMENT
- AVERTISSEMENT
- INFORMATION SUR LE DANGER
- Sécurité-incendie
- AVERTISSEMENT
- POUR RÉDUIRE LES RISQUES DE FEUX DE GRAISSE :
- a. Ne jamais faire fonctionner les unités de surface à des températures élevées sans surveillance. Des débordements causant de la fumée et des déversements graisseux peuvent prendre feu. Chauffer l'huile lentement à réglage faible ou moyen.
- b. Toujours mettre la hotte EN MARCHE pendant la cuisson à température élevée et au moment de flamber des aliments (p.ex., crêpes Suzette, cerises jubilées, steak au poivre flambé).
- c. Souvent nettoyer les ventilateurs d'aération. Il ne faut pas que la graisse s'accumule sur le ventilateur ou sur le filtre.
- d. Utiliser des casseroles de taille adéquate. Utiliser toujours des casseroles dont les dimensions conviennent à la taille de l'élément.
- AVERTISSEMENT
- POUR RÉDUIRE LE RISQUE DE BLESSURE AUX PERSONNES EN CAS D'INCENDIE DE GRAISSE, RESPECTEZ CE QUI SUIT :
- a. FLAMMES PLUS DOUCES avec un ajustement serré du couvercle, plaque à biscuits ou plateau métallique, puis éteignez le brûleur. FAITES ATTENTION POUR PRÉVENIR LES BRÛLURES. Si les flammes ne s'éteignent pas immédiatement, ÉVACUEZ ET APPELE...
- b. NE JAMAIS PRENDRE UNE POÊLE A FLAMBER - vous pourriez vous pourriez être brûlé.
- c. NE PAS UTILISER D'EAU, y compris des torchons ou des serviettes mouillés, cela provoquerait une violente explosion de vapeur.
- d. NE PAS UTILISER DE L'EAU SUR LES FEUX DE GRAISSE. Étouffer le feu ou la flamme ou utiliser un extincteur à sec chimique ou à mousse.
- e. Utiliser un extincteur UNIQUEMENT si :
- Sécurité en matière de gaz
- Prévention des brûlures
- Sécurité des enfants
- Consignes en matière de nettoyage
- Sécurité pour la batterie de cuisine
- Installation et entretien corrects
- Avertissement issu de la proposition 65 :
- Conversion gaz au propane
- Installation à altitude élevée
- Mise en route
- Pièces et accessoires
- Montage des chapeaux de brûleur
- Mise en place de la grille
- Rail téléscopique
- Pour insérer le rail télescopique dans le four:
- Utilisation de la plaque de cuisson
- Remarque concernant les ustensiles
- Nettoyage et entretien – Table de cuisson
- Fonctionnement du four
- Avant la première utilisation de l'appareil
- Fixer le temps
- Préparation du four
- Chauffe à vide du four
- Nettoyage préalable du four
- 1. Retirez les accessoires et les grilles d'accrochage du compartiment de cuisson.
- 2. Enlevez tous les résidus d'emballage, par ex. petits morceaux de polystyrène, du compartiment de cuisson.
- 3. Certaines parties sont recouvertes d'un film protecteur. Retirez ce film protecteur.
- 4. Nettoyez l'extérieur de l'appareil avec un chiffon doux humide.
- 5. Nettoyez le compartiment de cuisson à l'eau chaude additionnée de produit à vaisselle.
- 1. Retirez les accessoires et les grilles d'accrochage du compartiment de cuisson.
- Configuration initiale
- Nettoyage de finition du four
- Nettoyer les accessoires
- Montage du jeu de tablettes télescopiques
- Panneau de commande du four
- Boutons de commande
- Caractéristiques du four
- Ventilateur de refroidissement
- Indicateur de température
- Éclairage de four
- Les surfaces dans le compartiment de cuisson
- Surfaces autonettoyantes
- Réglage de l'horloge électronique
- Réglage de la minuterie
- Désactivation de la tonalité
- Règlage du temps de cuisson
- Temps de cuisson écoulé
- Réglez l'heure de fin
- Temps de cuisson écoulé
- 1. Pour désactiver le signal, appuyez sur n'importe quel bouton ou ouvrez la porte de l'appareil.
- Réglage de la température à cœur
- 1. Insérez la sonde dans la viande comme décrit ci- dessous.
- 2. Raccordez la sonde à la prise en haut à gauche du compartiment de cuisson.
- 3. Fermez la porte du four.
- 4. Tournez le sélecteur de fonctions à « cuire », « cuisson à conv », «multi-rack» ou « rôtissage à conv ».
- 5. Réglez la température de cuisson avec les boutons @ ou A.
- 6. Appuyez sur D pour passer à la température cible de la sonde thermométrique.
- 7. Réglez la température cible de la sonde thermométrique avec les boutons @ ou A (70 F (20 C) - 195 F (90 C)).
- Remarque :
- 1. Insérez la sonde dans la viande comme décrit ci- dessous.
- Conseils :
- Introduisez la sonde de température à cœur dans l'aliment à cuire
- Activation du panneau de verrouillage
- Désactivation du panneau de verrouillage
- Conseils généraux
- Papier d'aluminium
- Préchauffez le four
- Casseroles et plats allant au four
- Ouverture de la porte du four
- Cuisson à haute altitude
- Condensation
- Cuisson
- Conseils
- Cuisson à convection
- Conseils
- Multi-Rack
- Conseils
- Apprêt
- Pizza
- Conseils
- Rôtissage par convection
- Conseils
- Gril à convection
- Conseils
- Gril
- Conseils
- Liste des réglages de base
- Modification des réglages de base
- 1. Appuyez et maintenez la touche v enfoncée pendant env. 4 secondes.
- 2. Appuyez de nouveau sur le bouton v pour modifier le réglage de base.
- 3. Utilisez les boutons A ou @ pour modifier le réglage de base.
- 4. Appuyez de nouveau sur le bouton v pour enregistrer le réglage de base.
- 5. Utilisez les boutons et @ pour passer au prochain réglage de base.
- 6. Utilisez le bouton A ou @ pour continuer à travers tous les réglages de base comme décrit ci-dessus et utilisez le bouton v pour sélectionner et modifier les paramètres si nécessaire.
- 7. Lorsque vous avez terminé, appuyez de nouveau sur le bouton v et maintenez-le enfoncé pendant env. 4 secondes afin de confirmer les réglages.
- Remarque :
- 1. Appuyez et maintenez la touche v enfoncée pendant env. 4 secondes.
- Nettoyage et entretien – Four
- Nettoyage du four
- Éviter ces produits de nettoyage
- Guide de nettoyage de four
- Nettoyage des surfaces autonettoyantes
- 9 ATTENTION
- 1. Utilisez un tissu microfibre avec de l'eau savonneuse pour nettoyer les parties supérieures et inférieures des surfaces autonettoyantes.
- 2. Réglez le brûleur de four sur la température la plus élevée.
- 3. Appuyez sur w pour activer la recirculation de l'air.
- 4. Éteignez l'appareil au bout d'une heure.
- 5. Si les surfaces latérales autonettoyantes sont particulièrement sales, retirez-les du compartiment de cuisson.
- Remarque :
- 6. Lavez les surfaces autonettoyantes à l'eau chaude savonneuse.
- 7. Rincez et séchez les surfaces autonettoyantes.
- 8. Insérez le système autonettoyant dans le compartiment de cuisson.
- 9. Réglez le brûleur de four sur 350°F (177°C).
- 10. Appuyez sur w pour activer la recirculation de l'air.
- 11. Éteignez l'appareil au bout d'une heure.
- Entretien
- Nettoyage des surfaces autonettoyantes
- Comment retirer les guides de crémaillère et les surfaces autonettoyantes
- Comment retirer la vitre de la porte du four
- 9 AVERTISSEMENT
- 9 ATTENTION
- 1. Ouvrez complètement la porte du four.
- 2. Verrouillez les deux charnières à gauche et à droite à l'aide de la goupille de verrouillage. Les goupilles de verrouillage doivent être complètement insérées dans les trous des charnières.
- 3. Enlevez la vitre intérieure en tirant doucement la partie arrière vers le haut, tout en suivant le mouvement indiqué par les flèches (1). De cette façon, les 2 premières broches attaché à l'arrière de la vitre se détachent de leurs loge...
- 9 ATTENTION
- 9 ATTENTION
- Démontage de la porte du four
- 9 AVERTISSEMENT
- 1. Ouvrez complètement la porte du four.
- 2. Verrouillez les charnières gauche et droite à l'aide de la goupille de verrouillage. Les goupilles de verrouillage doivent être complètement insérées dans les trous des charnières.
- 3. Fermez la porte du four jusqu'à ce qu'elle s'enclenche sur les leviers d'arrêt des charnières tout en verrouillant ces dernières selon l'angle correct pour le retrait de la porte. La porte peut être retirée lorsqu'elle est soulevée d'enviro...
- 9 ATTENTION
- Risque de pincement
- 4. La porte est lourde. Saisissez les côtés de la porte fermement et des deux mains. Ne saisissez pas la porte par la poignée. En maintenant l'angle de la porte au même niveau, soulevez cette dernière d'environ 3/ 4 po (19 mm) vers le haut pou...
- 5. Placez la porte dans un endroit pratique et stable pour le nettoyage.
- 6. Replacez la porte dans l'ordre inverse dans lequel elle a été retirée.
- Risque de pincement
- Remplacement d'un éclairage de four
- 9 ATTENTION
- 1. Laissez refroidir le compartiment de cuisson.
- 2. Ouvrez la porte de l’appareil électroménager.
- 3. Placez un linge dans la cavité du four pour éviter de l'endommager.
- 4. Retirez les grilles et les guides de crémaillère.
- 5. Retirez le couvercle en verre. Pour ce faire, ouvrez manuellement le couvercle en verre situé à l'avant. Si vous avez de la difficulté à enlever le couvercle en verre, utilisez une cuillère pour vous aider.
- 6. Retirez l'ampoule du four.
- 7. Remplacez l'ampoule du four par une ampoule du même type.
- 8. Replacez le couvercle en verre de l'ampoule du four.
- 9. Remplacez les guides de crémaillère et les grilles.
- 10. Retirez le linge.
- 11. Ré-enclenchez le disjoncteur.
- 12. Vérifiez que l'éclairage du four fonctionne à nouveau.
- Tableaux de cuisson
- Service après-vente
- ÉNONCÉ DE LA GARANTIE LIMITÉE
- LIRE ET CONSERVER CES INSTRUCTIONS

27
Cleaning and Maintenance-Oven
To avoid electrical shock hazard, before servicing the
appliance, switch power off at the service panel and lock
the panel to prevent the power from being switched on
accidentally.
Cleaning the Oven
Avoid These Cleaners
Do not use commercial oven cleaners such as Easy
Off®. They may damage the oven finish or parts.
Chlorine or chlorine compounds in some cleansers are
corrosive to stainless steel. Check ingredients on label.
Never use scouring pads or abrasive cleaners.
Oven cleaning guide
Part Recommendations
Flat rack Clean with soapy water. Rinse
thoroughly and dry, or gently rub
with cleansing powder or soap-
filled pads as directed.
Telescopic rail Clean with soapy water. Rinse
thoroughly and dry, or gently rub
with cleansing powder or soap-
filled pads as directed. Avoid get-
ting cleansing powder in the tele-
scopic slides. Re-lubrication may
become necessary. Use only
high-temperature food-grade
lubricants to re-lubricate slides.
Fiberglass gasket Do not clean the door gasket –
The door gasket is essential for a
good seal. Care should be taken
not to rub, damage or move the
gasket.
Glass Clean with soapy water or glass
cleaner. Apply Fantastik® or For-
mula 409® to a clean sponge or
paper towel and wipe clean.
Avoid using powder cleaning
agents, steel wool pads and
oven cleaners.
Painted surfaces Clean with soapy water or apply
Fantastik® or Formula 409® to a
clean sponge or paper towel and
wipe clean. Avoid using powder
cleaning agents, steel wool pads
and oven cleaners.
Porcelain surfaces Immediately wipe up acid spills
like fruit juice, milk and tomatoes
with a dry cloth when surface is
cool enough to touch. Do not use
a moistened sponge/cloth on hot
porcelain. When cool, clean with
soapy water or apply Bon-Ami®
or Soft Scrub® to a damp
sponge. Rinse and dry. For stub-
born stains, use soap-filled pads.
It is normal for porcelain to show
fine lines with age due to expo-
sure to heat and food soil.
Stainless steel sur-
faces
(HGS8.55UC,
HDS8.55.)
Never allow food stains or salt to
remain on stainless steel for any
length of time. Always wipe or
rub in the direction of the grain.
Clean with a soapy sponge, then
rinse and dry, or wipe with Fan-
tastik® or Formula 409®
sprayed onto a paper towel. Pro-
tect and polish with Stainless
Steel Magic® and a soft cloth.
Remove water spots with a cloth
dampened with white vinegar.
Use Bar Keeper´s Friend® to
remove heat discoloration. Chlo-
rine or chlorine compounds in
some cleansers are corrosive to
stainless steel. Check the ingre-
dients on the label.
Black stainless sur-
faces
(HGS8.45UC,
HDS8.45.)
For black stainless steel and anti-
fingerprint surfaces, use a soft,
dry towel. For stubborn dirt, use
warm water diluted with a non-
abrasive, mild cleansing soap.
Never use stainless steel polish.
Plastic & controls When cool, clean with soapy
water, rinse and dry.
Probe
(HDS8..5.)
Wipe with soapy water. Do not
submerge. Do not wash in the
dishwasher.
Printed areas (words
& numbers)
Do not use abrasive cleaners or
petroleum based solvents.
Part Recommendations