
Installation Guide


(QJOLVK
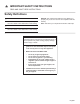
Preparation
Before You Begin
Tools and Parts Needed
'XDO)XHOPRGHOVRQO\RU$PSSRZHUVXSSO\
FRUGNLWZLWKVWUDLQUHOLHIGHSHQGLQJRQORFDOFRGH
Note:1RWQHFHVVDU\IRU&DQDGLDQLQVWDOODWLRQVFRUGLV
SUHLQVWDOOHGDWIDFWRU\
0HDVXULQJ7DSH
3KLOOLSV+HDG6FUHZGULYHU
ó:UHQFK
3HQFLO
77RU[6FUHZGULYHU
6FUHZVDQG$QFKRUVIRU$QWL7LS%UDFNHW6W\OH
ZLOOYDU\GHSHQGLQJRQPRXQWLQJVXUIDFH
/HYHO
'ULOODQG'ULOO%LWPDVRQU\ELWIRUFRQFUHWH
VFUHZV
6RDS\:DWHU
6DIHW\*ORYHVDQG*RJJOHV
&ORWKRU&DUGERDUG2SWLRQDOWR3URWHFW)ORRU
3LSH:UHQFK
*DVDSSURYHG7HIORQ7DSH
&KDQQHO/RFN3OLHUV
*DV/HDN7HVW6ROXWLRQ
*DV6XSSO\/LQHò´1370LQLPXP
*DV6KXWRII9DOYH
Parts Included
$QWL7LS%UDFNHW
ZRRGVFUHZV
DQFKRUOHVVFRQFUHWHVFUHZV
7HUPLQDO/XJV)RU8VH:LWK+DUG:LUH,QVWDOODWLRQV
Note:7HUPLQDOOXJVQRWQHFHVVDU\IRU&DQDGLDQ
LQVWDOODWLRQV
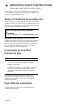
Additional Parts Needed for Hard-Wired
Installations
'XDO)XHOPRGHOVRQO\
)OH[LEOHFRQGXLW
7RUTXHZUHQFK
Note: 3RZHUVXSSO\FRUGNLWLVQRWQHFHVVDU\IRUKDUGZLUHG
LQVWDOODWLRQV
Remove Packaging
1.
Cut the straps.
2.
Open top of carton and remove top wood frame.
3.
Lift the carton up and over the appliance to remove, or
carefully cut along the cut line on the back left side of
the carton with a blade shorter than 3/4” and remove
carton.
4.
Carefully remove internal protective packaging taking
care to secure any loose accessories and instruction
manuals.
5.
Remove bracket(s) securing appliance to base pad, if
present.
6.
The unit should stay on the packaging base until ready
to be lifted into cabinet cutout.
7.
Install the appliance according to the installation
instructions.
Packaging Bracket Removal-Left and
Right Sides
Note: Actual bracket varies in appearance. The bracket
remains in the packaging base. The unit should stay on
the packaging
base until ready to be lifted into cabinet
cutout or onto the lower oven.
Preparing Oven
Place oven in front of the cabinet where it is to be
installed so that it is in line with the cabinet cutout.
Check to be sure all packing materials have been
removed from the unit. Also remove the accessories,
oven racks, literature pack and any shipping materials
from inside the oven cavity.
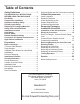
Installation Checklist
3OHDVHUHIHUWR
WKHSDJHVIROORZLQJIRUFRPSOHWHLQVWDOODWLRQ
LQVWUXFWLRQV8VHWKLVFKHFNOLVWWRYHULI\WKDW\RXKDYH
FRPSOHWHGHDFKVWHSRIWKHLQVWDOODWLRQSURFHVV7KLVFDQ
KHOS\RXDYRLGPLVWDNHV
BBB %HIRUHLQVWDOOLQJWKHUDQJHEHVXUHWRYHULI\WKH
FDELQHWGLPHQVLRQVDUHFRUUHFWIRU\RXUXQLWDQG
WKDWWKHUHTXLUHGHOHFWULFDODQGJDVFRQQHFWLRQVDUH
SUHVHQW.