
Use and Care Manual


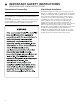

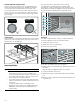
Table Of Contents
- Free-standing range
- Table of Contents Use and care manual
- 9 Safety DefinitionsSafety Definitions
- IMPORTANT SAFETY INSTRUCTIONS
- READ AND SAVE THESE INSTRUCTIONS
- Gas Appliance Safety
- WARNING
- WARNING
- TIP OVER HAZARD
- Fire Safety
- WARNING
- to reduce the risk of a grease fire:
- a. Never leave surface units unattended at high settings. Boilovers cause smoking and greasy spillovers that may ignite. Heat oils slowly on low or medium settings.
- b. Always turn hood ON when cooking at high heat or when flambéing food (i.e. Crepes Suzette, Cherries Jubilee, Peppercorn Beef Flambé).
- c. Clean ventilating fans frequently. Grease should not be allowed to accumulate on fan or filter.
- d. Use proper pan size. Always use cookware appropriate for the size of the surface element.
- WARNING
- TO REDUCE THE RISK OF INJURY TO PERSONS IN THE EVENT OF A GREASE FIRE, OBSERVE THE FOLLOWING:
- a. SMOTHER FLAMES with a close-fitting lid, cookie sheet, or metal tray, then turn off the burner. BE CAREFUL TO PREVENT BURNS. If the flames do not go out immediately, EVACUATE AND CALL THE FIRE DEPARTMENT.
- b. NEVER PICK UP A FLAMING PAN – You may be burned.
- c. DO NOT USE WATER, including wet dishcloths or towels – a violent steam explosion will result.
- d. Use an extinguisher ONLY if:
- Gas Safety
- Burn Prevention
- Child Safety
- Cleaning Safety
- Cookware Safety
- Proper Installation and Maintenance
- Proposition 65 Warning:
- Conversion to Propane Gas
- High Altitude Installation
- Getting Started
- ▯ Burner flames are too high.
- To insert Telescopic Rail into Oven:
- Control Knobs
- Normal Operation - Electronic Ignition
- Griddle
- Typical flame characteristics
- Cooking suggestions for best results
- Setting the time
- Prepping the oven
- Initial start up
- Note:
- 1. Operate the cooktop burners to ensure they all light and air is out the gas system. Follow instructions ~ Page 12
- 2. Turn off the cooktop burners.
- 3. Operate the oven by firmly pushing in the oven temperature control knob and holding for two seconds.
- 4. Turn the knob counter-clockwise to bake 500°F and release.
- 5. After about one hour, turn the oven temperature control clockwise to off.
- 6. Push in and turn the oven temperature control knob clockwise to Broil and release
- 7. After about 10 minutes, turn the knob clockwise to off.
- 8. Once oven has cooled wipe out with hot soapy water and replace rack guides.
- Note:
- Cleaning the accessories
- Fitting the telescopic rack set
- Oven control panel
- Control knobs
- Time-setting Options
- Oven Features
- Aluminum Foil
- Preheating the oven
- Baking Pans and Dishes
- Opening the oven door
- High Altitude Baking
- Condensation
- Broil
- Avoid These Cleaners
- Oven cleaning guide
- Cleaning Self-cleaning Surfaces
- 9 CAUTION
- 1. Use a microfiber cloth with soapy water to clean the upper and lower part of the self-cleaning surfaces.
- Maintenance
- Cleaning Self-cleaning Surfaces
- How to Remove the Rack Guides and Self-cleaning Surfaces
- How to Remove the Oven Door Glass
- 9 WARNING
- 9 CAUTION
- 1. Open the oven door fully.
- 2. Lock the two hinges on the left and right using the locking pin.The locking pins must be fully inserted into the holes in the hinges.
- 3. Remove the internal glass pane by pulling the rear part gently upwards, following the movement indicated by the arrows (1). This way, the first 2 pins attached to the rear of the glass detach from their housings in the oven door. Then, push the gl...
- 9 CAUTION
- 9 CAUTION
- How to Remove the Oven Door
- 9 WARNING
- 1. Open the oven door to its fully open position.
- 2. Lock the two hinges on the left and right using the locking pin. The locking pins must be fully inserted into the holes in the hinges.
- 3. Close the oven door until it catches on the hinge stop levers, locking the hinges at the correct angle for door removal. The door can be removed when it is pulled up from the open position by about 8 inches (203 mm). This takes the tension off the...
- 9 CAUTION
- Risk of pinching
- 4. The door is heavy. Use both hands to firmly grip it by the sides. Do not grip the door by the handle. Keeping the angle of the door the same, lift the door straight up approximately 3/4" (19 mm) to unhook the hinges from the slots, and then pull i...
- 5. Place the door in a convenient and stable location for cleaning.
- 6. Refit the door in the reverse order in which it was removed.
- Risk of pinching
- Replacing an Cven Light
- 9 CAUTION
- 1. Allow the cooking compartment to cool down.
- 2. Open the appliance door.
- 3. Place a cloth in the oven cavity to prevent damage.
- 4. Remove the racks and rack guides.
- 5. Remove the glass cover. To do this, open the glass cover at the front with your hand. Should you experience difficulties removing the glass cover, use a spoon to help.
- 6. Remove the oven light bulb.
- 7. Replace the oven light bulb with a bulb of the same type.
- 8. Replace the glass cover for the oven light bulb.
- 9. Replace rack guides and racks.
- 10. Remove the cloth.
- 11. Switch the circuit breaker back on.
- 12. Check that the oven lighting is working again.
- Cooking Charts
- Customer Service
- STATEMENT OF LIMITED PRODUCT WARRANTY
- ▯ For your normal, household (non-commercial) use, and has in fact at all times only been used for normal household purposes.
- ▯ Use of the Product in anything other than its normal, customary and intended manner (including without limitation, any form of commercial use, use or storage of an indoor product outdoors, use of the Product in conjunction with air or water-going...
- READ AND SAVE THESE INSTRUCTIONS
- Table des Matières Notice d’utilisation
- 9 Définitions de sécuritéDéfinitions de sécurité
- CONSIGNES DE SÉCURITÉ IMPORTANTES
- LIRE ET CONSERVER CES INSTRUCTIONS
- Sécurité en matière de gaz
- AVERTISSEMENT
- AVERTISSEMENT
- INFORMATION SUR LE DANGER
- Sécurité-incendie
- AVERTISSEMENT
- POUR RÉDUIRE LES RISQUES DE FEUX DE GRAISSE :
- a. Ne jamais faire fonctionner les unités de surface à des températures élevées sans surveillance. Des débordements causant de la fumée et des déversements graisseux peuvent prendre feu. Chauffer l'huile lentement à réglage faible ou moyen.
- b. Toujours mettre la hotte EN MARCHE pendant la cuisson à température élevée et au moment de flamber des aliments (p.ex., crêpes Suzette, cerises jubilées, steak au poivre flambé).
- c. Souvent nettoyer les ventilateurs d'aération. Il ne faut pas que la graisse s'accumule sur le ventilateur ou sur le filtre.
- d. Utiliser des casseroles de taille adéquate. Utiliser toujours des casseroles dont les dimensions conviennent à la taille de l'élément.
- AVERTISSEMENT
- POUR RÉDUIRE LE RISQUE DE LÉSIONS CORPORELLES DANS L'ÉVENTUALITÉ D'UN FEU DE GRAISSE, OBSERVER LES CONSIGNES SUIVANTES :
- a. ÉTOUFFER LES FLAMMES à l'aide d'un couvercle bien hermétique, d'une tôle à biscuits ou d'un plateau en métal, puis éteindre l'appareil. FAIRE ATTENTION À NE PAS SE BRÛLER. Si les flammes ne s'éteignent pas immédiatement, ÉVACUER LES LI...
- b. NE JAMAIS SAISIR UN RÉCIPIENT QUI BRÛLE. Vous pourriez vous brûler.
- c. NE PAS UTILISER D'EAU, y compris les chiffons ou serviettes mouillées. Une violente explosion de vapeur risque de se produire.
- d. Utiliser un extincteur uniquement si :
- Sécurité en matière de gaz
- Prévention des brûlures
- Sécurité des enfants
- Consignes en matière de nettoyage
- Sécurité pour la batterie de cuisine
- Installation et entretien corrects
- Avertissement issu de la proposition 65 :
- Conversion gaz au propane
- Installation à altitude élevée
- Mise en route
- ▯ La flamme du brûleur est trop élevée.
- Pour insérer le rail télescopique dans le four:
- Boutons de commande
- Fonctionnement normal - Allumage électronique
- Plaque
- Caractéristiques typiques de la flamme
- Suggestions de cuisson pour optimiser les résultats
- ▯ Faites bouillir l’eau dans une casserole avec un couvercle à température élevée en utilisant le plus grand brûleur pour optimiser les résultats. Si l’eau bouillante déborde, abaissez la température.
- ▯ Les casseroles à fond d’aluminium ou de cuivre conduisent la chaleur de façon uniforme.
- ▯ Il peut y avoir une légère odeur pendant les premières utilisations. C'est normal et cela va disparaître.
- Fixer le temps
- Préparation du four
- Configuration initiale
- Remarque :
- 1. Faire fonctionner les brûleurs de la table de cuisson pour garantir que toute la lumière et l'air sont évacués du système de gaz. Suivez les instructions ~ Page 43
- 2. Éteignez les brûleurs de la table de cuisson.
- 3. Faites fonctionner le four en appuyant fermement sur le bouton de commande de la température du four et en tenant pendant deux secondes.
- 4. Tournez le bouton dans le sens antihoraire pour cuire à 500 F et relâcher.
- 5. Après environ une heure, tournez la commande de température du four dans le sens des aiguilles d'une montre sur éteint.
- 6. Poussez et tournez le bouton de contrôle de la température du four dans le sens des aiguilles d'une montre pour griller et libérer
- 7. Après environ 10 minutes, tournez le bouton dans le sens des aiguilles d'une montre pour l'éteindre.
- 8. Une fois le four refroidi, essuyez-le avec de l'eau chaude savonneuse et replacez les guides de crémaillère.
- Remarque :
- Nettoyer les accessoires
- Montage du jeu de tablettes télescopiques
- Panneau de commande du four
- Boutons de commande
- Options de réglage du temps
- Caractéristiques du four
- Papier d'aluminium
- Préchauffez le four
- Casseroles et plats allant au four
- Ouverture de la porte du four
- Cuisson à haute altitude
- Condensation
- Gril
- Éviter ces produits de nettoyage
- Guide de nettoyage de four
- Nettoyage des surfaces autonettoyantes
- 9 ATTENTION
- 1. Utilisez un tissu microfibre avec de l'eau savonneuse pour nettoyer les parties supérieures et inférieures des surfaces autonettoyantes.
- 2. Réglez le brûleur de four sur la température la plus élevée.
- 3. Appuyez sur w pour activer la recirculation de l'air.
- 4. Éteignez l'appareil au bout d'une heure.
- 5. Si les surfaces latérales autonettoyantes sont particulièrement sales, retirez-les du compartiment de cuisson.
- Remarque :
- 6. Lavez les surfaces autonettoyantes à l'eau chaude savonneuse.
- 7. Rincez et séchez les surfaces autonettoyantes.
- 8. Insérez le système autonettoyant dans le compartiment de cuisson.
- 9. Réglez le brûleur de four sur 350°F (177°C).
- 10. Appuyez sur w pour activer la recirculation de l'air.
- 11. Éteignez l'appareil au bout d'une heure.
- Entretien
- Nettoyage des surfaces autonettoyantes
- Comment retirer les guides de crémaillère et les surfaces autonettoyantes
- Comment retirer la vitre de la porte du four
- 9 AVERTISSEMENT
- 9 ATTENTION
- 1. Ouvrez complètement la porte du four.
- 2. Verrouillez les deux charnières à gauche et à droite à l'aide de la goupille de verrouillage. Les goupilles de verrouillage doivent être complètement insérées dans les trous des charnières.
- 3. Enlevez la vitre intérieure en tirant doucement la partie arrière vers le haut, tout en suivant le mouvement indiqué par les flèches (1). De cette façon, les 2 premières broches attaché à l'arrière de la vitre se détachent de leurs loge...
- 9 ATTENTION
- 9 ATTENTION
- Démontage de la porte du four
- 9 AVERTISSEMENT
- 1. Ouvrez complètement la porte du four.
- 2. Verrouillez les charnières gauche et droite à l'aide de la goupille de verrouillage. Les goupilles de verrouillage doivent être complètement insérées dans les trous des charnières.
- 3. Fermez la porte du four jusqu'à ce qu'elle s'enclenche sur les leviers d'arrêt des charnières tout en verrouillant ces dernières selon l'angle correct pour le retrait de la porte. La porte peut être retirée lorsqu'elle est soulevée d'enviro...
- 9 ATTENTION
- Risque de pincement
- 4. La porte est lourde. Saisissez les côtés de la porte fermement et des deux mains. Ne saisissez pas la porte par la poignée. En maintenant l'angle de la porte au même niveau, soulevez cette dernière d'environ 3/ 4 po (19 mm) vers le haut pou...
- 5. Placez la porte dans un endroit pratique et stable pour le nettoyage.
- 6. Replacez la porte dans l'ordre inverse dans lequel elle a été retirée.
- Risque de pincement
- Remplacement d'un éclairage de four
- 9 ATTENTION
- 1. Laissez refroidir le compartiment de cuisson.
- 2. Ouvrez la porte de l’appareil électroménager.
- 3. Placez un linge dans la cavité du four pour éviter de l'endommager.
- 4. Retirez les grilles et les guides de crémaillère.
- 5. Retirez le couvercle en verre. Pour ce faire, ouvrez manuellement le couvercle en verre situé à l'avant. Si vous avez de la difficulté à enlever le couvercle en verre, utilisez une cuillère pour vous aider.
- 6. Retirez l'ampoule du four.
- 7. Remplacez l'ampoule du four par une ampoule du même type.
- 8. Replacez le couvercle en verre de l'ampoule du four.
- 9. Remplacez les guides de crémaillère et les grilles.
- 10. Retirez le linge.
- 11. Ré-enclenchez le disjoncteur.
- 12. Vérifiez que l'éclairage du four fonctionne à nouveau.
- Tableaux de cuisson
- Service après-vente
- ÉNONCÉ DE LA GARANTIE LIMITÉE
- ▯ Pour une utilisation normale, résidentielle (non commerciale), et qu’en fait, en tout temps, a été utilisé pour un usage domestique normal.
- ▯ Utilisation du produit autre qu’un usage normal, habituel et de la façon destinée (incluant, sans s'y limiter, toute forme d’utilisation commerciale, d’utilisation ou de rangement d’un produit pour l’intérieur à l’extérieur, d'ut...
- LIRE ET CONSERVER CES INSTRUCTIONS

5
9 IMPORTANT SAFETY INSTRUCTIONS
READ AND SAVE THESE INSTRUCTIONS
IMPORTANT: SAVE THESE INSTRUCTIONS FOR THE
LOCAL ELECTRICAL INSPECTOR’S USE.
INSTALLER: LEAVE THESE INSTRUCTIONS WITH THE
UNIT FOR THE OWNER.
OWNER: PLEASE RETAIN THESE INSTRUCTIONS FOR
FUTURE REFERENCE.
WARNING
When properly cared for, your new appliance has been
designed to be safe and reliable. Read all instructions
carefully before use. These precautions will reduce the
risk of burns, electric shock, fire and injury to persons.
When using kitchen appliances, basic safety precautions
must be followed including those in the following pages.
WARNING
TIP OVER HAZARD
Fire Safety
Save these instructions.
Set the burner control so that the flame does not extend
beyond the bottom of the pan.
Do not allow aluminum foil, plastic, paper or cloth to
come in contact with a hot surface element, burner or
grate. Do not allow pans to boil dry.
If the cooktop is near a window, forced air vent or fan, be
certain that flammable materials such as window
coverings do not blow over or near the burners or
elements. They could catch on fire.
Always have a working smoke detector near the kitchen.
Never leave the cooktop unattended when in use.
Boilovers cause smoking and greasy spillovers may
ignite.
WARNING
TO REDUCE THE RISK OF A GREASE FIRE:
a.
Never leave surface units unattended at high settings.
Boilovers cause smoking and greasy spillovers that
may ignite. Heat oils slowly on low or medium settings.
b.
Always turn hood ON when cooking at high heat or
when flambéing food (i.e. Crepes Suzette, Cherries
Jubilee, Peppercorn Beef Flambé).
c.
Clean ventilating fans frequently. Grease should not be
allowed to accumulate on fan or filter.
d.
Use proper pan size. Always use cookware
appropriate for the size of the surface element.
In the event that personal clothing or hair catches fire,
drop and roll immediately to extinguish flames.
Smother flames from food fires other than grease fires
with baking soda. Never use water on cooking fires.
Take care that drafts like those from fans or forced air
vents do not push the flames so that they extend beyond
the edges of the pan.
Have an appropriate fire extinguisher available, nearby,
highly visible and easily accessible near the appliance.
WARNING
TO REDUCE THE RISK OF INJURY TO PERSONS IN
THE EVENT OF A GREASE FIRE, OBSERVE THE
FOLLOWING:
a.
SMOTHER FLAMES with a close-fitting lid, cookie
sheet, or metal tray, then turn off the burner. BE
CAREFUL TO PREVENT BURNS. If the flames do not
go out immediately, EVACUATE AND CALL THE FIRE
DEPARTMENT.
b.
NEVER PICK UP A FLAMING PAN – You may be
burned.
c.
DO NOT USE WATER, including wet dishcloths or
towels – a violent steam explosion will result.
d.
Use an extinguisher ONLY if:
- You know you have a Class ABC extinguisher, and
you already know how to operate it.
- The fire is small and contained in the area where it
started.
- The fire department is being called.
- You can fight the fire with your back to an exit.
Whenever possible, do not operate the ventilation system
during a cooktop fire. However, do not reach through fire
to turn it off.
A child or adult can tip the
range over and be killed.
Install the anti-tip device
to the structure and/or the
range. Verify the anti-tip
device has been properly
installed and engaged.
Engage the range to the
anti-tip device. Ensure the
anti-tip device is re-
engaged when the range
is moved.
Re-engage the anti-tip device if the range is moved.
Do not operate the range without the anti-tip device
in place and engaged.
See installation instructions for details.
Failure to follow the instructions in this manual can
result in death or serious burns to children and
adults.
Check for proper installation and use of the anti-tip
bracket. Carefully tip the range forward pulling from
the back to ensure that the anti-tip bracket engages
the range leg and prevents tip-over. The range
should not move more than 1” (2.5cm).