
Use and Care Manual


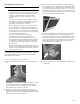
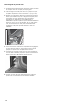

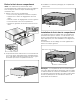
Table Of Contents
- Induction Ranges
- Table of ContentsUse and care manual
- Safety Definitions
- IMPORTANT SAFETY INSTRUCTIONS
- READ AND SAVE THESE INSTRUCTIONS
- WARNING
- Proper Installation and Maintenance
- Fire Safety
- WARNING
- WARNING
- WARNING
- TO REDUCE THE RISK OF INJURY TO PERSONS IN THE EVENT OF A GREASE FIRE, OBSERVE THE FOLLOWING:
- a. SMOTHER FLAMES with a close-fitting lid, cookie sheet, or metal tray, then turn off the burner. BE CAREFUL TO PREVENT BURNS. If the flames do not go out immediately, EVACUATE AND CALL THE FIRE DEPARTMENT.
- b. NEVER PICK UP A FLAMING PAN – You may be burned.
- c. DO NOT USE WATER, including wet dishcloths or towels – a violent steam explosion will result.
- d. Use an extinguisher ONLY if:
- Burn Prevention
- Electromagnetic Interference
- Child Safety
- Cleaning Safety
- Cookware Safety
- State of California Proposition 65 Warnings
- Food Safety
- Causes of Damage
- Protecting the Environment
- Getting Started
- 2. Insert rack (see picture).
- 4. Bring rack to a horizontal position and push the rest of the way in.
- 2. Tilt the front of the rack up about 3/4” (A) and finish pushing the rack all the way back (B).
- 6. Slide the movable part of the telescopic rack in and out a few times to make sure it is able to move freely and that the non-moving part of the telescopic rack is securely anchored.
- 2. Lift the rear of the telescopic rack assembly so it clears the rack position guide and gently pull the rack from the oven.
- 2. Within the following 10 seconds, set the desired power level using the number keys.
- 3. Whithin 10 seconds enter the desired cook time using the number keys.
- 2. Set the desired time using the number keys.
- 3. Select the desired frying level using the number keys. The s symbol lights up on the display. The selected frying level is displayed.
- 2. Within10 seconds, touch the Timer key for about 4 seconds.
- 3. Touching the Timer key again takes you to the basic settings.
- 5. Select the desired setting using the number keys.
- Precautions for Long Life and Good Appearance of the Surface
- 9 WARNING
- 1. Clean the surface when it is completely cool with glass ceramic cooktop cleaner.
- Cleaning guidelines
- Cleaning charts
- Maintenance
- Operation-Oven
- 2. To access the clock set mode:
- 4. When the desired time is entered, set the time by pressing Enter.
- 3. To change the temperature, enter the new temperature using the numeric buttons. For example, changing temperature to 375°. Press Enter to set the updated temperature.
- 4. Preheating starts.
- 2. Select a cooking mode that is compatible with the temperature entered. If no cooking mode is selected within 5 seconds of setting the temperature, an error tone sounds and a “SELECT MODE” message is displayed and blinks.
- 3. Press a Mode Selection button to select a cooking mode.
- 2. Press Enter.
- 2. Select mode, press Enter.
- 3. When the timer reaches :00 the cooking mode ends and the message “OVEN TIMER FINISHED” is displayed. The oven alarm tone sounds every 10 seconds for 2 minutes.
- 4. The Set Probe Temp screen is displayed. A three digit input prompt “- - -” blinks in the lower right corner. Use the numeric keypad to enter the desire probe temperature and press Enter.
- 5. The probe current temperature and target temperature are both displayed in the format “105/180” at the lower right corner of the display. The actual temperature will display <80 until the food temperature reaches 80°F.
- 6. When the probe temperature reaches the set temperature, the cooking mode turns off. The current time is displayed and the message “COOKING COMPLETE” blinks at the bottom left of the display. An alarm tone sounds every 10 seconds for 2 minutes.
- Notes
- Sabbath Mode
- 1. Begin a Bake operation. While Bake is running, press and hold the Oven Timer button for 5 seconds.
- 2. Press Enter to accept the default 74:00 hours and start Sabbath Mode or use the numeric keypad to enter the desired Sabbath Mode timer value. Timer values between 0:01 and 74:00 can be entered.
- 3. Once Sabbath Mode has begun, the display changes to show the message “SABBATH ON”.
- 4. After the Sabbath Mode countdown reaches zero, the oven displays the current time and the message “SABBATH”. No changes can be made at this point. To end the Sabbath Mode and return to normal function, press the Oven Clear/Off button.
- Notes
- 1. Press the Bake button.
- 1. To enable Panel Lock, press and hold the Panel Lock button for 3 seconds (in Standby mode).
- 1. Press the Settings button.
- 4. To change the value for the displayed setting, press the Enter button to enter the edit mode. Use the numeric keypad to change the setting value. The corresponding setting value is shown in the table following.
- Tips
- Tips
- Tips
- Tips
- Tips
- Tips
- Tips
- Tips
- Proof $
- Warm %
- Cleaning and Maintenance-Oven
- 3. Press the Self Clean button below the display.
- 4. When the desired Self Clean time is displayed, press Enter on the numeric keypad.
- 5. Self Clean starts and the oven Self Clean timer begins its countdown.
- 6. When the cool down is complete, the message “SELF CLEAN FINISHED” is displayed. Continue to use caution when opening the oven door.
- 2. Flip levers on hinges toward you.
- 4. Close the oven door until it catches on the hinge stop levers, locking the hinges at the proper angle for door removal. The door will be open about 7 inches at the top. This takes the spring tension off the hinges so the door can be easily lifted out
- 5. The door is heavy. Use both hands to firmly grip it by the sides. Do not grip the door by the handle. Maintaining the door angle, lift the door straight up approximately 3/4” to unhook the hinges from the slots and then pull it out towards you u...
- 3. Slide the hinges into the slots as far as they will go and then lower the door straight down. The angle of the door may need to be adjusted slightly to allow the hinges to engage properly and the door to lower into place. The door should lower abo...
- 5. Push the levers on both the hinges up and forward until they are locked into the slot and flush with the front of the oven body.
- 6. Close and open the door slowly to be sure it is correctly and securely in place.
- Operation-Warming Drawer
- About the Warming Drawer
- Warming Drawer Specifications
- Operation
- 9 CAUTION
- Preheating
- Turning the Warming Drawer On and Off
- 1. Press the Warming Drawer button.
- 2. WARMING DRAWER will be displayed with the default setting “MED”. The warming drawer amber icon is displayed below the clock.
- 3. To accept the “MED” setting, press the Enter button. The setting is accepted and the warming drawer icon remains illuminated. If enter is not pressed, the warming drawer setting is not accepted and the warming drawer turns off.
- 4. To change the setting, when “MED” is displayed, press the Warming Drawer button again. The setting changes to “HIGH”. Press the Warming Drawer button again to change the setting to “LOW”.
- 5. To turn the warming drawer off, press the Warming Drawer button and the warming drawer will turn off. The warming drawer icon will no longer appear under the clock.
- Sabbath Mode
- Warming Empty Serving Bowls and Plates
- Getting the Most Out of Your Warming Drawer
- About the Appliance
- General Tips
- Use of Your Appliance
- Preheating
- Warming Empty Serving Bowls and Plates
- Crisping Stale Items
- Temperature Recommendations
- Food/Cookware
- Setting
- Cover Dish
- HIGH
- No
- MED
- No
- LOW
- No
- MED
- No
- MED
- Yes
- MED
- Yes
- MED
- Yes
- MED
- Yes
- MED
- Yes
- HIGH
- No
- MED
- Yes
- MED
- Yes
- HIGH
- Yes
- MED
- Yes
- MED
- No
- HIGH
- No
- MED
- Yes
- HIGH
- Yes
- MED
- Yes
- MED
- Yes
- MED
- Yes
- LOW
- No
- MED
- Yes
- Cleaning and Maintenance-Warming Drawer
- 2. Grasp both sides of the drawer and pulling straight and level, carefully remove the drawer housing. This step may require light to moderate force to completely remove drawer.
- 3. Install or service (clean) housing with drawer removed.
- 2. Position the drawer assembly in front of the housing assembly and align the rail (plastic rail tip) to the slide ball carrier assembly. Keeping the drawer assembly level and square to the housing, gently insert the drawer to the housing assembly.
- Notes
- NOTICES
- 4. Test the operation of the PTO drawer by pushing on the center lower portion of the drawer front (optimum location for function).
- 3. Touch the settings range. A will flash on the cooking zone display.
- READ AND SAVE THESE INSTRUCTIONS
- Table des MatièresNotice d’utilisation
- Définitions de sécurité
- IMPORTANTES CONSIGNES DE SÉCURITÉ
- LIRE ET CONSERVER CES INSTRUCTIONS
- AVERTISSEMENT
- Installation et entretien corrects
- Sécurité-incendie
- AVERTISSEMENT
- AVERTISSEMENT
- AVERTISSEMENT
- POUR RÉDUIRE LE RISQUE DE LÉSIONS CORPORELLES DANS L'ÉVENTUALITÉ D'UN FEU DE GRAISSE, OBSERVER LES CONSIGNES SUIVANTES :
- a. ÉTOUFFER LES FLAMMES à l'aide d'un couvercle bien hermétique, d'une tôle à biscuits ou d'un plateau en métal, puis éteindre l'appareil. FAIRE ATTENTION À NE PAS SE BRÛLER. Si les flammes ne s'éteignent pas immédiatement, ÉVACUER LES LI...
- b. NE JAMAIS SAISIR UN RÉCIPIENT QUI BRÛLE. Vous pourriez vous brûler.
- c. NE PAS UTILISER D'EAU, y compris les chiffons ou serviettes mouillées. Une violente explosion de vapeur risque de se produire.
- d. Utiliser un extincteur uniquement si :
- Prévention des brûlures
- Interférence électromagnétique
- Sécurité des enfants
- Consignes en matière de nettoyage
- Sécurité pour la batterie de cuisine
- Avertissements de la Proposition 65 de l’État de la Californie
- Sécurité alimentaire
- ATTENTION
- a. NE PAS utiliser tiroir chauffant pour faire chauffer des aliments froids. Il est sécuritaire d'utiliser le tiroir pour y faire croustiller des craquelins, des chips ou des céréales sèches et garder des assiettes au chaud.
- b. Veiller à garder la nourriture à la bonne température. L'USDA recommande de maintenir les aliments chauds à 140 °F (60 °C) ou plus.
- c. NE PAS maintenir des aliments au chaud pendant plus d'une heure.
- ATTENTION
- Causes de pannes
- Protection de l'environnement
- Mise en route
- 2. Installer la grille (voir illustration).
- 4. Ramener la grille à l'horizontale et la pousser complètement.
- 2. Incliner la partie avant de la grille d'environ ¾ po (2 cm) (A) et continuer de l'enfoncer toute entière jusqu'au fond du four (B).
- Remarque :
- 3. L'arrière de la grille télescopique se met en place en se calant.
- 4. Tirer la grille vers l'avant pour engager sa partie inférieure sur la partie arrière du guide de positionnement de grille.
- 5. Abaisser la partie avant de la grille pour terminer sa mise en place sur le guide de grille. Lorsque correctement positionnée, la grille doit être stable au toucher.
- Remarque :
- 6. Faire glisser la partie amovible de la grille télescopique plusieurs fois d'avant en arrière pour vérifier qu'elle peut se déplacer librement et que la partie non amovible de la grille télescopique est bien fixée.
- 2. Soulever la partie arrière de la grille télescopique de manière qu'elle se dégage du guide de positionnement de grille et tirer doucement la grille hors du four.
- 2. Dans les 10 secondes qui suivent, réglez le niveau de puissance souhaité avec les touches numérotées.
- 3. Dans les 10 secondes qui suivent, réglez le temps souhaité avec les touches numérotées.
- 2. Réglez le temps souhaité avec les touches numérotées.
- 3. Sélectionner le niveau de friture souhaité à partir des touches numériques. Le symbole s s'allume à l'écran. Le niveau de friture sélectionné est affiché.
- 2. Dans les 10 secondes qui suivent, effleurer la touche Timer (Minuterie) pendant 4 secondes.
- 3. Effleurer la touche Timer (Minuterie) à nouveau pour revenir aux réglages de base.
- 5. Sélectionner le réglage souhaité au moyen des touches numériques.
- Précautions pour une surface durable et de belle apparence
- 9 AVERTISSEMENT
- 1. Nettoyer la surface lorsqu'elle a complètement refroidi à l'aide du produit nettoyant pour table de cuisson en vitrocéramique.
- 2. Essuyer les projections à l'aide d'une éponge humide propre ou d'un papier absorbant. Rincer et sécher. Éliminer les traces pouvant persister avec du vinaigre blanc; rincer.
- 3. Appliquer une petite quantité de produit nettoyant pour table de cuisson en vitrocéramique. Une fois sec, polir la surface avec du papier absorbant ou un chiffon propre.
- 9 AVERTISSEMENT
- Instructions pour le nettoyage
- Tableau de nettoyage
- Entretien
- Fonctionnement –Four
- 2. Pour accéder au mode de réglage de l'horloge :
- 4. Quand l'heure souhaitée est saisie, confirmer l'heure en appuyant sur Enter (Entrée).
- 3. Pour modifier la température, entrer la nouvelle température à l'aide des touches numériques. Par exemple, modifier la température à 375 °F (190 °C). Appuyer sur Enter (Entrée) régler la température modifiée.
- 4. Le préchauffage démarre.
- 2. Sélectionner un mode de cuisson compatible avec la température saisie. Si aucun mode de cuisson n'est sélectionné dans les 5 secondes suivant le réglage de la température, une tonalité retentit et le message « SELECT MODE » (Sélectionner...
- 3. Appuyer sur une touche de sélection de mode pour sélectionner un mode de cuisson.
- 2. Appuyer sur Enter (Entrée).
- 3. Lorsque le compte à rebours de la minuterie de cuisine atteint zéro, une tonalité d'alarme retentit toutes les 10 secondes, et ce, pendant 2 minutes et le message « TIMER END » (Minuterie Fin) s'affiche.
- Remarque :
- 1. Appuyez sur le bouton Kitchen Timer On/Off (Minuterie de cuisine Activée/Désactivée).
- 1. Sélectionner la touche Oven Timer (Minuterie du four).
- 2. Sélectionner le mode, appuyer sur Enter (Entrée).
- 3. Lorsque la minuterie atteint :00, le mode de cuisson prend fin et le message « OVEN TIMER FINISHED » (Minuterie du four – Fin) s'affiche. L'alarme du four retentit toutes les 10 secondes, et ce, pendant 2minutes.
- 1. Si la minuterie du four est en service et que le temps restant doit être modifié, entrer le mode de minuterie du four en appuyant sur Oven Timer (Minuterie du four).
- 2. La température clignote, signalant qu'elle peut être modifiée. Saisir une nouvelle température ou appuyer sur Enter (Entrée) pour ne pas apporter de modification.
- 3. La valeur de minuterie clignote, signalant qu'elle peut être modifiée. Saisir la nouvelle durée et redémarrer la minuterie en appuyant sur Enter.
- Préchauffage rapide
- 1. Appuyer sur Fast Preheat (Préchauffage rapide).
- Fonctions spéciales
- 1. Si la minuterie du four est en service et que le temps restant doit être modifié, entrer le mode de minuterie du four en appuyant sur Oven Timer (Minuterie du four).
- 4. L'écran de réglage de la température de la sonde s,affiche. Une invite à trois chiffres « - - - » clignote dans le coin inférieur droit. Entrer la température de la sonde souhaitée à l’aide des touches numériques et appuyer sur Enter ...
- 5. La température réelle de la sonde et la température ciblée s'affichent toutes deux au format : « 105/180 » (40/80), dans le coin inférieur droit de l'écran. La température réelle affichera <80 jusqu'à ce que la température atteigne 80 ...
- 6. Lorsque la température de la sonde atteint la température définie, le mode de cuisson est désactivé. L'heure en cours s'affiche et le message « COOKING COMPLETE » (Cuisson terminée) s'affiche au coin inférieur gauche de l'écran. Une tona...
- Remarques
- Mode Shabbat
- 1. Commencer une cuisson. Pendant que le mode de cuisson est en cours, appuyer et maintenir enfoncée la touche Oven Timer (Minuterie du four) pendant 5 secondes.
- 2. Appuyer sur Enter (Entrée) pour confirmer les 74:00 heures par défaut et lancer le mode Shabbat ou utiliser le clavier numérique pour saisir la valeur de minuterie du mode Shabbat. Des valeurs de minuterie peuvent être saisies entre 0:01 et 74:00
- 3. Le mode Shabbat lancé, l'écran change pour afficher « SABBATH ON » (Shabbat activé).
- 4. Une fois que le compte à rebours atteint zéro, le four affiche l'heure courante et le message «SABBATH » (Shabbat). À ce stade, aucune modification ne peut être apportée. Pour mettre fin au mode Shabbat et revenir au fonctionnement habituel...
- Remarques
- 1. Appuyer sur la touche Bake (Cuisson).
- 1. Pour le verrouillage du bandeau, appuyer et tenir enfoncée la touche Panel Lock (Verrouillage du bandeau) pendant 3 secondes.
- 1. Appuyer sur la touche Settings (Réglages).
- 2. Le premier élément de réglage s'affiche. L'écran affiche « SET CLOCK » (Réglage de l'horloge). Appuyer de nouveau sur Réglages pour accéder au menu des réglages.
- 3. Pour afficher un élément de réglage différent, appuyer sur le chiffre correspondant à ce réglage (voir le tableau ci-dessous ou appuyer sur Réglages pour faire défiler les options).
- 4. Pour modifier la valeur du réglage affiché, appuyer sur Enter pour accéder au mode d'édition.Modifier la valeur du réglage souhaité à l'aide du clavier numérique. La valeur de réglage correspondante apparaît dans le tableau ci-dessous.
- Température compensée du four
- Remarque :
- Options de menu des réglages
- Tirer le meilleur parti de votre appareil
- Conseils généraux
- Mode
- Plus faible
- Plus élevé
- 100
- 550
- 100
- 550
- 450
- 550
- 150
- 225
- 85
- 125
- 100
- 550
- 100
- 550
- 100
- 550
- 100
- 550
- 450
- 550
- Conseils
- Conseils
- Conseils
- Conseils
- Conseils
- Conseils
- Conseils
- Conseils
- Apprêt $
- Maintien au chaud %
- Nettoyage et entretien – Four
- 3. Appuyer sur la touche Self Clean (Nettoyage Auto) sous l'écran d'affichage.
- 4. Lorsque la durée d'autonettoyage voulue est affichée, appuyer sur Entrée sur le clavier numérique.
- 5. Le processus d'autonettoyage démarre et la minuterie d'autonettoyage du four débute son compte à rebours.
- 6. Lorsque la période de refroidissement est terminée, le message « SELF CLEAN FINISHED » (Nettoyage Auto terminé) s'affiche.Continuer à faire attention en ouvrant la porte du four.
- 7. Appuyer sur Oven Clear/Off (Four Effacer/Désactiver) pour effacer les données affichées à l'écran une fois l'autonettoyage terminé.
- 8. Une fois le four refroidi et la porte déverrouillée, essuyer les cendres à l'intérieur du four à l'aide d'un chiffon humide.
- Remarques
- Éviter ces produits de nettoyage
- Guide de nettoyage du four
- Entretien
- Description de l'ampoule
- Illustration de l'ampoule
- 2. Basculer les leviers de fermeture des charnières vers soi.
- 4. Fermer la porte du four jusqu'à ce qu'elle s'accroche sur les leviers d'arrêt des charnières, verrouillant ainsi les charnières au bon angle pour le démontage de la porte. La porte sera ouverte d'environ 7 po (17,8 cm) sur la partie supérieu...
- 5. La porte est lourde.Saisir la porte fermement à deux mains en la prenant par les côtés. Ne pas saisir la porte par la poignée. Tout en maintenant l'angle de la porte, soulever la porte à la verticale d'environ ¾ po (2 cm) pour dégager les c...
- 3. Glisser les charnières dans leurs logements jusqu'en butée, puis baisser la porte. L'angle de la porte peut nécessiter un léger ajustement pour permettre d'engager les charnières convenablement et d'abaisser la porte en place.La porte devrait...
- 5. Poussez les loquets à levier sur les deux charnières vers le haut et l'avant, jusqu'à ce qu'ils s'enclenchent dans logements, affleurant à l'avant du four.
- 6. Fermer et ouvrir la porte lentement pour s'assurer qu'elle est correctement et solidement installée.
- Fonctionnement - Tiroir chauffant
- À propos du tiroir chauffant
- Spécifications du tiroir chauffant :
- Fonctionnement
- 9 ATTENTION
- Préchauffage
- Allumer ou éteindre le tiroir chauffant
- 1. Appuyer sur la touche Warming Drawer (Tiroir chauffant).
- 2. WARMING DRAWER (Tiroir chauffant) s'affiche avec le réglage par défaut à « MED » (Moyen). L'icône ambrée du tiroir chauffant s'affiche sous l'horloge.
- 3. Pour confirmer le réglage moyen, appuyer sur Enter (Entrée). Le réglage est confirmé et l'icône du tiroir chauffant reste allumée. Si la touche Enter (Entrée) n'est pas appuyée, le réglage du tiroir chauffant n'est pas accepté et le tiro...
- 4. Pour modifier le réglage lorsque « MED » est affiché, appuyer de nouveau sur la touche du tiroir chauffant. Le réglage passe à « HIGH » (Élevé). Pour modifier le réglage à « LOW » (Faible), appuyer de nouveau sur la touche du tiroir ...
- 5. Pour éteindre le tiroir chauffant, appuyer sur la touche du tiroir chauffant et le tiroir chauffant s'éteindra. L'icône du tiroir chauffant ne s,affichera plus sous l'horloge.
- Mode Shabbat
- Maintenir au chaud des bols et des assiettes vides
- Tirer le meilleur parti de votre tiroir chauffant
- À propos de l'appareil
- Conseils généraux
- Utilisation de l'appareil
- Préchauffage
- Maintenir au chaud des bols et des assiettes vides
- Faire croustiller des aliments rassis
- Températures recommandées
- Aliment/Ustensile de cuisson
- Réglage
- Plat couvert
- ÉLEVÉ
- Non
- MOYEN
- Non
- FAIBLE
- Non
- MOYEN
- Non
- MOYEN
- Oui
- MOYEN
- Oui
- MOYEN
- Oui
- MOYEN
- Oui
- MOYEN
- Oui
- ÉLEVÉ
- Non
- MOYEN
- Oui
- MOYEN
- Oui
- ÉLEVÉ
- Oui
- MOYEN
- Oui
- MOYEN
- Non
- ÉLEVÉ
- Non
- MOYEN
- Oui
- ÉLEVÉ
- Oui
- MOYEN
- Oui
- MOYEN
- Oui
- MOYEN
- Oui
- FAIBLE
- Non
- MOYEN
- Oui
- Nettoyage et entretien – Tiroir chauffant
- 2. En prenant les deux côtés du tiroir et en tirant droit et vers vous, retirez soigneusement le compartiment du tiroir. Cette étape pourrait nécessiter une force légère à modérée pour retirer complètement le tiroir.
- 3. Installation ou entretien (nettoyage) du compartiment sans le tiroir.
- 2. Placez l'assemblage du tiroir devant l'assemblage du compartiment et alignez le rail (bout en plastique du rail) avec l'assemblage du porteur à roulement à billes. Tout en gardant l'assemblage du tiroir droit et au niveau par rapport au comparti...
- Remarques
- AVIS
- 4. Vérifiez le fonctionnement du tiroir PPO en poussant sur le centre de la portion inférieure de l'avant du tiroir (l'endroit optimal pour la fonction).
- Remarque :
- Dépannage
- 3. Touchez la zone des réglages. A clignotera à l'écran de la zone de cuisson.
- 4. Vérifiez le fonctionnement du tiroir PPO en poussant sur le centre de la portion inférieure de l'avant du tiroir (l'endroit optimal pour la fonction).
- LIRE ET CONSERVER CES INSTRUCTIONS
- 8001150776_UC_SIR_Electric_.pdf
- How This Manual Is Organized
- Safety
- Proper Installation and Maintenance
- Fire Safety
- Burn Prevention
- Child Safety
- Cleaning Safety
- Cookware Safety
- Food Safety
- Getting Started
- Parts and Accessories
- Radiant Elements
- Single Element
- Double Element (some models)
- The dual element consists of two (a small and a large) radiant element within the same heating area. Either the small element, or both elements may be selected for use.
- Triple Element (some models)
- Power Element (some models)
- Warming Zone
- Retained Heat
- Temperature Limiter
- Hot Surface Indicator
- Convection Fan
- Oven Vent
- Automatic Shutoff
- Self-Cleaning
- Indicators and Other Features
- Standby Mode
- Accessories
- Inserting Racks
- Flat Rack
- To insert the flat rack into the oven:
- 1. Grasp rack firmly on both sides.
- 2. Insert rack (see picture).
- 3. Tilt rack up (A) to allow the upwardly sloped rear of the rack to slide under the stop molded into the front portion of the rack guide above.
- 4. When the back of the rack is past this stop, lower the front of the rack to a horizontal position (B) and push it the rest of the way in.
- To remove the flat rack from the oven:
- Telescopic Rack (some models)
- To insert the telescopic rack into the oven:
- 1. Slide the rack in evenly until the rear of the rack is about 2 inches from the back of the oven.
- 2. Tilt the front of the rack up about 3/4’s of an inch (A) and finish pushing the rack all the way back (B)
- 3. The back of the telescopic rack drops into place.
- 4. Pull the rack forward to engage the bottom of the rack onto the rear of the rack position guide.
- 5. Lower the front of the rack to finish seating it on the rack guide. The rack should feel stable when properly seated.
- 6. Slide the movable part of the telescopic rack in and out a few times to make sure it is able to move freely and that the non-moving part of the telescopic rack is securely anchored.
- To remove the telescopic rack from the oven:
- Accessories
- Before Using the Appliance for the First Time
- Operation - Cooktop
- Setting the Element Heat Level
- Single Element Control Knob
- Double Element Control Knob
- Power Element Control Knob (some models)
- Triple Element Control Knob (some models)
- Warming Zone
- Surface Element On/Hot Indicators
- Cooktops with a triple front element
- Cooktops with a double front element
- Surface Elements Disabled During Self Clean
- Operation - Oven
- Oven Control Panel
- Setting the Clock
- To set the clock
- 1. The oven must be in Standby mode (oven is powered on, but no cooking mode or timer in operation).
- 2. To access the clock set mode:
- 3. Use the numeric keypad to enter the desired time. Each number pressed is entered at the right and moving previously entered digits to the left. To set “12:45 pm”, press 1, 2, 4, 5.
- 4. When the desired time is entered, set the time by pressing Enter.
- To set the clock
- Setting the Cooking Mode and Temperature
- 1. Press the desired Cooking Mode button. The cooking mode and default temperature are displayed. The temperature flashes to show it can be edited.
- 2. Press Enter to start the mode using the default temperature.
- 3. To change the temperature, enter the new temperature using the numeric buttons. 375° is used for this example. Press Enter to set the updated temperature.
- 4. Preheating starts.
- 1. Press the numeric keys to enter the desired temperature setting. The temperature entered is displayed beside the current time.
- 2. Select a cooking mode that is compatible with the temperature entered. If no cooking mode is selected within 5 seconds of setting the temperature, an error tone sounds and a SELECT MODE message is displayed and blinks.
- 3. Press a Mode Selection button to select a cooking mode.
- 1. Press the Cooking Mode button.
- 2. The current temperature flashes. Use the numeric buttons to enter a new temperature. Press Enter.
- Timer
- To set a kitchen timer
- Cancel the kitchen timer - by pressing the Kitchen Timer On/Off button.
- Note
- To edit a kitchen timer
- To set an oven timer
- 1. Press the Oven Timer button.
- 2. Select mode, press Enter.
- 3. When the timer reaches :00 the cooking mode ends and the message “OVEN TIMER FINISHED” is displayed. The oven alarm tone sounds every 10 seconds for 2 minutes.
- 1. If the oven timer is running and the time remaining needs to be changed, enter the oven timer mode by pressing the Oven Timer button.
- 2. The temperature blinks, indicating it can be edited. Input a new temperature or press Enter for no change.
- 3. The timer value blinks, indicating it can be edited. Input the new time and restart the timer by pressing the Enter button.
- Fast Preheat
- Probe (some models)
- 1. Insert the probe into the meat as described above. The probe symbol is displayed.
- 2. Connect the probe to the oven. If the probe is not connected to the oven prior to starting Probe mode, an error tone sounds and the message “INSERT PROBE” is displayed.
- 3. Set the cooking mode and temperature.
- 4. The Set Probe Temp screen is displayed. A three digit input prompt “- - -” blinks in the lower right corner. Use the numeric keypad to enter the desired probe temperature and press Enter.
- 5. The probe current temperature and target temperature are both displayed in the format “105 / 180” at the lower right corner of the display. The actual temperature will display < 80 until the food temperature reaches 80° F.
- 6. When the probe temperature reaches the set temperature, the cooking mode turns off. The current time is displayed and the message “COOKING COMPLETE” blinks at the bottom left of the display. An alarm tone sounds every 10 seconds for 2 minutes.
- Note:
- Sabbath Mode
- 1. Begin a Bake operation. While Bake is running, press and hold the Oven Timer button for five seconds.
- 2. Press Enter to accept the default 74:00 hours and start Sabbath Mode, or use the numeric keypad to enter the desired Sabbath Mode timer value. Timer values between 0:01 and 74:00 can be entered.
- 3. Once Sabbath Mode has begun, the display changes to show the message “SABBATH ON”.
- 4. After the Sabbath Mode countdown reaches zero, the oven displays the current time and the message “SABBATH”. No changes can be made at this point. To end the Sabbath Mode and return to normal function, press the Oven Clear/Off button.
- Note:
- Panel Lock
- Sabbath Mode
- 1. Press the Settings button.
- 2. The first setup item is displayed. The display shows “SET CLOCK”. Press Settings again to access the settings menu.
- 3. To display a different setup item, press the number corresponding to that setting (see table following or press the Settings button to cycle through available options).
- 4. To change the value for the displayed setting press the Enter button to enter the edit mode. Use the numeric keypad to change the setting value. The corresponding setting value is shown in the table following.
- Oven Temperature Offset
- Settings Menu Options
- Operation - Warming Drawer
- About the Warming Drawer
- Operation
- Preheating
- Turning Warming Drawer On and Off
- 1. Press the Warming Drawer button.
- 2. “WARMING DRAWER” will be displayed with the default setting “MED”. The warming drawer amber icon is displayed below the clock.
- 3. To accept the “MED” setting, press Enter. The setting is accepted and the warming drawer icon remains illuminated. If enter is not pressed, the warming drawer setting is not accepted and the warming drawer turns off.
- 4. To change the setting, when “MED” is displayed, press the Warming Drawer button again. The setting changes to “HIGH”. Press the Warming Drawer button again to change the setting to “LOW”. To accept a setting, press Enter. The displayed...
- 5. To turn the warming drawer off, press the Warming Drawer button and the warming drawer will turn off. The warming drawer icon will no longer appear under the clock.
- Warming Empty Serving Bowls and Plates
- Cooktop Cooking Guide
- Cookware Selection Guide
- General Tips
- Care and Cleaning
- Cleaning the Cooktop
- Precautions for Long Life and Good Appearance of the Surface
- Before Use Care
- Daily Cleaning Techniques
- 1. Clean the surface when completely cool with the glass ceramic cooktop cleaner. Exception: Remove dry sugar, sugar syrup, tomato products and milk immediately with the razor blade scraper (See Cooktop Care Chart, next page).
- 2. Wipe off spatters with a clean, damp sponge or paper towel. Rinse and dry. Use white vinegar if smudge remains; rinse.
- 3. Apply a small amount of the glass ceramic cooktop cleaner. When dry, buff surface with a clean paper towel or cloth.
- Using the Razor Blade Scraper
- Cleaning the Control Knobs
- Do Not Use the Following Cleaners
- Cooktop Care Chart
- Cleaning the Oven
- Self Clean
- NOTICE:
- To set the Self Clean mode
- 1. Remove all accessories and racks from the oven.
- 2. If there is a cooking mode on, press Oven Clear/Off to end the running mode.
- 3. Press the Self Clean button below the display.
- 4. When the desired Self Clean time is displayed, press Enter.
- 5. Self Clean starts and the oven Self Clean timer begins its countdown.
- To Cancel Self Clean
- 6. When the cool down is complete, the message “SELF CLEAN FINISHED” is displayed. Continue to use caution when opening the oven door.
- 7. Press Oven Clear/Off to clear the display when Self Clean is finished.
- 8. After the oven has cooled down and the door is unlocked, wipe remaining ash from the oven using a moist cloth.
- Note:
- To set the Self Clean mode
- NOTICE:
- Avoid These Cleaners
- Oven Cleaning Guide
- Cooktop Maintenance
- Glass Ceramic Cooktop Models
- Oven Maintenance
- Replacing an Oven Light
- To change the bulb
- 1. Turn off power to the oven at the main power supply (fuse or breaker box).
- 2. Remove the glass cover by unscrewing it. Turn the glass counterclockwise to remove it.
- 3. Remove the bulb. The bulb unscrews counterclockwise.
- 4. Grasp the new bulb with a clean, dry cloth to prevent depositing skin oils on the glass which could lead to premature bulb failure. Replace the bulb by screwing it in turning the bulb clockwise.
- 5. Screw the glass cover back on.
- 6. Turn power back on at the main power supply (fuse or breaker box).
- To change the bulb
- Removing the Oven Door
- 1. Open the oven door to its fully open, horizontal position.
- 2. Flip levers on hinges toward you.
- Note: It may be necessary to use a tool, such as a screwdriver, to gently pry the upper part of the lever away from the housing. Take care to avoid scratching the housing.
- 3. Bring both door hinge levers to their fullest down position as shown in the illustration. The left and right door hinges may differ slightly but operate in the same manner.
- 4. Close the oven door until it catches on the hinge stop levers, locking the hinges at the proper angle for door removal. The door will be open about 7 inches at the top. This takes the spring tension off the hinges so the door can be easily lifted out
- 5. The door is heavy. Use both hands to firmly grip it by the sides. Do not grip the door by the handle. Maintaining the door angle, lift the door straight up approximately 3/4" to unhook the hinges from the slots and then pull it out towards you unt...
- 6. Place the door in a convenient and stable location for cleaning.
- To replace the oven door
- 1. Holding the door firmly in both hands, grip it on either side, not by the handle.
- 2. Tilt the door back slightly towards you until it opens about 7" at the top.
- 3. Slide the hinges into the slots as far as they will go and then lower the door straight down. The angle of the door may need to be adjusted slightly to allow the hinges to engage properly and the door to lower into place. The door should lower abo...
- 4. Once both hinges are fully engaged as described in Step 3, gently open the door until it is fully open.
- 5. Push the levers on both the hinges up and forward until they are locked into the slot, flush with the front of the oven body.
- 6. Close and open door slowly to be sure it is correctly and securely in place.
- Warming Drawer Maintenance
- Removing the Drawer
- Replacing the Drawer
- 1. Be sure housing slides are pushed inside housing.
- 2. Align the drawer rails with the housing slides attached to the drawer housing.
- 3. Firmly push the drawer straight into the drawer housing until the drawer clicks into place. Note: The drawer has a “push-to-open” operation. Pressing the lower center front of the drawer causes the drawer to self-open.
- 4. Open and close drawer to test operation. Note: if the drawer will not close, verify that the rails on the drawer are properly aligned to housing slides and that the rail release levers are properly positioned.
- Service
- How to Obtain Service or Parts
- Product Data Plate
- Glass Ceramic Cooktop Models
- Cleaning the Cooktop
- Self Help
- Leere Seite
- Leere Seite
- 8001127795_BO_UC_Induction Ranges_Chapter only_A.pdf
- Induction Ranges
- Table of ContentsUse and care manual
- Safety Definitions
- IMPORTANT SAFETY INSTRUCTIONS
- READ AND SAVE THESE INSTRUCTIONS
- WARNING
- Proper Installation and Maintenance
- Fire Safety
- WARNING
- WARNING
- WARNING
- TO REDUCE THE RISK OF INJURY TO PERSONS IN THE EVENT OF A GREASE FIRE, OBSERVE THE FOLLOWING:
- a. SMOTHER FLAMES with a close-fitting lid, cookie sheet, or metal tray, then turn off the burner. BE CAREFUL TO PREVENT BURNS. If the flames do not go out immediately, EVACUATE AND CALL THE FIRE DEPARTMENT.
- b. NEVER PICK UP A FLAMING PAN – You may be burned.
- c. DO NOT USE WATER, including wet dishcloths or towels – a violent steam explosion will result.
- d. Use an extinguisher ONLY if:
- Burn Prevention
- Electromagnetic Interference
- Child Safety
- Cleaning Safety
- Cookware Safety
- State of California Proposition 65 Warnings
- 2. Providing good ventilation during and immediately after self-cleaning the oven.
- 3. Tilt rack up to allow stop into rack guide.
- 3. The back of the telescopic rack drops in to place.
- 4. Pull the rack forward to engage the bottom of the rack onto the rear of the rack position guide.
- 5. Lower the front of the rack to finish seating it on the rack guide. The rack should feel stable when properly seated.
- 6. Slide the movable part of the telescopic rack in and out a few times to make sure it is able to move freely and that the non-moving part of the telescopic rack is securely anchored.
- 9 CAUTION
- 1. Lift the front of the telescopic rack assembly about 1/ 2” and push the rack to the rear about 3/4”. This allows the rack to disengage from the rack position guide.
- Getting familiar with the appliance
- Operation
- 9 WARNING
- Main power switch
- Setting the cooktop
- Settings table
- 9 CAUTION
- FlexInduction® cooking zone
- PowerMove function
- Time-setting options
- 3. Within the next 10 seconds, set the required cooking time using the number keys.
- 2. Select the required time on the control panel and touch the Kitchen Timer key to confirm.
- 2. Touch the Panel Lock key for approx. 4 seconds.
- 4. Touch the Kitchen Timer key repeatedly until the indicator for the required function is displayed.
- 2. Wipe off spatters with a clean, damp sponge or a paper towel. Rinse and dry. Use white vinegar if smudge remains; rinse.
- 3. Use the numeric keypad to enter the desired time. Each number pressed is entered at the right and moving previously entered digits to the left. To set “12:45 pm”, press 1,2,4,5.
- 2. Press Enter to start the mode using the default temperature.
- 3. To change the temperature, enter the new temperature using the numeric buttons. For example, changing temperature to 375°. Press Enter to set the updated temperature.
- Note:
- Note:
- 1. Press the numeric keys to enter the desired temperature setting. The temperature entered is displayed beside the current time.
- 1. Press the Cooking Mode button.
- Temperature
- in °F
- Temperature
- in °C
- Max. Time Allowed without Activity
- 100-200
- 30-120
- 24 hours
- 201-550
- 121-300
- 12 hours
- 2. The temperature blinks, indicating it can be edited. Input a new temperature or press Enter for no change.
- 3. The timer value blinks, indicating it can be edited. Input the new time and restart the timer by pressing the Enter button.
- 2. Connect the probe to the oven. If the probe is not connected to the oven prior to starting Probe mode, an error tone sounds and the message “INSERT PROBE” is displayed.
- 3. Set the cooking mode and temperature.
- 4. The Set Probe Temp screen is displayed. A three digit input prompt “- - -” blinks in the lower right corner. Use the numeric keypad to enter the desire probe temperature and press Enter.
- Note:
- 5. The probe current temperature and target temperature are both displayed in the format “105/180” at the lower right corner of the display. The actual temperature will display <80 until the food temperature reaches 80°F.
- 6. When the probe temperature reaches the set temperature, the cooking mode turns off. The current time is displayed and the message “COOKING COMPLETE” blinks at the bottom left of the display. An alarm tone sounds every 10 seconds for 2 minutes.
- Notes
- Sabbath Mode
- 1. Begin a Bake operation. While Bake is running, press and hold the Oven Timer button for 5 seconds.
- 2. Press Enter to accept the default 74:00 hours and start Sabbath Mode or use the numeric keypad to enter the desired Sabbath Mode timer value. Timer values between 0:01 and 74:00 can be entered.
- Note:
- 3. Once Sabbath Mode has begun, the display changes to show the message “SABBATH ON”.
- 4. After the Sabbath Mode countdown reaches zero, the oven displays the current time and the message “SABBATH”. No changes can be made at this point. To end the Sabbath Mode and return to normal function, press the Oven Clear/Off button.
- Notes
- 1. Press the Bake button.
- 2. Enter the new desired set temperature.
- 3. Press Enter.
- 2. The fist setup item is displayed. The display shoes “SET CLOCK”. Press Settings again to access the settings menu.
- 3. To display a different setup item, press the number corresponding to that setting (see table following or press the Settings button to cycle through available options).
- 4. To change the value for the displayed setting, press the Enter button to enter the edit mode. Use the numeric keypad to change the setting value. The corresponding setting value is shown in the table following.
- Oven Temperature Offset
- Note:
- Settings Menu Options
- Getting the Most Out of Your Appliance
- Cleaning and Maintenance-Oven
- 2. If there is a cooking mode on, press Oven Clear/Off to end the running mode.
- 7. Press Oven Clear/Off to clear the display when Self Clean is finished.
- 8. After the oven has cooled down and the door is unlocked, wipe remaining ash from the oven using a moist cloth.
- 3. Bring both door hinge levers to their fullest down position as shown in the illustration. The left and right door hinges differ slightly but operate in the same manner.
- 4. Close the oven door until it catches on the hinge stop levers, locking the hinges at the proper angle for door removal. The door will be open about 7 inches at the top. This takes the spring tension off the hinges so the door can be easily lifted out
- 5. The door is heavy. Use both hands to firmly grip it by the sides. Do not grip the door by the handle. Maintaining the door angle, lift the door straight up approximately 3/4” to unhook the hinges from the slots and then pull it out towards you u...
- 6. Place the door in a convenient and stable location for cleaning.
- How to Replace the Oven Door
- 1. Holding the door firmly in both hands, grip it on either side, not by the handle.
- 2. Tilt the door back slightly towards you until it opens about 7 inches at the top.
- 4. Once both hinges are fully engaged as described in Step 3, gently open the door until it is fully open.
- 2. WARMING DRAWER will be displayed with the default setting “MED”. The warming drawer amber icon is displayed below the clock.
- 3. To accept the “MED” setting, press the Enter button. The setting is accepted and the warming drawer icon remains illuminated. If enter is not pressed, the warming drawer setting is not accepted and the warming drawer turns off.
- 4. To change the setting, when “MED” is displayed, press the Warming Drawer button again. The setting changes to “HIGH”. Press the Warming Drawer button again to change the setting to “LOW”.
- 5. To turn the warming drawer off, press the Warming Drawer button and the warming drawer will turn off. The warming drawer icon will no longer appear under the clock.
- Sabbath Mode
- Warming Empty Serving Bowls and Plates
- Getting the Most Out of Your Warming Drawer
- 2. Preheat for 10 minutes, then place dish in drawer.
- 3. Set the warming timer.
- 4. Check crispness after 45 minutes. Add time as needed.
- Temperature Recommendations
- Food/Cookware
- Setting
- Cover Dish
- HIGH
- No
- MED
- No
- LOW
- No
- MED
- No
- MED
- Yes
- MED
- Yes
- MED
- Yes
- MED
- Yes
- MED
- Yes
- HIGH
- No
- MED
- Yes
- MED
- Yes
- HIGH
- Yes
- MED
- Yes
- MED
- No
- HIGH
- No
- MED
- Yes
- HIGH
- Yes
- MED
- Yes
- MED
- Yes
- MED
- Yes
- LOW
- No
- MED
- Yes
- Cleaning and Maintenance-Warming Drawer
- Notes
- NOTICES
- 4. Test the operation of the PTO drawer by pushing on the center lower portion of the drawer front (optimum location for function).
- Note:
- Service
- 2. Go to the basic settings and select the ™‚ƒ setting.
- READ AND SAVE THESE INSTRUCTIONS
- Table des MatièresNotice d’utilisation
- Définitions de sécurité
- IMPORTANTES CONSIGNES DE SÉCURITÉ
- LIRE ET CONSERVER CES INSTRUCTIONS
- AVERTISSEMENT
- Installation et entretien corrects
- Sécurité-incendie
- AVERTISSEMENT
- AVERTISSEMENT
- AVERTISSEMENT
- POUR RÉDUIRE LE RISQUE DE LÉSIONS CORPORELLES DANS L'ÉVENTUALITÉ D'UN FEU DE GRAISSE, OBSERVER LES CONSIGNES SUIVANTES :
- a. ÉTOUFFER LES FLAMMES à l'aide d'un couvercle bien hermétique, d'une tôle à biscuits ou d'un plateau en métal, puis éteindre l'appareil. FAIRE ATTENTION À NE PAS SE BRÛLER. Si les flammes ne s'éteignent pas immédiatement, ÉVACUER LES LI...
- b. NE JAMAIS SAISIR UN RÉCIPIENT QUI BRÛLE. Vous pourriez vous brûler.
- c. NE PAS UTILISER D'EAU, y compris les chiffons ou serviettes mouillées. Une violente explosion de vapeur risque de se produire.
- d. Utiliser un extincteur uniquement si :
- Prévention des brûlures
- Interférence électromagnétique
- Sécurité des enfants
- Consignes en matière de nettoyage
- Sécurité pour la batterie de cuisine
- Avertissements de la Proposition 65 de l’État de la Californie
- 2. assurant une bonne ventilation pendant et immédiatement après le cycle d'autonettoyage du four;
- 3. utilisant l'unité selon les instructions de ce manuel.
- Sécurité alimentaire
- ATTENTION
- a. NE PAS utiliser tiroir chauffant pour faire chauffer des aliments froids. Il est sécuritaire d'utiliser le tiroir pour y faire croustiller des craquelins, des chips ou des céréales sèches et garder des assiettes au chaud.
- b. Veiller à garder la nourriture à la bonne température. L'USDA recommande de maintenir les aliments chauds à 140 °F (60 °C) ou plus.
- c. NE PAS maintenir des aliments au chaud pendant plus d'une heure.
- ATTENTION
- Causes de pannes
- Protection de l'environnement
- Mise en route
- 3. Incliner la grille vers le haut pour engager la butée dans la glissière.
- 3. L'arrière de la grille télescopique se met en place en se calant.
- 4. Tirer la grille vers l'avant pour engager sa partie inférieure sur la partie arrière du guide de positionnement de grille.
- 5. Abaisser la partie avant de la grille pour terminer sa mise en place sur le guide de grille. Lorsque correctement positionnée, la grille doit être stable au toucher.
- 6. Faire glisser la partie amovible de la grille télescopique plusieurs fois d'avant en arrière pour vérifier qu'elle peut se déplacer librement et que la partie non amovible de la grille télescopique est bien fixée.
- 9 ATTENTION
- 1. Soulever la partie avant de la grille télescopique d'environ ½ po (1,3 cm) et pousser la grille d'environ ¾ po (2 cm) vers le fond. Cela permet de dégager la grille du guide de positionnement de grille.
- Faire connaissance avec l’appareil
- Fonctionnement
- 9 AVERTISSEMENT
- Interrupteur d'alimentation principal
- Allumage de la table de cuisson
- Tableau des réglages
- 9 ATTENTION
- Zone de cuisson FlexInductionMD
- Recommandations d'utilisation de l'ustensile de cuisson
- En tant que deux foyers indépendants
- Activation
- En tant que foyer unique
- Joindre les deux éléments
- 1. Déposez l'ustensile de cuisine. Sélectionnez un des deux éléments assignés à la zone de cuisson flexible et réglez ensuite le niveau de puissance souhaité.
- Fonction PowerMove (Déplacement de puissance)
- Options de réglage du temps
- 3. Dans les 10 secondes qui suivent, réglez le temps de cuisson souhaité avec les touches numérotées.
- 4. Touchez la touche Cook Timer (Minuterie de cuisson) pour confirmer le réglage choisi.
- Remarques
- Modification ou annulation du temps
- Une fois que le temps s'est écoulé,
- Remarques
- Minuterie de cuisine
- Procédure de réglage
- 1. Touchez la touche Kitchen Timer (Minuterie de cuisine). Le symbole ‹‹ et l'indicateur V s'allument dans l'affichage de la minuterie.
- 2. Sélectionnez le temps requis sur le panneau de commande et touchez la touche Kitchen Timer (Minuterie de cuisine) pour confirmer.
- 2. Touchez Panel Lock (Verrouillage du panneau) pendant environ 4 secondes.
- 4. Touchez la touche Kitchen Timer (Minuterie de cuisine) à plusieurs reprises jusqu'à ce que l'indicateur pour la fonction requise s'affiche.
- 5. Réglez la valeur requise avec les touches numérotées.
- 6. Touchez de nouveau la touche Kitchen Timer (Minuterie de cuisine) pendant au moins 4 secondes. Les réglages sont sauvegardés.
- Sortie des réglages de base
- Indicateur de consommation énergétique
- Cuisson à induction
- Nettoyage et entretien
- 2. Essuyer les projections à l'aide d'une éponge humide propre ou d'un papier absorbant. Rincer et sécher. Éliminer les traces pouvant persister avec du vinaigre blanc; rincer.
- 3. Appliquer une petite quantité de produit nettoyant pour table de cuisson en vitrocéramique. Une fois sec, polir la surface avec du papier essuie-tout ou un chiffon propre.
- 9 AVERTISSEMENT
- 1. Tirer et enlever les boutons. Essuyer les boutons de commande avec un chiffon imbibé d'eau savonneuse chaude. Rincer et sécher. Ne pas faire tremper les boutons de commande.
- Instructions pour le nettoyage
- Tableau de nettoyage
- Entretien
- Fonctionnement –Four
- 3. Saisir l'heure souhaitée à l'aide du clavier numérique. Chaque chiffre saisi s'affiche à droite et déplace les chiffres précédemment saisis vers la gauche. Pour régler l'heure à « 12:45 p.m. », appuyer sur 1,2, 4 , 5.
- 4. Quand l'heure souhaitée est saisie, confirmer l'heure en appuyant sur Enter (Entrée).
- Réglage du mode de cuisson et de la température
- 1. Appuyer sur le mode de cuisson désiré. Le mode de cuisson et la température par défaut s'affichent. La température clignote, signalant qu'elle peut être modifiée.
- 2. Appuyer sur Enter (Entrée) pour lancer le mode avec la température par défaut.
- 3. Pour modifier la température, entrer la nouvelle température à l'aide des touches numériques. Par exemple, modifier la température à 375 °F (190 °C). Appuyer sur Enter (Entrée) régler la température modifiée.
- Remarque :
- Remarque :
- 1. Entrez la température souhaitée à l’aide des touches numériques. La température saisie s'affiche à côté du temps.
- 2. Sélectionner un mode de cuisson compatible avec la température saisie. Si aucun mode de cuisson n'est sélectionné dans les 5 secondes suivant le réglage de la température, une tonalité retentit et le message « SELECT MODE » (Sélectionner...
- 3. Appuyer sur une touche de sélection de mode pour sélectionner un mode de cuisson.
- Remarque :
- 1. Appuyer sur le mode de cuisson désiré.
- Température
- en °F
- Température
- en °C
- Durée d'inactivité maximum autorisée
- 100-200
- 30-120
- 24 heures
- 201-550
- 121-300
- 12 heures
- Minuterie
- 1. Appuyez sur le bouton Kitchen Timer On/Off (Minuterie de cuisine Activée/Désactivée).
- 1. Appuyez sur le bouton Kitchen Timer On/Off (Minuterie de cuisine Activée/Désactivée).
- 1. Sélectionner la touche Oven Timer (Minuterie du four).
- 1. Si la minuterie du four est en service et que le temps restant doit être modifié, entrer le mode de minuterie du four en appuyant sur Oven Timer (Minuterie du four).
- 2. La température clignote, signalant qu'elle peut être modifiée. Saisir une nouvelle température ou appuyer sur Enter (Entrée) pour ne pas apporter de modification.
- 3. La valeur de minuterie clignote, signalant qu'elle peut être modifiée. Saisir la nouvelle durée et redémarrer la minuterie en appuyant sur Enter.
- 2. Brancher la sonde au four. Si la sonde n'est pas connectée au four avant le démarrage du mode Sonde, une tonalité d'erreur retentit et le message « INSERT PROBE » (Introduire la sonde) s'affiche.
- 3. Régler la mode de cuisson et la température.
- 4. L'écran de réglage de la température de la sonde s,affiche. Une invite à trois chiffres « - - - » clignote dans le coin inférieur droit. Entrer la température de la sonde souhaitée à l’aide des touches numériques et appuyer sur Enter ...
- Remarque :
- 5. La température réelle de la sonde et la température ciblée s'affichent toutes deux au format : « 105/180 » (40/80), dans le coin inférieur droit de l'écran. La température réelle affichera <80 jusqu'à ce que la température atteigne 80 ...
- 6. Lorsque la température de la sonde atteint la température définie, le mode de cuisson est désactivé. L'heure en cours s'affiche et le message « COOKING COMPLETE » (Cuisson terminée) s'affiche au coin inférieur gauche de l'écran. Une tona...
- Remarques
- Mode Shabbat
- 1. Commencer une cuisson. Pendant que le mode de cuisson est en cours, appuyer et maintenir enfoncée la touche Oven Timer (Minuterie du four) pendant 5 secondes.
- 2. Appuyer sur Enter (Entrée) pour confirmer les 74:00 heures par défaut et lancer le mode Shabbat ou utiliser le clavier numérique pour saisir la valeur de minuterie du mode Shabbat. Des valeurs de minuterie peuvent être saisies entre 0:01 et 74:00
- Remarque :
- 3. Le mode Shabbat lancé, l'écran change pour afficher « SABBATH ON » (Shabbat activé).
- 4. Une fois que le compte à rebours atteint zéro, le four affiche l'heure courante et le message «SABBATH » (Shabbat). À ce stade, aucune modification ne peut être apportée. Pour mettre fin au mode Shabbat et revenir au fonctionnement habituel...
- Remarques
- 1. Appuyer sur la touche Bake (Cuisson).
- 2. Saisir la nouvelle température souhaitée.
- 3. Appuyez sur Enter (Entrée).
- 2. Le premier élément de réglage s'affiche. L'écran affiche « SET CLOCK » (Réglage de l'horloge). Appuyer de nouveau sur Réglages pour accéder au menu des réglages.
- 3. Pour afficher un élément de réglage différent, appuyer sur le chiffre correspondant à ce réglage (voir le tableau ci-dessous ou appuyer sur Réglages pour faire défiler les options).
- 4. Pour modifier la valeur du réglage affiché, appuyer sur Enter pour accéder au mode d'édition.Modifier la valeur du réglage souhaité à l'aide du clavier numérique. La valeur de réglage correspondante apparaît dans le tableau ci-dessous.
- Température compensée du four
- Remarque :
- Options de menu des réglages
- Tirer le meilleur parti de votre appareil
- Conseils généraux
- Mode
- Plus faible
- Plus élevé
- 100
- 550
- 100
- 550
- 450
- 550
- 150
- 225
- 85
- 125
- 100
- 550
- 100
- 550
- 100
- 550
- 100
- 550
- 450
- 550
- Nettoyage et entretien – Four
- 2. Si un mode de cuisson est activé pour le four sélectionné, appuyer sur Oven Clear/Off (Four Effacer/Désactiver) pour mettre fin au mode en fonctionnement.
- 7. Appuyer sur Oven Clear/Off (Four Effacer/Désactiver) pour effacer les données affichées à l'écran une fois l'autonettoyage terminé.
- 8. Une fois le four refroidi et la porte déverrouillée, essuyer les cendres à l'intérieur du four à l'aide d'un chiffon humide.
- 3. Mettre les deux leviers de charnière en position abaissée comme le montre l'illustration.Les charnières gauche et droite de la porte diffèrent légèrement mais fonctionnent de la même manière.
- 4. Fermer la porte du four jusqu'à ce qu'elle s'accroche sur les leviers d'arrêt des charnières, verrouillant ainsi les charnières au bon angle pour le démontage de la porte. La porte sera ouverte d'environ 7 po (17,8 cm) sur la partie supérieu...
- 5. La porte est lourde.Saisir la porte fermement à deux mains en la prenant par les côtés. Ne pas saisir la porte par la poignée. Tout en maintenant l'angle de la porte, soulever la porte à la verticale d'environ ¾ po (2 cm) pour dégager les c...
- 6. Placer la porte dans un endroit pratique et stable pour le nettoyage.
- Remontage de la porte du four
- 1. En tenant fermement la porte des deux mains, la saisir de chaque côté et non pas par la poignée.
- 2. Incliner légèrement la porte vers soi, jusqu'à ce que. sa partie supérieure s'ouvre d'environ 7 po (18 cm).
- 4. Une fois les deux charnières complètement engagées, tel que décrit à l'tape 3, doucement ouvrir la porte jusqu'à ce qu'elle soit complètement ouverte.
- 2. WARMING DRAWER (Tiroir chauffant) s'affiche avec le réglage par défaut à « MED » (Moyen). L'icône ambrée du tiroir chauffant s'affiche sous l'horloge.
- 3. Pour confirmer le réglage moyen, appuyer sur Enter (Entrée). Le réglage est confirmé et l'icône du tiroir chauffant reste allumée. Si la touche Enter (Entrée) n'est pas appuyée, le réglage du tiroir chauffant n'est pas accepté et le tiro...
- 4. Pour modifier le réglage lorsque « MED » est affiché, appuyer de nouveau sur la touche du tiroir chauffant. Le réglage passe à « HIGH » (Élevé). Pour modifier le réglage à « LOW » (Faible), appuyer de nouveau sur la touche du tiroir ...
- 5. Pour éteindre le tiroir chauffant, appuyer sur la touche du tiroir chauffant et le tiroir chauffant s'éteindra. L'icône du tiroir chauffant ne s,affichera plus sous l'horloge.
- Mode Shabbat
- Maintenir au chaud des bols et des assiettes vides
- Tirer le meilleur parti de votre tiroir chauffant
- 2. Préchauffer pendant 10 minutes, puis placer le plat dans le tiroir.
- 3. Régler la minuterie du tiroir.
- 4. Vérifier le croustillant après 45 minutes. Ajouter du temps, si nécessaire.
- Températures recommandées
- Aliment/Ustensile de cuisson
- Réglage
- Plat couvert
- ÉLEVÉ
- Non
- MOYEN
- Non
- FAIBLE
- Non
- MOYEN
- Non
- MOYEN
- Oui
- MOYEN
- Oui
- MOYEN
- Oui
- MOYEN
- Oui
- MOYEN
- Oui
- ÉLEVÉ
- Non
- MOYEN
- Oui
- MOYEN
- Oui
- ÉLEVÉ
- Oui
- MOYEN
- Oui
- MOYEN
- Non
- ÉLEVÉ
- Non
- MOYEN
- Oui
- ÉLEVÉ
- Oui
- MOYEN
- Oui
- MOYEN
- Oui
- MOYEN
- Oui
- FAIBLE
- Non
- MOYEN
- Oui
- Nettoyage et entretien – Tiroir chauffant
- 9 ATTENTION
- Remarque :
- Nettoyer le tiroir chauffant
- Pièce
- Recommandations
- Retirer le tiroir de son compartiment
- Installation du tiroir dans le compartiment
- Remarques
- AVIS
- 4. Vérifiez le fonctionnement du tiroir PPO en poussant sur le centre de la portion inférieure de l'avant du tiroir (l'endroit optimal pour la fonction).
- Remarque :
- Dépannage
- 2. Accédez aux réglages de base et sélectionnez le réglage ™‚ƒ.
- LIRE ET CONSERVER CES INSTRUCTIONS
- Leere Seite
- Leere Seite
- Leere Seite

129
Températures recommandées
Nettoyage et entretien – Tiroir chauffant
9 ATTENTION
Pour éviter les brûlures, ne pas retirer le tiroir quand
il est chaud. Vérifier que le tiroir est vide avant de le
retirer.
Remarque : Le tiroir chauffant s'ouvre avec un
mécanisme de poussoir (Push-To-Open).Dans ce
chapitre, il est désigné sous l'acronyme PTO.
Nettoyer le tiroir chauffant
Aliment/Ustensile de cuisson Réglage Plat couvert
Bacon ÉLEVÉ Non
Bœuf, à point et bien cuit MOYEN Non
Bœuf, rosé FAIBLE Non
Pain, petits pains croustillants MOYEN Non
Pain, petits pains moelleux,
petits gâteaux
MOYEN Oui
Biscuits MOYEN Oui
Plats en casserole MOYEN Oui
Œufs MOYEN Oui
Poissons, fruits de mer MOYEN Oui
Aliments frits ÉLEVÉ Non
Sauce, sauces à la crème MOYEN Oui
Jambon MOYEN Oui
Crêpes ÉLEVÉ Oui
Tartes, croûte simple MOYEN Oui
Tartes, double croûte MOYEN Non
Pizza ÉLEVÉ Non
Porc MOYEN Oui
Pommes de terre, au four ÉLEVÉ Oui
Pommes de terre, purée MOYEN Oui
Volaille, rôtie MOYEN Oui
Légumes MOYEN Oui
Assiettes FAIBLE Non
Plat de nourriture MOYEN Oui
Pièce Recommandations
Tiroir intérieur (acier inoxy-
dable poli)
Utiliser un détergent à vais-
selle.Laver, bien rincer et
sécher. Pour les taches de
calcaire ou de calamine,
utiliser du vinaigre blanc.
Appliquer avec une éponge
ou un chiffon, rincer et
sécher. Le chlore ou des
composés chlorés conte-
nus dans certains produits
de nettoyage peuvent oxy-
der l'acier inoxydable et
causer des blessures. Véri-
fier les ingrédients sur l'éti-
quette.
Surfaces peintes Utiliser de l'eau chaude
savonneuse ou des pro-
duits de nettoyage doux,
tels que Fantastik® ou
Formula 409®. Laver, bien
rincer et sécher. Éviter les
produits de nettoyage abra-
sifs, les tampons métal-
liques et les produits pour
nettoyer les fours.
Cadre extérieur du tiroir
(acier inoxydable brossé)
Essuyez ou frottez toujours
dans la direction du poli.
Nettoyer avec une éponge
savonneuse, puis rincer et
sécher ou essuyer avec du
Fantastik® ou du
Formula 409® vaporisé sur
du papier absorbant.Proté-
ger et polir en utilisant du
Stainless Steel Magic® et
un chiffon doux.Retirez les
traces d’eau avec un chif-
fon humecté de vinaigre
blanc. Utiliser Bar Keeper's
Friend® pour éliminer les
traces d'échauffement. Le
chlore ou des composés
chlorés contenus dans cer-
tains produits de nettoyage
peuvent oxyder l'acier
inoxydable. Vérifier les
ingrédients sur l'étiquette.