
Manual
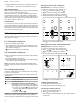
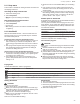
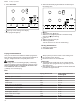
Table Of Contents
- _
- en-us
- Table of contents
- 1 IMPORTANT SAFETY INSTRUCTIONS
- 2 Preventing material damage
- 3 Environmental protection and energy-saving
- 4 Familiarizing yourself with your appliance
- 5 Accessories
- 6 Before using for the first time
- 7 Oven operation
- 7.1 Setting the heating mode and temperature
- 7.2 Turning the oven off
- 7.3 Temperature range by heating mode
- 7.4 Heating time limitation
- 7.5 Fast preheat
- 7.6 Meat probe
- 7.7 Turning the panel lock on or off
- 7.8 Kitchen timer
- 7.9 Oven timer
- 7.10 Sabbath mode
- 7.11 Basic settings
- 7.12 General tips for heating modes
- 7.12.1 How to use bake mode
- 7.12.2 How to use convection bake mode
- 7.12.3 How to use convection multi-rack/true convection mode
- 7.12.4 How to use pizza mode
- 7.12.5 How to use roast mode
- 7.12.6 How to use convection roast mode
- 7.12.7 How to use convection broil mode
- 7.12.8 How to use proof mode
- 7.12.9 How to use warm mode
- 7.13 Getting the best results
- 8 Cooktop operation
- 8.1 Turning the cooktop on
- 8.2 Turning the cooktop off
- 8.3 Cooking zone settings
- 8.4 Recommended cooking settings
- 8.5 FlexInduction™ cooking zone
- 8.5.1 Cookware recommendations for the flexible cooking zone
- 8.5.2 Using the flexible zone as two separate cooking zones
- 8.5.3 Activating the FlexInduction™ function
- 8.5.4 Changing the power level for the flexible cooking zone
- 8.5.5 Adding cookware to the flexible cooking zone
- 8.5.6 Deactivating the FlexInduction™ function
- 8.6 PowerMove® function
- 8.7 Kitchen timer
- 8.8 Count-up timer
- 8.9 SpeedBoost®
- 8.10 ShortBoost
- 8.11 Keep warm
- 8.12 AutoChef®
- 8.13 Panel lock
- 8.14 Wipe protection
- 8.15 Basic settings
- 8.16 Energy consumption display
- 8.17 PowerManager function
- 8.18 Induction cooking
- 9 Warming drawer operation
- 10 Cleaning and maintenance
- 11 Troubleshooting
- 12 Disposal
- 13 Customer service
- 14 STATEMENT OF LIMITED PRODUCT WARRANTY
- fr-ca
- Table des matières
- 1 IMPORTANTES CONSIGNES DE SÉCURITÉ
- 1.1 Définitions des termes de sécurité
- 1.2 Indications générales
- 1.3 Utilisation prévue
- 1.4 Restriction sur le groupe d'utilisateurs
- 1.5 Utilisation sécuritaire
- 1.6 Sécurité des enfants
- 1.7 Sécurité alimentaire
- 1.8 Fonction de nettoyage
- 1.9 Installation et entretien appropriés
- 1.10 Mises en garde conformément à la proposition 65 de l'État de Californie
- 2 Prévenir les bris matériels
- 3 Protection de l'environnement et économies
- 4 Description de l'appareil
- 5 Accessoires
- 6 Avant d'utiliser pour la première fois
- 7 Fonctionnement du four
- 7.1 Réglage du mode de chauffage et de la température
- 7.2 Éteindre le four
- 7.3 Plage de température par mode de chauffage
- 7.4 Limitation du temps de chauffage
- 7.5 Préchauffage rapide
- 7.6 Sonde thermométrique
- 7.7 Activer ou désactiver le verrouillage du panneau
- 7.8 Minuterie de cuisine
- 7.9 Minuterie du four
- 7.10 Mode sabbat
- 7.11 Réglages de base
- 7.12 Conseils généraux pour les modes de chauffage
- 7.12.1 Comment utiliser le mode de cuisson
- 7.12.2 Comment utiliser le mode de cuisson par convection
- 7.12.3 Comment utiliser le mode de convection multi-grille/vraie convection
- 7.12.4 Comment utiliser le mode pizza
- 7.12.5 Comment utiliser le mode de rôtissage
- 7.12.6 Comment utiliser le mode de rôtissage par convection
- 7.12.7 Comment utiliser le mode de cuisson au gril par convection
- 7.12.8 Comment utiliser le mode de fermentation
- 7.12.9 Comment utiliser le mode maintenir au chaud
- 7.13 Obtenir les meilleurs résultats
- 8 Fonctionnement de la table de cuisson
- 8.1 Mise en marche de la table de cuisson
- 8.2 Mise à l'arrêt de la table de cuisson
- 8.3 Paramètres de la zone de cuisson
- 8.4 Paramètres de cuisson recommandés
- 8.5 Zone de cuisson FlexInduction™
- 8.5.1 Recommandations de batterie de cuisine pour la zone de cuisson flexible
- 8.5.2 Utilisation de la zone flexible comme deux zones de cuisson séparées
- 8.5.3 Activer la fonction FlexInduction™
- 8.5.4 Modification du niveau de puissance de la zone de cuisson flexible
- 8.5.5 Ajout d'ustensiles de cuisine à la zone de cuisson flexible
- 8.5.6 Désactivation de la fonction FlexInduction™
- 8.6 PowerMove® fonction
- 8.7 Kitchen timer
- 8.8 Count-up timer
- 8.9 SpeedBoost®
- 8.10 ShortBoost
- 8.11 Garder au chaud
- 8.12 AutoChef®
- 8.13 Verrouillage du panneau
- 8.14 Protection essuyageProtection essuyage
- 8.15 Réglages de base
- 8.16 Affichage de la consommation énergétique
- 8.17 Fonction PowerManager
- 8.18 Cuisson par induction
- 9 Fonctionnement du tiroir réchaud
- 9.1 Niveaux du tiroir réchaud
- 9.2 Allumer le tiroir réchaud
- 9.3 Éteindre le tiroir réchaud
- 9.4 Utilisation du tiroir réchaud en mode Sabbat
- 9.5 Réchauffer des bols et des assiettes vides
- 9.6 Mettre croustillant des articles rassis
- 9.7 Conseils généraux pour le tiroir réchaud
- 9.8 Recommandations de température du tiroir réchaud
- 10 Nettoyage et entretien
- 11 Dépannage
- 12 Élimination
- 13 Service à la clientèle
- 14 ÉNONCÉ DE LA GARANTIE LIMITÉE DU PRODUIT

en-us Cooktop operation
24
¡ Stagger bakeware so that one is not directly above an-
other. Allow 1½'' (4cm) above and below each pan.
High altitude baking
When cooking at high altitudes, recipes and cooking times
will vary. For accurate information, go to
www.csuextstore.com, or write to the Extension Service,
Colorado State University, Fort Collins, Colorado 80521.
There may be a cost for the guides. Specify which high al-
titude food preparation guide you prefer: general informa-
tion, cakes, cookies, breads, etc.
Condensation
It is normal for a certain amount of moisture to evaporate
from the food during any cooking process. The amount de-
pends on the moisture content of the food. The moisture
will condense on any surface cooler than the inside of the
oven, such as the control panel.
Cooktop operation
8 Cooktop operation
Cooktop operation
Here you will find out everything you need to know about
operating your cooktop.
8.1 Turning the cooktop on
▶
Press the cooktop main switch.
a The indicator above the cooktop main switch turns on.
a The symbols for the cooking zones and functions avail-
able at this time light up.
a lights up in the cooking zone displays.
8.2 Turning the cooktop off
▶
Press and hold the cooktop main switch until all indica-
tors go out.
a All cooking zones are turned off.
a The residual heat indicators remain lit until the cooking
zones have cooled off sufficiently.
Note:The cooktop turns off automatically when all the
cooking zones have been turned off for more than 20sec-
onds.
8.3 Cooking zone settings
In order to make settings on a cooking zone, the cooking
zone has to be selected.
Set the desired power level for each cooking zone in the
settings area.
Setting Power level
lowest power level
highest power level
Intermediate setting for all power levels
Depending on your model, the intermediate
level is displayed on the cooking zone display
¡ as a dot, for example . lights up when you
set the intermediate level between power
level and .
¡ as . , for example .
Note:The cooktop may temporarily reduce the power au-
tomatically to protect the fragile parts of your appliance
and to prevent the appliance from producing excess noise.
Setting the power level - 800 Series
Requirement:The cooktop is turned on.
1. Place the cookware on the cooking zone.
2. Press to select the cooking zone .
a lights up in the cooking zone display.
a lights up under the cooking zone display.
3. Set the power level in the settings area
Press to set an intermediate level.
Setting the power level - Benchmark® Series
Requirement:The cooktop is turned on.
1. Place the cookware on the cooking zone.
2. Press or to select the cooking zone .
a lights up in the cooking zone display.
3. Set the power level in the settings area
Press to set an intermediate level.
Changing the power level
1. Select the desired cooking zone.
2. Set the power level in the settings area.
Turning the cooking zone off
1. Select the desired cooking zone.
2. Select in the settings area.
a The residual heat indicator lights up after approximately
10seconds.