3FHJTU FS \RXU QHZ GH YLFH RQ 0\%RV FK QRZ DQG JHW IUH H EHQH ILWV CPTDI IPNF XFMDP DPN NF Free standing cooker HKA05.020U, HKA05.
en Table of contents [en]I nst r uct i on manual Fr e st andi ng co ker 8 Intended use . . . . . . . . . . . . . . . . . . . . . . . . . . . . . 4 ( Important safety information . . . . . . . . . . . . . . . 4 q Appliance door . . . . . . . . . . . . . . . . . . . . . . . . . . 20 Halogen lamp. . . . . . . . . . . . . . . . . . . . . . . . . . . . . . . . 6 3 Trouble shooting . . . . . . . . . . . . . . . . . . . . . . . . 21 ] Causes of damage . . . . . . . . . . . . . . . . . . . . . . . . 6 Hob . .
en Intended use 8Intended use Read these instructions carefully. Only then will you be able to operate your appliance safely and correctly. Retain the instruction manual and installation instructions for future use or for subsequent owners. The images shown in these instructions are for guidance only. Check the appliance for damage after unpacking it. Do not connect the appliance if it has been damaged in transport. Only a licensed professional may connect appliances without plugs.
Important safety information Alcoholic vapours may catch fire in the hot cooking compartment. Never prepare food containing large quantities of drinks with a high alcohol content. Only use small quantities of drinks with a high alcohol content. Open the appliance door with care. Risk of burns! ■ The hotplates and surrounding area (particularly the hob surround, if fitted) become very hot. Never touch the hot surfaces. Keep children at a safe distance.
en Causes of damage Halogen lamp ]Causes of damage : Warning – Risk of burns! The bulbs in the cooking compartment become very hot. There is still a risk of burning your skin for some time after they have been switched off. Do not touch the glass cover. Avoid contact with your skin when cleaning. : Warning – Risk of electric shock! When replacing the cooking compartment bulb, the bulb socket contacts are live.
Environmental protection ■ Grilling: do not insert the baking tray or universal pan higher than level 3 when grilling. The high heat distorts it and the enamel may be damaged when it is removed. At level 4 and 5, only grill directly on the wire rack. Damage to the plinth drawer Caution! Do not place hot objects in the plinth drawer. It could be damaged. en 7Environmental protection Your new appliance is particularly energy-efficient.
en ■ Environmental protection Open the appliance door as infrequently as possible when the appliance is in use. Environmentally-friendly disposal Dispose of packaging in an environmentally-friendly manner. This appliance is labelled in accordance with European Directive 2012/19/EU concerning used electrical and electronic appliances (waste electrical and electronic equipment WEEE). The guideline determines the framework for the return and recycling of used appliances as applicable throughout the EU.
Installation and connection 5Installation and connection Do not install the appliance behind a decorative door or the door of a kitchen unit, as this may cause the appliance to overheat. I n s t a l a t i on a n d c o n e c t i o n en Adjacent units Any adjacent units must not be made of flammable materials. The fronts of any adjacent units must be heatresistant up to at least 90 °C. Wall fixing Electrical connection Only licensed specialists may connect the appliance.
en Getting to know your appliance Keep the original appliance packaging. Only transport the appliance in the original packaging. Observe the transport arrows on the packaging. If the original packaging is no longer available pack the appliance in protective packaging to guarantee sufficient protection against any transport damage. Transport the appliance in an upright position. Do not hold the appliance by the door handle or the connections on the rear, as these could be damaged.
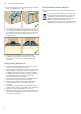
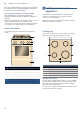
Getting to know your appliance en Control panel Details may vary depending on the appliance model. Types of heating and functions Use the function selector to set the types of heating and other functions. Type of heating % Top/bottom heating 8 Gentle top/bottom heating $ * Bottom heating ( Grill, large area Centre-area grill -------- To make sure you always use the right type of heating to cook your food, we have explained the differences and applications below.
en Accessories Cooking compartment Various functions in the cooking compartment make your appliance easier to use. For example, the cooking compartment is well lit and a cooling fan prevents the appliance from overheating. Opening the appliance door If you open the appliance door when the appliance is in operation, the appliance will continue to operate as before.
Accessories When sliding accessories into the cooking compartment, ensure that the kink in the side rail is at the back. Only then will they lock in place. Notes Hold the baking tray securely at the sides with both hands and slide it into the shelf supports, keeping it parallel. Do not move the baking tray from side to side as you slide it in, otherwise it will not go in easily and the enamelled surfaces may be damaged.
en Before using for the first time KBefore using for the first time Switch off the appliance after the cooking time indicated. After the cooking compartment has cooled down, clean the smooth surfaces with soapy water and a dish cloth. Before you can use your new appliance, you must make some settings. You must also clean the cooking compartment and accessories. Cleaning the accessories Clean the accessories thoroughly using soapy water and a dish cloth or soft brush.
Setting the cooking time Boiling, steaming, stewing Rice (with double the quantity of water) Unpeeled boiled potatoes Boiled potatoes Pasta, noodles Stew, soups Vegetables Vegetables, frozen Cooking in a pressure cooker Braising Roulades Pot roasts Goulash Frying** Escalope, plain or breaded Escalope, frozen Steak (3 cm thick) Fish and fish fillet, plain Fish and fish fillet, breaded Fish and fish fillet, breaded and frozen, e.g.
en Operating the appliance 1Operating the appliance You have already learnt about the controls and how they work. Now we will explain how to apply settings on your appliance. Oper at i ng t he ap l i ance Switching the appliance on and off Use the function selector to switch the appliance on or off. Turning the function selector to any position other than the "Off" position switches on the appliance. To switch off the appliance, always turn the function selector to the "Off" position.
Cleaning Zone Upper glass cover* (depending on appliance model) Cleaning agent Glass cleaner: Clean with a soft cloth. You can remove the upper glass cover for cleaning. To find out how to do this, please refer to the section Upper glass cover. Rotary knobs Hot soapy water: Do not remove. Clean with a dish cloth and dry with a soft cloth. Hob surround Hot soapy water: Do not clean with a glass scraper, lemon juice or vinegar. Gas hob and pan sup- Hot soapy water. ports* Use very little water.
en Cleaning Zone Accessories Cleaning agent Hot soapy water: Soak and then clean with a dish cloth or a brush. Aluminium baking tray*: (depending on appliance model) Dry with a soft cloth. Do not clean in the dishwasher. Never use oven cleaner. To prevent scratches, never touch the metal surfaces with a knife or a similar sharp object. Harsh cleaning products, scratchy sponges and rough cleaning cloths are not suitable. Otherwise, you may scratch the surface.
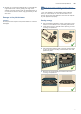
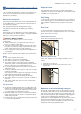
Rails en 2. the two hooks must be inserted fully into the upper pRails With good care and cleaning, your appliance will retain its appearance and remain fully functional for a long time to come. This will tell you how to remove the shelves and clean them. Rai l s Detaching and refitting the rails holes. Now move the frame slowly and carefully downwards and insert in the lower holes (figure D). 3. Insert both frames into the side walls of the oven (figure E).
en Appliance door qAppliance door With good care and cleaning, your appliance will retain its appearance and remain fully functional for a long time to come. This will tell you how to remove the appliance door and clean it. Ap l i ance do r Detaching and attaching the oven door For cleaning purposes and to remove the door panels, you can detach the oven door. The oven door hinges each have a locking lever. When the locking levers are closed (figure A), the oven door is secured in place.
Trouble shooting 4. Lift the panel up and pull it out (fig. C). & en 3Trouble shooting If a fault occurs, there is often a simple explanation. Before calling the after-sales service, please refer to the fault table and attempt to correct the fault yourself. Tr oubl e sho t i ng Malfunction table Clean the panels with glass cleaner and a soft cloth. : Warning – Risk of injury! Scratched glass in the appliance door may develop into a crack.
en Customer service Replacing the bulb in the top of the cooking compartment If the cooking compartment light bulb fails, it must be replaced. Heat-resistant, 25 watt, 230 V halogen bulbs are available from the after-sales service or specialist retailers. When handling the halogen bulb, use a dry cloth. This will increase the service life of the bulb. Only use these bulbs. : Warning – Risk of electric shock! When replacing the cooking compartment bulb, the bulb socket contacts are live.
Tested for you in our cooking studio JTested for you in our cooking studio Here, you can find a selection of dishes and the ideal settings for them. We will show you which type of heating and temperature are best suited to your dish. You will get information on suitable cooking accessories and the height at which they should be placed in the oven. You will also get tips about cookware and preparation methods.
en Tested for you in our cooking studio Frozen products Do not use frozen products that are heavily frosted. Remove any ice on the food. Some frozen products may be unevenly pre-baked. Uneven browning may remain even after baking. Bread and rolls cooking compartment. The change in temperature can cause damage to the enamel. Some food turns out better if it is baked in several stages. These dishes are indicated in the table.
Tested for you in our cooking studio en Biscuits Dish Accessories/cookware Shelf position Heating function Viennese whirls Universal pan 3 Biscuits Universal pan 3 Meringue Universal pan 3 Macaroons Universal pan 2 % % % % Temperature in Cooking °C time in min 140-150* 30-40 140-160 20-30 80-100 100-150 100-120 30-40 * Preheat Bread and rolls Dish Accessories/cookware Shelf position Heating function Step Bread, 750 g (in a loaf tin or free-form) Universal pan or loaf tin 2 -
en Tested for you in our cooking studio Baking tips You want to find out whether the cake Push a cocktail stick into the highest point on the cake. If the cocktail stick comes out clean with no cake mixis completely cooked in the middle. ture on it, the cake is ready. The cake collapses. Next time use less liquid. Alternatively, set the temperature 10 °C lower and extend the baking time. Use the ingredients and preparation instructions given in the recipe.
Tested for you in our cooking studio Poultry, meat and fish Your appliance offers you a range of heating types for preparing poultry, meat and fish. You can find the ideal settings for certain dishes in the settings tables. Roasting on the wire rack Roasting on the wire rack works particularly well for large poultry or for multiple pieces at the same time. Place the food to be grilled directly onto the wire rack. If you are grilling a single piece, place it in the centre of the wire rack for best results.
en Tested for you in our cooking studio Meat Baste lean meat with fat as required or cover it with strips of bacon. When roasting, add a little liquid if the meat is lean. A covering of approx. ^ cm depth should be applied to the base of any glass cookware. Score the rind crosswise. If you turn the joint when cooking, ensure that the rind is underneath at first. When the joint is ready, turn off the oven and allow it to rest for another 10 minutes in the cooking compartment.
Tested for you in our cooking studio en Dish Accessories/cookware Shelf position Heating function Step Temperature in °C Joint of veal, 1.5 kg Cookware, uncovered 2 - 180-200 Knuckle of veal, 1.5 kg Cookware, uncovered 2 - 210-230 130-150 Leg of lamb, boned, medium, 1.5 kg Cookware, uncovered 2 - 200-210 70-80* Saddle of lamb on the bone, medium, 1.
en Tested for you in our cooking studio It is sufficient to heat UHT milk to 40 °C. Yoghurt You can use your appliance to make your own yoghurt. Remove accessories and shelf supports from the cooking compartment. The cooking compartment must be empty. 1. Heat 1 litre of milk (3.5% fat) to 90 °C on the hob and then leave it to cool down to 40 °C. 2. Stir in 30 g (approx. 1 tbsp) (chilled) yoghurt. 3. Pour into cups or small jars with lids and cover. 4.
Tested for you in our cooking studio Vegetables As soon as bubbles begin to form in the jars, set the temperature back to between 120 and 140 °C. Vegetables with cold cooking water in one-litre jars Gherkins Beetroot Brussels sprouts Beans, kohlrabi, red cabbage Peas Taking out the jars After preserving, remove the jars from the cooking compartment. Caution! Do not place the hot jars on a cold or wet surface. They could suddenly burst.
en Tested for you in our cooking studio Test dishes These tables have been produced for test institutes to facilitate appliance testing. As per EN 60350-1. 1 Baking Baked items or cakes that are placed in the oven on baking trays or in baking tins/dishes at the same time will not necessarily be ready at the same time.
6
6
6
5IBOL ZPV GPS CVZJOH B #PTDI )PNF "QQMJBODF 5HJLVWHU \RXU QHZ GHYLFH RQ 0\%RVFK QRZ DQG SURILW GLUHFWO\ IURP t &YQFSU UJQT USJDLT GPS ZPVS BQQMJBODF t 8BSSBOUZ FYUFOTJPO PQUJPOT t %JTDPVOUT GPS BDDFTTPSJFT TQBSF QBSUT t %JHJUBM NBOVBM BOE BMM BQQMJBODF EBUB BU IBOE t &BTZ BDDFTT UP #PTDI )PNF "QQMJBODFT 4FSWJDF )UHH DQG HDV\ UHJLVWUDWLRQ ² DOVR RQ PRELOH SKRQHV XXX CPTDI IPNF DPN XFMDPNF -PPLJOH GPS IFMQ :PV}MM GJOE JU IFSF ([SHUW DGYLFH IRU \RXU %RVFK KRPH DSSOLDQFHV QHHG KHOS ZLWK SUREOHPV RU