Built-In Convection Microwave Oven (Speed Oven) Use and Care Manual 800 SERIES HMC80152UC HMC87152UC HMC80252UC HMC80242UC
Table of Contents Useandcremanul Safety Definitions .......................................................... 3 IMPORTANT SAFETY INSTRUCTIONS ........................ 4 9 PRECAUTIONS TO AVOID POSSIBLE EXPOSURE TO EXCESSIVE MICROWAVE ENERGY .......................... 4 GROUNDING INSTRUCTIONS .......................................... 5 TV / Radio Interference ....................................................... 5 Intended Use .........................................................................
7KLV %RVFK $SSOLDQFH LV PDGH E\ %6+ +RPH $SSOLDQFHV &RUSRUDWLRQ 0DLQ 6WUHHW 6XLWH ,UYLQH &$ 4XHVWLRQV" ZZZ ERVFK KRPH FRP XV :H ORRN IRUZDUG WR KHDULQJ IURP \RX Safety Definitions 9 SafetyDfintos WARNING This indicates that death or serious injuries may occur as a result of non-observance of this warning. 9 CAUTION This indicates that minor or moderate injuries may occur as a result of non-observance of this warning.
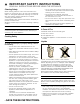
9 IMPORTANT SAFETY INSTRUCTIONS READ ALL INSTRUCTIONS BEFORE USING THE APPLIANCE 9 PRECAUTIONS TO AVOID POSSIBLE EXPOSURE TO EXCESSIVE MICROWAVE ENERGY I M P O R T A N T S A F E T Y I N S T R U C T I O N S R E A D A L L I N S T R U C T I O N S B E F O R E U S I N G T H E A P P L I A N C E PRECAUTIONS TO AVOID POSSIBLE EXPOSURE TO EXCESSIVE MICROWAVE ENERGY (1) Do not attempt to operate this oven with the door open, since open-door operation can result in harmful exposure to microwave energy.
9 IMPORTANT SAFETY INSTRUCTIONS READ ALL INSTRUCTIONS BEFORE USING THE APPLIANCE GROUNDING INSTRUCTIONS TV / Radio Interference For all cord-connected appliances: This appliance must be grounded. Grounding reduces risk of electric shock by providing a safe pathway for electric current in the event of a short circuit. If this oven is equipped with a cord having a grounding wire with a grounding plug, the plug must be plugged into an outlet that is properly installed and grounded.
IMPORTANT SAFETY INSTRUCTIONS 9 READ ALL INSTRUCTIONS BEFORE USING THE APPLIANCE Cleaning Safety ▯ When cleaning surfaces of door and oven that come together on closing the door, use only mild, nonabrasive soaps, or detergents applied with a sponge or soft cloth. See door surface cleaning instructions in chapter “Cleaning and Maintenance”. Clean turntable roller rest and oven bottom frequently to prevent excessive noise. Allow the ceramic tray to cool before cleaning or placing in water.
9 ▯ ▯ ▯ IMPORTANT SAFETY INSTRUCTIONS READ ALL INSTRUCTIONS BEFORE USING THE APPLIANCE Stir or turn the food several times during cooking. Check the temperature. After heating, allow the food to stand for a further 2 to 5 minutes so that it can achieve an even temperature. Always use an oven cloth or oven gloves when removing plates from the oven. Cooking Items Eggs: Do not cook or reheat whole eggs, with or without shell.
9 IMPORTANT SAFETY INSTRUCTIONS READ ALL INSTRUCTIONS BEFORE USING THE APPLIANCE Thermometers Do not use regular cooking thermometers in oven. Most cooking thermometers contain mercury and may cause electrical arc, malfunction, or damage to the oven. Pacemakers CAUTION To avoid pacemaker malfunction, consult physician or pacemaker manufacturer about effects of microwave energy on pacemaker.
Causes of Damage NOTICES: ▯ Metal e.g. a spoon in a glass must be kept at least 1 inch (25 mm) from the oven walls and the inside of the door. Sparks could irreparably damage the glass on the inside of the door. ▯ Water in the hot oven interior: Never pour water into the hot oven interior. Steam is produced. Damage to the enamel can arise due to the temperature change. ▯ ▯ ▯ ▯ Do not leave moist groceries in a closed oven for an extended period of time. It can lead to corrosion inside the oven.
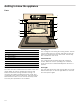
Getting to know the appliance Parts $PRXQW Control panel and display Convection fan and element Rack holders (4) Door gasket Door hinges Ceramic microwave tray Metal tray turntable with bake element below Broil element Oven vents Cooling Fan The cooling fan runs during all cooking modes. The fan can be heard when it is running, and warm air may be felt as it is released from the oven vents. The fan may also run after the oven is off.
Control Panel 3DQHO /RFN KROG VHF 6HQVRU 5HKHDW 6HQVRU &RRN $XWR 'HIURVW %URLO &RQYHFWLRQ )UR]HQ )RRGV KLJK ORZ 6HWWLQJV VWDUW HQWHU WEV NJ OEV FXSV VHF SUHKHDWLQJ VHQVLQJ WLPHU R] PLQ KU PLQ WHPS 6WDUW (QWHU 6SHHG &KHI 3RSFRUQ &ORFN 3L]]D 0RUH 0RGHV %HYHUDJH .LWFKHQ 7LPHU RQ RII 0LFURZDYH VHF 3RZHU /HYHO $PRXQW &OHDU 2II Touch keys You can activate a function by briefly touching the corresponding touch key.
Accessories Metal tray turntable Food which particularly requires a lot of heat from underneath, such as pizza and chicken nuggets, can be prepared directly on the metal tray turntable. The turntable can turn clockwise or counterclockwise. It is dishwasher safe and cut resistant. You can cut pizza into slices on the turntable itself. Place the metal tray turntable on the drive in the center of the cooking compartment. Ensure that it is properly fitted.
Inserting the wire rack 1. Place rack securely in the four plastic supports. 9 CAUTION ▯ ▯ ▯ ▯ ▯ Note: Rack must not touch metal walls or back of microwave. 2. Place food on the rack. ▯ Do not use the rack to pop popcorn. The rack must be on the four plastic supports when used. Do not cook with rack on the bottom of the oven cavity. For regular microwave cooking use the ceramic tray and remove the rack. The rack can get hot during cooking. Allow the rack to cool down before handling.
Microwave Microwave utensil guide Suitable ovenware ▯ Heat-resistant glass, glass ceramic and earthenware: Utility dishes, loaf dishes, pie plates, cake plates, liquid measuring cups, casseroles and bowls without metallic trim (e.g. Pyrex®, Anchor Hocking™, Corning Ware®, Emile Henry, etc.). ▯ China: Bowls, cups, serving plates and platters without metallic trim. ▯ Plastic films and wraps: Plastic wrap (as a cover) - lay the plastic wrap loosely over the dish and press it to the sides.
Power Microwave Use for level output 50% † 40% … 30% „ 20% ƒ ‚ 10% Cooking meat Cooking custard Cooking spare ribs, rib roast & sirloin roast Cooking less tender cuts of meat Reheating frozen packaged foods Thawing meat, poultry & seafood Cooking small quantities of food Finish cooking casseroles, stew & some sauces Melting chocolate Softening butter & cream cheese Softening ice cream Raise yeast dough Setting the microwave The appliance must be turned off. 1.
▯ ▯ Arranging food Arrange unevenly shaped foods, such as chicken pieces or salmon, with the thicker or meatier parts toward the outside of the turntable tray. Letting food stand After removing the food from the microwave, cover the food with foil or a casserole lid and let it stand to finish cooking. This will help the food finish cooking in the center and avoids overcooking the outer edges. The length of stand time depends on the density and surface area of the food items.
Broil The Broil feature uses intense heat radiated from the upper element. You can set two intensity levels: ▯ Broil high ( ▯ Broil low * Setting Broil mode The appliance must turned off. 1. Touch Broil. The Broil mode is set to high. •‚ and start/enter are blinking, the Broil high symbol ( will be displayed. The time of day will be permanently displayed in Broil mode. 2. Touch Broil again or use the +Amount key, to change to Broil low mode. –‹ and the broil low symbol * will light up on the display. 3.
Opening appliance door during operation Opening the appliance door during operation will interrupt the current mode. Close the appliance door and then touch Start/Enter to resume operation. Cancel operation Touch Clear/Off to cancel the active oven mode. The appliance turns off and the clock is displayed. The cooling fans may continue to run for awhile and then switch off automatically. Speed Chef Programs Place the food in a dish that is suitably sized for the amount of food you want to cook.
Auto Defrost With the Auto Defrost feature you can defrost three different types of food by entering the weight. The ideal defrost time will be calculated by the program. Ovenware for defrosting Place the food in a microwaveable shallow dish, such as a glass casserole dish or glass plate, but do not cover. Stand time The defrosted food should be left to stand for an additional 10 to 30 minutes until it reaches an even temperature. Large pieces of meat require a longer standing time than smaller pieces.
Frozen Foods Use the Frozen Foods feature to prepare frozen convenience foods, like chicken nuggets, french fries, fish sticks, using bottom heat and Convection. Place the food you want to cook directly on the metal tray turntable. You can set a temperature range from 200 to 450° F (100 to 230°C). Setting Frozen Foods The appliance must be turned off. Pizza tips ▯ For fresh pizza use a pizza paddle for sliding the pizza on and from the metal turntable.
Opening appliance door during operation Opening the appliance door during operation will interrupt the current mode. Close the appliance door and then touch Start/Enter to resume operation. Popcorn 9 3. Touch Start/Enter. The microwave timer starts counting down. When the microwave time has elapsed, a beep will sound. The appliance turns off and the clock is displayed. Beverage CAUTION Do not leave oven unattended while popping corn. Popcorn may ignite and cause fire.
Reheat cooking suggestions Food Directions Quantity Dinner plate Use only pre-cooked, refrigerated foods. Cover plate with vented 1 serving (1 plate) plastic wrap or waxed paper, tucked under plate. If food is not hot enough after heating with the Reheat feature, continue heating using manual time and power level setting. Contents: 3-4 oz. meat, poultry or fish (up to 6 oz. with bone) 1/2 cup starch (potatoes, pasta, rice, etc.) ▯ 1/2 cup of vegetables (about 3-4 oz.
When sensing is complete, a beep will sound and the calculated cook time will start to count down. Note: Do not open the door during the sensing process, or the program will be cancelled. Once the calculated cook time is displayed, you can open the door to stir, turn or rearrange the food. Touch Start/Enter to resume operation. When sensor cook is finished a beep will sound and the appliance turns off.
Setting Melt Chocolate You can set two different quantities for melting chocolate: ▯ 1 cup ▯ 2 cups 1. Touch More Modes once. The display shows SELECT PROGRAM 1 - 6. 2. Touch the number key 4 or touch More Modes four times. MELT CHOCOLATE and the microwave symbol Ý are displayed. The first quantity 1 cup and start/enter are blinking. The cook time is displayed. 3. Touch +Amount to change the quantity. 4. Touch Start/Enter. The heating time starts counting down. 2.
Panel Lock You can use the panel lock to prevent children from accidentally turning the appliance on. The panel lock feature is also very useful when cleaning the control panel. The lock will prevent accidental programming when wiping the control panel clean. To activate the panel lock: Touch and hold Panel Lock for 3 seconds. The panel lock symbol ?and PANEL LOCKED will appear in the display and a double beep sounds. To deactivate the panel lock: Touch and hold Panel Lock for 3 seconds.
Cooking Charts The charts can be used as a guide. Follow package or recipe directions. Broil Place pan of food on the wire rack with the recess facing up.
Food Oven temperature Fresh fruit pie 375°F (190°C) 50 - 60 Muffins 400°F (205°C) 10 - 18 Roasted vegetables 425 - 450°F 15 - 20 (220 - 230°C) 450°F (230°C) 10 - 18 Shortcakes Cooking time (minutes) Cooking eggs in your microwave ▯ ▯ ▯ ▯ ▯ A dark or dull baking pie pan will result in a browner, crisper crust. Ideal for ready-made mixes. Prepare according to package directions. Use dark or dull metal pan. Stir once. Best for individual shortcakes. Use dark coated pan.
Cleaning and Maintenance with a soft cloth and warm (not hot) mild detergent solution. Then rinse and wipe completely dry. WARNING 9 Be sure the entire appliance has cooled and grease has solidified before attempting to clean any part of the appliance. ▯ ▯ Cleaning Guide ▯ ▯ For best performance and for safety reasons, keep the oven clean inside and outside. Take special care to keep the inner door panel and oven front frame free of food and grease build–up.
Before Calling for Service Before calling customer service, consider the suggestions and instructions below: Problem Suggestion Properly insert the plug into a grounded power outlet. ▯ Reset the household circuit breaker or replace any blown fuses. The oven display works, but the ▯ Make sure the oven door is closed securely and completely. oven will not operate. ▯ Check to see if packing material or other materials are stuck to the door seal. ▯ Check for damage to the oven door.
Bosch® Support Before Calling Service Service See the Use and Care Manual for troubleshooting information. Refer to the “Statement of Limited Product Warranty” in the Use and Care Manual. To reach a service representative, see the contact information at the front of the manual or in the following section. Please be prepared with the information printed on your product data plate prior to calling. We realize that you have made a considerable investment in your kitchen.
STATEMENT OF LIMITED PRODUCT WARRANTY What this Warranty Covers & Who it Applies to The limited warranty provided by BSH Home Appliances Corporation (“BSH“) in this Statement of Limited Product Warranty applies only to the Bosch appliance (“Product“) sold to you, the first using purchaser, provided that the Product was purchased: ▯ ▯ For your normal, household (non-commercial) use, and has in fact at all times only been used for normal household purposes.
Any external, elemental and/or environmental forces and factors, including without limitation, rain, wind, sand, floods, fires, mud slides, freezing temperatures, excessive moisture or extended exposure to humidity, lightning, power surges, structural failures surrounding the appliance, and acts of God. In no event shall BSH have any liability or responsibility whatsoever for damage to surrounding property, including cabinetry, floors, ceilings, and other structures or objects around the Product.
Table des Matières Noticed’utilsaon Définitions de sécurité ................................................ 34 CONSIGNES DE SÉCURITÉ IMPORTANTES ............. 35 9 MESURES DE PRÉCAUTION POUR ÉVITER L’EXPOSITION EXCESSIVE À L’ÉNERGIE MICRO-ONDE .................................................................... 35 INSTRUCTIONS DE MISE À LA TERRE ........................ 36 Interférences radio/télévision .......................................... 36 Utilisation prévue .....................................
&HW DSSDUHLO pOHFWURPpQDJHU %RVFK HVW IDEULTXp SDU %6+ +RPH $SSOLDQFHV &RUSRUDWLRQ 0DLQ 6WUHHW 6XLWH ,UYLQH &$ 9RXV DYH] GHV TXHVWLRQV" â â ZZZ ERVFK KRPH FRP XV 1RXV QRXV IHURQV XQ SODLVLU GH YRXV VHUYLU Définitions de sécurité Défintosdeécurit 9 AVERTISSEMENT Ceci indique que le non-respect de cet avertissement peut entraîner des blessures graves, voire la mort.
9 CONSIGNES DE SÉCURITÉ IMPORTANTES LISEZ TOUTES LES INSTRUCTIONS AVANT D'UTILISER L'APPAREIL 9 MESURES DE PRÉCAUTION POUR ÉVITER L’EXPOSITION EXCESSIVE À L’ÉNERGIE MICRO-ONDE C O N S I G N E S D E S É C U R I T É I M P O R T A N T E S L I S E Z T O U T E S L E S I N S T R U C T I O N S A V A N T D ' U T I L I S E R L ' A P P A R E I L MESURES DE PRÉCAUTION POUR ÉVITER L'EXPOSITION EXCESSIVE À L'ÉNERGIE MICRO-ONDE (1) Lorsque vous faites fonctionner l'appareil, ne laissez pas la porte du four ou
9 CONSIGNES DE SÉCURITÉ IMPORTANTES LISEZ TOUTES LES INSTRUCTIONS AVANT D'UTILISER L'APPAREIL Pour réduire le risque de feu dans la cavité du four : ▯ Ne cuisez pas trop les aliments. Surveillez attentivement l’appareil quand des matériaux en papier, plastique et autres combustibles sont insérés à l’intérieur du four pour faciliter la cuisson. ▯ Retirez les attaches métalliques des sacs de papier ou de plastique avant de placer le sac dans le four.
9 CONSIGNES DE SÉCURITÉ IMPORTANTES LISEZ TOUTES LES INSTRUCTIONS AVANT D'UTILISER L'APPAREIL Sécurité des enfants Ne pas permettre aux enfants d’utiliser cet appareil sauf sous la surveillance attentive d’un adulte. Ne pas laisser les enfants et les animaux seuls ou sans surveillance lorsque l’appareil, que ce dernier soit en service ou non.
9 CONSIGNES DE SÉCURITÉ IMPORTANTES LISEZ TOUTES LES INSTRUCTIONS AVANT D'UTILISER L'APPAREIL Liquides Des liquides, comme de l’eau, du café ou du thé peuvent surchauffer. Ils peuvent être chauffés au-delà du point d’ébullition sans que cela ne paraisse. Par exemple, le bouillonnement ou l’ébullition lorsque le contenant est retiré du micro-ondes n’est pas toujours présent.
9 CONSIGNES DE SÉCURITÉ IMPORTANTES LISEZ TOUTES LES INSTRUCTIONS AVANT D'UTILISER L'APPAREIL Conserves maison / Séchage des aliments / Petites quantités d’aliments : N’utilisez pas le four à microondes pour les conserves maison ou pour le chauffage de tout pot fermé. La pression s’accumulera et le pot pourrait éclater. Par ailleurs, le four ne peut maintenir l’aliment à la bonne température de mise en conserve. Les aliments mis en conserve incorrectement pourraient rancir et être dangereux à consommer.
Causes des dommages AVIS: ▯ Du métal, par exemple, une cuillère dans un verre, doit être conservé à au moins 1 pouce (25 mm) des parois du four et de l’intérieur de la porte. Des étincelles pourraient endommager irrévocablement le verre à l’intérieur de la porte. ▯ ▯ ▯ ▯ ▯ Eau dans le four chaud : ne jamais verser d'eau dans le four chaud, car cela produit de la vapeur qui peut endommager l'enceinte émaillée sous l'effet du changement de température.
Découvrir l'appareil Pièces $PRXQW 1 2 3 4 5 6 7 8 9 Panneau de commande et affichage Ventilateur et élément du four à convexion Supports de grille (4) Joint d’étanchéité de porte Charnières de porte Plat céramique pour micro-ondes Plaque tournante métallique avec élément de cuisson en dessous Élément de gril Évents de four Ventilateur à convection Le ventilateur à convection fonctionne pendant tous les modes de cuisson à convection.
Panneau de commande 3DQHO /RFN KROG VHF 6HQVRU 5HKHDW 6HQVRU &RRN $XWR 'HIURVW %URLO &RQYHFWLRQ )UR]HQ )RRGV KLJK ORZ 6HWWLQJV VWDUW HQWHU WEV NJ OEV FXSV VHF SUHKHDWLQJ VHQVLQJ WLPHU R] PLQ KU PLQ WHPS 6WDUW (QWHU 6SHHG &KHI 3RSFRUQ &ORFN 3L]]D 0RUH 0RGHV %HYHUDJH .LWFKHQ 7LPHU RQ RII Touches Vous pouvez activer une fonction en touchant brièvement la touche correspondante. Chaque fois que vous touchez une touche, un court signal sonore retentira.
Élément Signification start/enter (démarrer/ entrer) Temp ‹‹‹° tbsp/kg/lb/cups/ oz (c. à soupe)/ kg/lb/tasses/oz) h/min Touchez la touche Start/Enter (Démarrer/Entrer) requise min/sec La température est affichée Unités de mesure Valeur de la minuterie de cuisine en heures/minutes Temps de cuisson programmé en minutes/secondes L’appareil est en cours de préchauffage L’appareil est en cours de détection.
Le plateau tournant Posez le plateau tournant avec les marqueurs "A", comme illustré, sur l'entraîneur "B" situé au centre du fond du compartiment de cuisson. Le plateau tournant doit se trouver droit sur l'entraîneur. $ $ Remarque : La grille ne doit pas toucher les parois métalliques ou la partie arrière du micro-ondes. 2. Placez l’aliment sur la grille. 9 ATTENTION ▯ ▯ % $ ▯ % ▯ % Remarque : Utilisez l'appareil uniquement avec le plateau tournant en place.
Accessoires de nettoyage Appliquer l'étiquette de programme Avant d’utiliser les accessoires pour la première fois, lavez les accessoires à fond avec de l’eau savonneuse et un chiffon propre et doux. Choisir la langue soutaitée des étiquettes incluses. Fixer l'étiquette au côté de la cavité du four, comme décrit dans le feuillet des étiquettes.
Niveaux de puissance du micro-ondes Réglage du micro-ondes Vous pouvez sélectionner parmi 10 niveaux de puissance pour le micro-ondes. Si vous ne réglez pas un niveau de puissance, le micro-ondes fonctionnera automatiquement au niveau de puissance maximum de 10. Le tableau suivant fournit les niveaux de puissance suggérés pour les différents types d’aliments pouvant être préparés au micro-ondes. L'appareil doit être éteint. 1. Entrez le temps de cuisson souhaité avec les touches numérotées.
3. Touchez Start/Enter (Démarrer/Entrer). ▯ Le fonctionnement du micro-ondes se poursuit avec le nouveau niveau de puissance. Ouverture de la porte de l’appareil en cours de fonctionnement L’ouverture de la porte de l’appareil en cours de fonctionnement interrompra le mode courant. Vous devez fermer la porte de l’appareil, puis toucher Start/Enter (Démarrer/Entrer) pour reprendre le fonctionnement.
Convection La cuisson à convection circule l’air chaud dans la cavité du four au moyen d’un ventilateur. L’air en circulation constante entoure l’aliment pour chauffer la partie extérieure rapidement, pour un brunissement uniforme et pour saisir le goût par le mouvement constant de l’air chaud sur les surfaces de l’aliment. Vous pouvez régler la plage de température de 200 à 450 °F (100 à 230 °C). Remarques ▯ Utilisez le mode Speed Chef pour la cuisson combinée au micro-ondes et au four conventionnel.
Gril La fonction Gril utilise une chaleur intense qui est rayonnée depuis l’élément du haut. Vous pouvez régler deux niveaux d’intensité: ▯ Gril élévé( ▯ Gril bas* 2. Touchez de nouveau Broil ou utilisez la touche Réglage du mode Gril Vous pouvez alterner entre Gril élevé et Gril bas en cours de fonctionnement en touchant Broil ou +Amount. L’appareil doit être éteint. 1. Touchez Broil (Gril). Le mode Gril est réglé à élevé. Le symbole de Gril élevé ( s’alume, •‚ et start/enter clignotent.
4. Touchez Start/Enter (Démarrer/Entrer). Speed Chef réglera le temps de cuisson approprié et lancera la minuterie. Pendant la cuisson, un signal sonore retentira et le message « Turn Food Over » (Retourner l’aliment) est affiché à l’écran. Ouvrez la porte et retournez l’aliment. Remettez l’aliment dans le micro-ondes et touchez Start/Enter (Démarrer/Entrer). OEV PLQ VHF Une fois que le temps de cuisson s’est écoulé, un signal sonore retentira. L’appareil s’éteint et l’horloge est affichée.
Décongélation automatique 5. Touchez Start/Enter (Démarrer/Entrer). La décongélation automatique règlera le temps de décongélation approprié et lancera le compte à rebours. Avec la fonction Auto Defrost (Décongélation automatique), vous pouvez décongeler trois différents types d’aliments en entrant leur poids. Le temps de décongélation idéal sera calculé par le programme.
▯ ▯ ▯ ▯ ▯ La décongélation donne les meilleurs résultats lorsque l’aliment a décongelé et a un minimum de 0 °F (pris directement du congélateur).Si l’aliment a été rangé dans un réfrigérateur-congélateur qui ne maintient pas une température de 5 °F ou moins, programmez toujours un poids d’aliment inférieur ou un temps de cuisson inférieur pour empêcher de cuire l’aliment.
3. Touchez Start/Enter (Démarrer/Entrer). Pour la pizza fraîche ou congelée, l’écran affiche BAKE ON METAL TRAY (plat métal). La température par défaut et le témoin ; s’allument à l’écran. 4. Vous pouvez modifier la température au moyen des touches numérotées. Touchez Start/Enter (Démarrer/ Entrer) pour confirmer. Le préchauffage du four est lancé. La température réglée est atteinte une fois que la barre de préchauffage s’est remplie complètement et un signale sonore retentit.
Capteur cuisson Vous pouvez sélectionner deux modes de Capteur cuisson. Le mode Capteur cuisson vous permet de cuire bon nombre de vos aliments préférés sans sélectionner les temps de cuisson ou les niveaux de puissance. Le four à micro-ondes détermine automatiquement le temps de cuisson requis pour chaque aliment.
Capteur cuisson Le mode Capteur cuisson vous permet de cuire bon nombre de vos aliments préférés sans sélectionner les temps de cuisson et les niveaux de puissance. Le four à micro-ondes détermine automatiquement le temps de cuisson requis pour chaque aliment. Programme de Quantité capteur de cuisson 8 - Riz blanc Programmes Capteur cuisson Programme de Quantité capteur de cuisson Conseils de cuisson 1 - Pommes de terre 1 - 4 pommes Percér peau avec au four de terre une fourche.
Ouverture de la porte de l’appareil en cours de fonctionnement L’ouverture de la porte de l’appareil en cours de fonctionnement interrompra le mode courant. Vous devez fermer la porte de l’appareil, puis toucher Start/ Enter (Démarrer/Entrer) pour reprendre le fonctionnement. Annuler le fonctionnement Touchez Clear/Off (Effacer/Arrêt) pour annuler le mode de four actif. L’appareil s’éteint et l’horloge est affichée. Le ventilateur fonctionne encore quelque temps, puis s'arrête automatiquement.
Réglage du mode Melt Chocolate (Fondre chocolat) Vous pouvez régler deux différentes quantités pour fondre du chocolat: ▯ 1 tasse ▯ 2 tasses 1. Touchez More Modes (Autres modes) une fois. L’affichage montre SELECT PROGRAM 1 – 6 (SÉLECT. PROGRAMME 1 – 6) 2. Touchez la touche numérotée 4 ou touchez More Modes quatre fois. MELT CHOCOLATE (FONDRE CHOCOLAT) et le symbole de micro-ondes Ý sont affichés. La première quantité 1 cup (1 tasse) et start/enter clignotent. Le temps de cuisson est affiché. 3.
Verrouillage du panneau de commande Vous pouvez utiliser le verrouillage du panneau pour empêcher les enfants d'activer accidentellement l'appareil. La fonction de verrouillage du panneau est également très utile lorsque vous nettoyez le panneau de commande. Le verrouillage empêchera la programmation accidentelle lorsque vous essuyez le panneau de commande pour le nettoyer. Pour activer le verrouillage du panneau : Maintenez enfoncé Panel Lock (Verrouillage du panneau) pendant 3 secondes.
Tableaux de cuisson Les tableaux de cuisson peuvent servir de guide. Suivez les instructions de l'emballage ou de la recette. Gril Placer la poêle avec les aliments sur la grille avec la cavité vers le haut.
Aliment Température du four Petits gâteaux 350°F (175°C) 18 - 21 Petits pains Tarte de fruits frais 400°F (205°C) 12 - 18 375°F (190°C) 50 - 60 Muffins 400°F (205°C) 10 - 18 Légumes rôtis 425 - 450°F 15 - 20 (220 - 230°C) 450°F (230°C) 10 - 18 Gâteaux sablés Durée de cuisson (minutes) Cuisson des œufs dans le micro-ondes ▯ ▯ ▯ ▯ Ne cuisez jamais les œufs dans leur coquille et ne réchauffez jamais des œufs durs dans leur coquille, au risque de les éclater.
Cuisson de fruits de mer dans le micro-ondes Assurez-vous de disposer le poisson sur une grille à rôtir et dans un plat transparent aux micro-ondes. Assurezvous de toujours cuire le poisson jusqu’à ce qu’il se détache facilement à la fourchette. Utilisez un couvercle bien serré pour cuire à la vapeur le poisson; un couvercle plus léger de papier ciré ou de serviette de papier réduit l’efficacité de la cuisson à la vapeur.
Partie Recommandations Cavité du four Conservez l’intérieur (la cavité) du four propre. Les particules alimentaires et les liquides déversés peuvent adhérer aux parois du four, dégradant ainsi le rendement du four. Essuyez immédiatement tous les déversements. Utilisez un chiffon humide et propre et un savon léger. N'UTILISEZ PAS des détergents puissants ou des nettoyants abrasifs.
Dépannage Avant de contacter le service à la clientèle, veuillez songer à suivre les suggestions et les instructions cidessous : Problème Ni l’écran ni le four du microondes fonctionne. L’écran fonctionne mais le four ne fonctionne pas. Suggestion ▯ ▯ ▯ ▯ ▯ ▯ L’alimentation est coupée avant que le temps de cuisson ne soit écoulé. ▯ ▯ Insérez correctement la fiche dans une prise de courant mise à la terre. Réenclenchez le disjoncteur du circuit résidentiel ou remplacez tout fusible grillé.
Soutien Bosch® Avant d'appeler le service de dépannage Service Pour des informations sur le dépannage, se reporter au Manuel d'utilisation et d'entretien. Consulter la “Énoncé de la Garantie Limitée” figurant dans le Manuel d'utilisation et d'entretien. Nous réalisons que vous avez effectué un investissement considérable dans votre cuisine. Nous nous engageons à offrir tout le support dont vous et votre appareil avez besoin afin que vous puissiez profiter pleinement de votre appareil.
ÉNONCÉ DE LA GARANTIE LIMITÉE Couverture de la garantie : La garantie limitée fournie par BSH Home Appliances Ltd.
réglementation ou lois, incluant le manquement d’installer le produit en stricte conformité avec les codes et réglementations de construction et d’incendie locaux ; usure ordinaire, déversements d’aliments, liquide, accumulation de graisse ou autres substances accumulées dans, sur ou autour du produit ; ▯ toute force ou tout facteur externe, élémentaire et/ou environnemental, incluant sans limitation, pluie, vent, sable, inondation, incendie, coulée de boue, gel, humidité excessive et exposition prolongée à
Contenido Manuldeinstruciones Definiciones de seguridad .......................................... 68 INSTRUCCIONES DE SEGURIDAD IMPORTANTES . 69 9 PRECAUCIONES PARA EVITAR UNA POSIBLE EXPOSICIÓN A UNA EXCESIVA CANTIDAD DE ENERGÍA DE MICROONDAS ......................................... 69 INSTRUCCIONES PARA LA CONEXIÓN A TIERRA ... 70 Interferencia con la TV/radio .......................................... 70 Uso previsto .......................................................................
(VWH HOHFWURGRPpVWLFR GH %RVFK HV KHFKR SRU %6+ +RPH $SSOLDQFHV &RUSRUDWLRQ 0DLQ 6WUHHW 6XLWH ,UYLQH &$ ¢3UHJXQWDV" ZZZ ERVFK KRPH FRP XV £(VSHUDPRV RLU GH XVWHG Definiciones de seguridad Defincoesdgurida 9 ADVERTENCIA Esto indica que pueden producirse heridas graves o incluso la muerte si no se cumple con esta advertencia. 9 ATENCION Esto indica que pueden producirse heridas leves o moderadas si no se cumple con esta advertencia.
INSTRUCCIONES DE SEGURIDAD IMPORTANTES 9 LEER TODAS LAS INSTRUCCIONES ANTES DE UTILIZAR EL APARATO 9 PRECAUCIONES PARA EVITAR UNA POSIBLE EXPOSICIÓN A UNA EXCESIVA CANTIDAD DE ENERGÍA DE MICROONDAS I N S T R U C C I O N E S D E S E G U R I D A D I M P O R T A N T E S L E E R T O D A S L A S I N S T R U C C I O N E S A N T E S D E U T I L I Z A R E L A P A R A T O PRECAUCIONES PARA EVITAR UNA POSIBLE EXPOSICIÓN A UNA EXCESIVA CANTIDAD DE ENERGÍA DE MICROONDAS (1) No intente manejar este horno
9 INSTRUCCIONES DE SEGURIDAD IMPORTANTES LEER TODAS LAS INSTRUCCIONES ANTES DE UTILIZAR EL APARATO Para reducir el riesgo de incendio en la cavidad del horno: ▯ No cocine los alimentos excesivamente. Preste especial atención al aparato cuando coloque adentro papel, plástico u otros materiales combustibles para facilitar la cocción. ▯ Retire los cierres de alambre de las bolsas de papel o plástico antes de colocarlas en el horno.
9 INSTRUCCIONES DE SEGURIDAD IMPORTANTES LEER TODAS LAS INSTRUCCIONES ANTES DE UTILIZAR EL APARATO Uso previsto Seguridad al cocinar Este electrodoméstico ha sido diseñado para uso doméstico normal únicamente. No está aprobado para uso en exteriores. Consulte la Declaración de Garantía limitada del Producto. Si tiene alguna pregunta, comuníquese con el fabricante. No use la cavidad del horno para almacenar elementos.
INSTRUCCIONES DE SEGURIDAD IMPORTANTES 9 LEER TODAS LAS INSTRUCCIONES ANTES DE UTILIZAR EL APARATO ▯ ▯ No cubrir las rejillas ni ninguna otra parte del horno con papel de aluminio. Esto causará el sobrecalentamiento del horno. No utilice productos de papel cuando el aparato funciona en el modo tostadora. En caso de incendio Si los materiales dentro de un horno se prenden fuego: 1. Mantenga la puerta cerrada 2. Apague el electrodoméstico 3.
9 INSTRUCCIONES DE SEGURIDAD IMPORTANTES LEER TODAS LAS INSTRUCCIONES ANTES DE UTILIZAR EL APARATO Enlatado casero/deshidratación de alimentos/ pequeñas cantidades de alimentos: No utilice el horno microondas para enlatados caseros ni para calentar ningún tarro cerrado. Esto hace que la presión se acumule, y es posible que explote el tarro. Además, el horno no puede mantener los alimentos a la temperatura adecuada del enlatado.
Causas para los daños AVISOS: ▯ El metal —p. ej., una cuchara en una copa— debe mantenerse alejado, como mínimo, 1 pulg. (25 mm) de las paredes del horno y del interior de la puerta. Las chispas podrían provocar daños irreparables en el cristal del interior de la puerta. ▯ ▯ ▯ ▯ ▯ Agua en el interior del horno caliente: Nunca vierta agua en el interior del horno caliente. Se produce vapor. Se puede dañara el esmalte debido al cambio de temperatura.
Conozca el equipo Componentes $PRXQW 1 2 3 4 5 6 7 8 9 Cuadro de mandos y display Ventilador y elemento de convección Soportes de racks (4) Empaque de la puerta Bisagras de la puerta Bandeja de cerámica para microondas Plato giratorio con bandeja de metal con elemento para hornear debajo Elemento para asar con calor directo Ventilaciones del horno Ventilador de convección El ventilador de convección funciona durante todos los modos por convección.
Panel de control 3DQHO /RFN KROG VHF 6HQVRU 5HKHDW 6HQVRU &RRN $XWR 'HIURVW %URLO &RQYHFWLRQ )UR]HQ )RRGV KLJK ORZ 6HWWLQJV VWDUW HQWHU WEV NJ OEV FXSV VHF SUHKHDWLQJ VHQVLQJ WLPHU R] PLQ KU PLQ WHPS 6WDUW (QWHU 6SHHG &KHI 3RSFRUQ &ORFN 3L]]D %HYHUDJH .LWFKHQ 7LPHU 0RUH 0RGHV RQ RII Teclas digitales Puede activar una función pulsando brevemente la tecla digital correspondiente. Cada vez que pulse una tecla, sonará un bip breve.
Elemento Significado hr/min (h/min) Valor del temporizador de cocina en horas/minutos Tiempo de cocción programado en minutos/segundos El aparato se está precalentando min/sec (min/s) preheating (precalentamiento) sensing (sensor activo) timer (temporizador) Å Línea para texto libre El aparato tiene el sensor activo El temporizador de cocina está funcionando Muestra el progreso del precalentamiento Muestra información del programa, solicita al usuario el ingreso de valores requeridos Accesorios Plato
Para colocar la bandeja giratoria Coloque la bandeja giratoria con los rodillos “A”, sobre la pieza de arrastre “B” al centro del fondo de la cavidad del horno, tal como lo muestra la figura. La bandeja giratoria debe estar asentado justo sobre la pieza de arrastre. $ % Inserción del rack de alambre 1. Coloque el rack firmemente en los cuatro soportes de plástico. $ $ % % Nota: Utilizar el aparato solo cuando la bandeja giratoria esté colocada.
Limpieza de accesorios Aplicación de la etiqueta de programas Antes de utilizar accesorios por primera vez, límpielos minuciosamente con agua jabonosa caliente y un repasador suave. Seleccionar el idioma deseado de las etiquetas de programas incluidas. Aplicarlo en el lado de la cavidad del horno de forma descrita en el folleto que lleva las etiquetas.
Niveles de potencia del microondas Programación del microondas Puede seleccionar 10 distintos niveles de potencia de microondas. Si no programa un nivel de potencia, el microondas automáticamente funcionará al nivel de potencia más alto, que es el 10. La siguiente tabla proporciona los niveles de potencia sugeridos para diversos tipos de alimentos que puede preparar en el microondas. El aparato debe estar apagado. 1. Ingrese el tiempo de cocción deseado con las teclas numéricas.
Abertura de la puerta del aparato durante el funcionamiento La abertura de la puerta del aparato durante el funcionamiento interrumpirá el modo actual. Debe cerrar la puerta del aparato y, luego, pulsar Start/Enter (Comenzar/Intro) para reanudar el funcionamiento. +30 sec (+30s) Utilice la tecla +30 sec (+30 s) para poner en marcha rápidamente su microondas en el nivel de potencia más alto. Puede pulsar la tecla repetidas veces para aumentar el tiempo del microondas en incrementos de 30 segundos.
Consejos sobre utensilios de cocina para Convection (Convección) ▯ ▯ Charolas de metal: Recomendadas para todos los tipos de productos horneados, especialmente cuando es importante dorar. Las charolas de metal oscuras o con acabado opaco son las mejores para panes y pays debido a que absorben calor y producen una costra más crujiente. Las charolas de aluminio brillantes son mejores para pasteles, galletas o muffins debido a que reflejan el calor y ayudan a producir una costra liviana y tierna.
Nota: Siempre use una asadera al cocinar en modo Broil (Asar) (consulte los accesorios opcionales). Abertura de la puerta del aparato durante el funcionamiento La abertura de la puerta del aparato durante el funcionamiento interrumpirá el modo actual. Al cerrar la puerta del aparato, se reanudará el funcionamiento. Cancelación del funcionamiento Pulse Clear/Off (Borrar/Apagar) para cancelar el modo activo del horno. Se apaga el aparato y se muestra el reloj.
Programas de cocción rápida Colocar la comida en una charola cuyo tamaño sea adecuado para la cantidad de alimentos que se quieran Programa de cocción rápida Rango de peso 1 - Pechuga de pollo 0.5 - 3.0 lb 2 - Muslos de pollo 0.5 - 3.0 lb 3 - Ave entera 1.5 - 4.5 lb 4 - Asado de carne de res 0.5 - 3.25 lb 5 - Lomo de cerdo 1.0 - 3.0 lb 6 - Chuletas de cerdo 0.5 - 3.0 lb 7 - Pastel de carne 1.0 - 3.25 lb 8 - Filetes de pescado 0.5 - 2.
Programación de Auto Defrost (Descongelar automáticamente) El aparato debe estar apagado. Ejemplo: Programe Auto Defrost (Descongelar automáticamente) para Ground Meat (Carne molida). 1. Retire el alimento del embalaje y péselo; luego, colóquelo en un plato apto y en la bandeja de cerámica. 2. Pulse Auto Defrost (Descongelar automáticamente). Se enciende el símbolo Auto Defrost B y el display muestra SELECT FOOD (Seleccionar alimento) ‚ - „. 3.
Frozen Foods (Alimentos congelados) Pizza Utilice la función Frozen Foods (Alimentos congelados) para preparar alimentos congelados de preparación rápida, como nuggets de pollo, papas fritas, palitos de pescado, utilizando calor inferior y la función Convection (Convección). Coloque el alimento que desea cocina directamente en el plato giratorio con bandeja de metal. Puede programar un rango de temperaturas de 200° F a 450° F (de 100°C a 230°C).
Programación del modo Pizza para pizza para microondas Coloque la pizza para microondas en la bandeja de cerámica e introdúzcala en el horno siguiendo las instrucciones del paquete. 1. Pulse Pizza. El display muestra SELECT TYPE (Seleccionar tipo) ‚ - „. 2. Pulse la tecla numérica 3 o pulse Pizza o +Amount (+Cantidad) repetidas veces hasta que se muestre MICROWAVE PIZZA (Pizza para microondas). 3. Pulse Start/Enter (Comenzar/Intro).
Cocción por sensor Puede seleccionar dos modos de cocción por sensor. La cocción por sensor le permite cocinar muchos de sus alimentos favoritos sin seleccionar tiempos de cocción ni niveles de potencia. El horno microondas determina automáticamente el tiempo de cocción requerido para cada alimento. Para obtener los mejores resultados al cocinar por sensor, siga estas recomendaciones: ▯ Los alimentos cocidos con el sistema de sensor deben estar a una temperatura de almacenamiento normal.
Sensor Cook (Cocción por sensor) La función Sensor Cook (Cocción por sensor) le permite cocinar muchos de sus alimentos favoritos sin seleccionar tiempos de cocción ni niveles de potencia. El horno microondas determina automáticamente el tiempo de cocción requerido para cada alimento. Programa de Cantidad cocción por sensor Consejos para cocinar 8 - Arroz blanco 0.5 - 2 tazas (arroz en seco) 9 - Entradas congelados 10 - 20 oz. Utilizar una fuente con bordes altos y tapa.
Abertura de la puerta del aparato durante el funcionamiento La abertura de la puerta del aparato durante el funcionamiento interrumpirá el modo actual. Debe cerrar la puerta del aparato y, luego, pulsar Start/Enter (Comenzar/Intro) para reanudar el funcionamiento. Cancelación del funcionamiento Pulse Clear/Off (Borrar/Apagar) para cancelar el modo activo del horno. Se apaga el aparato y se muestra el reloj. El ventilador de enfriamiento funciona todavía por un tiempo, y luego se apaga automáticamente.
Programación Melt Butter (Derretir mantequilla) Programación de Soften Ice Cream (Ablandar helado) Puede programar tres distintas cantidades para derretir mantequilla: ▯ 2 cucharadas (tbsp) ▯ ] taza ▯ ^ taza Puede programar cuatro cantidades distintas para ablandar helado: ▯ 8 oz ▯ 16 oz ▯ 32 oz 1. Pulse una vez la tecla More Modes (Más modos). ▯ El display muestra SELECT PROGRAM (Seleccionar programa) 1 - 6. 2. Pulse la tecla numérica 3 o pulse More Modes tres veces.
Temporizador de cocina El temporizador de cocina se puede usar cuando el aparato se apaga o mientras un modo de cocción está activo. Puede programar el valor del temporizador de la cocina en horas y minutos. El último minuto del tiempo programada hará la cuenta regresiva en segundos. Nota: El temporizador de la cocina continua corriendo si se selecciona un modo de cocción.
Valores básicos El electrodoméstico tiene varios valores básicos. Puede ajustar estos valores según el modo en el que cocina habitualmente.
Alimento Temperatura Tiempo de del horno cocción (minutos) Temperatura Consejo/procedimiento de cocción interna Pan tostado Alimentos gratinados en cazuela Low (Baja) Low (Baja) - 3-5 3-5 Comprobar al transcurrir el tiempo mínimo. Usar solamente cazuelas de metal o de cerámica, por ejemplo, Corning Ware®. Asar a la parrilla por convección Colocar la charola de alimentos sobre la parrilla con la concavidad hacia arriba.
Cocción de verduras en su microondas ▯ ▯ ▯ ▯ ▯ ▯ Las verduras deben lavarse justo antes de cocinarse. Por lo general, no es necesario agregar agua. Si quiere cocinar verduras densas como papas o zanahorias, agregue aproximadamente ¼ taza de agua. Las verduras pequeñas (zanahorias rebanadas, chícharos, pallares, etc.) se cocinan más rápido que las verduras más grandes.
Limpieza y mantenimiento de detergente suave y tibia (no caliente).Luego, enjuague y seque completamente. ADVERTENCIA 9 Asegúrese de que todo el aparato se haya enfriado y de que la grasa se haya solidificado antes de intentar limpiar cualquier parte del aparato. ▯ ▯ Guía de limpieza ▯ ▯ Para un mejor rendimiento y por motivos de seguridad, mantenga limpios el interior y el exterior del horno.
Resolución de problemas Antes de llamar al servicio a clientes, tenga en cuenta las sugerencias y las instrucciones que aparecen a continuación: Problema Sugerencia Conectar correctamente el enchufe en la toma de corriente con conexión a tierra. ▯ Resetear el interruptor principal de energía eléctrica o cambiar posibles fusibles fundidos. El display del horno funciona, ▯ Comprobar que la puerta del horno está bien cerrada. pero el horno no trabaja.
Soporte de Bosch® Antes de llamar al servicio Servicio técnico Para obtener información sobre resolución de problemas, consulte el Manual de uso y cuidado. Consulte la “Declaración de Garantía Limitada del Producto” en el Manual de uso y cuidado. Sabemos que usted ha realizado una inversión considerable en su cocina. Nos dedicamos a brindar asistencia a usted y a su aparato de manera que tenga muchos años de cocina creativa.
DECLARACIÓN DE GARANTÍA LIMITADA DEL PRODUCTO Cobertura de esta garantía y a quiénes se aplica La garantía limitada otorgada por BSH Home Appliances Corporation (“BSH“) en esta Declaración de Garantía Limitada del Producto se aplica únicamente al electrodoméstico Bosch (“Producto“) vendido a usted, el primer comprador usuario, siempre que el Producto haya sido comprado: Para uso doméstico (no comercial) normal y haya sido utilizado en todo momento únicamente para fines domésticos normales.
▯ ▯ Uso del Producto de maneras distintas del uso normal, habitual y previsto (incluidos, entre otros, cualquier forma de uso comercial, uso o almacenamiento en exteriores de un producto diseñado para interiores, uso del Producto en aeronaves o embarcaciones).
*9001152445* 9001152445 971110 1901 Main Street, Suite 600 • Irvine, CA 92614 • 800-944-2904 www.bosch-home.