
Installation Guide


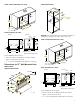


Table Of Contents
- Built-In Convection Microwave Oven (Speed Oven)
- Table of ContentsInstallation instructions
- Safety DefinitionsSafety Definitions
- IMPORTANT SAFETY INSTRUCTIONS
- READ ALL INSTRUCTIONS BEFORE USING THE APPLIANCE
- Before you beginBefore you begin
- Checklist for Installation
- 1. Before installing the appliance, be sure to verify the cabinet dimensions are correct for your appliance and that the required electrical connections are present. Make sure the electrical conduit provided on the appliance is able to reach to the p...
- 2. Move the appliance into place in front of the cabinet opening.
- 3. Remove packaging materials, leaving the bottom packaging on the appliance to avoid damage to the floor.
- 4. Team-lift the appliance directly into the cabinet cutout.
- 5. Slide the appliance all the way into place.
- 6. Fasten the appliance to the cabinet opening with the screws supplied.
- 1. Before installing the appliance, be sure to verify the cabinet dimensions are correct for your appliance and that the required electrical connections are present. Make sure the electrical conduit provided on the appliance is able to reach to the p...
- Removing Packaging
- Dimensions and Cabinet Requirements
- Electrical Installation - GROUNDING INSTRUCTIONS
- Install Appliance
- Testing Operation
- 1. Turn on power at the breaker.
- 2. For Model HMC80252UC and HMCP0252UC: Check power at junction box using a volt meter.
- 3. For all models: Test the oven mode.
- 4. Verify that the oven light comes on and the oven begins to preheat.
- 5. Test the microwave:
- 6. Verify that the oven light comes on and the water is heated.
- 7. If any of the tests do not result as explained above, contact Service for assistance. Otherwise, the installation is complete at this time.
- 1. Turn on power at the breaker.
- Bosch® Support
- Table des matièresNotice de montage
- Définitions de sécuritéDéfinitions de sécurité
- CONSIGNES DE SÉCURITÉ IMPORTANTES
- LISEZ TOUTES LES INSTRUCTIONS AVANT D'UTILISER L'APPAREIL
- AVERTISSEMENT
- AVERTISSEMENT
- Sécurité de manutention des appareils
- Codes et normes de sécurité
- Sécurité électrique
- Sécurité des micro-ondes
- 1. Fonctionnement de l’interverrouillage
- 2. Fermeture appropriée des portes
- 3. Joint d’étanchéité et surfaces étanches (production d'arcs électriques, usure et autres dommages)
- 4. Dommages aux charnières et loquet ou leur desserrement
- 5. Signe de chute ou d’abus
- Instructions de mise à la terre
- Pour tous les appareils avec un cordon d'alimentation :
- Pour tous les appareils raccordés en permanence :
- 1. Fonctionnement de l’interverrouillage
- Équipement de sécurité
- Avertissement issue de la proposition 65 de l’État de la Californie
- Avant de commencerAvant de commencer
- Liste de contrôle pour l’installation
- 1. Avant d’installer l’appareil, assurez-vous de vérifier que les dimensions du caisson sont correctes pour votre appareil et que les connexions électriques requises sont présentes. Assurez-vous que le conduit électrique fourni sur l’appare...
- 2. Déplacez l’appareil devant l’avant de l’ouverture du caisson.
- 3. Retirez les matériaux d’emballage, en laissant l’emballage du fond de l’appareil pour éviter d’endommager le plancher.
- 4. L’équipe soulève l’appareil directement dans la découpe du caisson.
- 5. Glissez l’appareil en place complètement.
- 6. Fixez l’appareil dans l’ouverture du caisson avec les vis fournies.
- 1. Avant d’installer l’appareil, assurez-vous de vérifier que les dimensions du caisson sont correctes pour votre appareil et que les connexions électriques requises sont présentes. Assurez-vous que le conduit électrique fourni sur l’appare...
- Pour enlever l’emballage
- Exigences en matière de dimensions et d'armoire
- Installation électrique - INSTRUCTIONS DE MISE À LA TERRE
- Installation de l’appareil
- Opération d’essai
- 1. Mettez sous tension au disjoncteur.
- 2. Pour modèles HMC80252UC et HMCP0252UC : Vérifiez l’alimentation à la boîte de jonction au moyen d’un voltmètre.
- 3. Pour touts les modèles : Testez le mode de four.
- 4. Vérifiez que l’éclairage du four s’allume et que le four se met à préchauffer.
- 5. Testez le micro-ondes :
- 6. Vérifiez que l’éclairage du four s’allume et que l’eau est chauffée.
- 7. Se l’un des tests n’aboutit pas tel que prévu ci-dessus, contactez le Service pour obtenir de l'aide.Sinon, l’installation est terminée à ce moment-ci.
- 1. Mettez sous tension au disjoncteur.
- Soutien Bosch®
- LISEZ TOUTES LES INSTRUCTIONS AVANT D'UTILISER L'APPAREIL
- ÍndiceInstrucciones de instalación
- Definiciones de seguridadDefiniciones de seguridad
- INSTRUCCIONES DE SEGURIDAD IMPORTANTES
- LEER TODAS LAS INSTRUCCIONES ANTES DE UTILIZAR EL APARATO
- ADVERTENCIA
- ADVERTENCIA
- Seguridad de manejo del electrodoméstico
- Códigos y normas de seguridad
- Seguridad eléctrica
- Seguridad con el microondas
- 1. Funcionamiento del enclavamiento
- 2. Cierre correcto de la puerta
- 3. Sellos y superficies sellantes (arcos eléctricos, desgaste y otros daños)
- 4. Bisagras y trabas dañadas o sueltas
- 5. Evidencia de caídas o abuso
- Instrucciones para la conexión a tierra
- Para todos los aparatos conectados por cable:
- Para un aparato conectado de forma permanente
- 1. Funcionamiento del enclavamiento
- Seguridad del equipo relacionado
- Advertencia en virtud de la Proposición 65 del estado de California
- Antes de empezarAntes de empezar
- Lista de verificación de instalación
- 1. Antes de instalar el aparato, asegúrese de verificar que las medidas del gabinete sean correctas para su aparato y que estén presentes las conexiones eléctricas requeridas. Asegúrese de que el conducto eléctrico proporcionado en el aparato pu...
- 2. Mueva el aparato a su lugar, en frente de la abertura del gabinete.
- 3. Retire los materiales de embalaje, pero deje el embalaje de la parte inferior en el aparato para evitar daños al piso.
- 4. Con ayuda, levante el aparato y colóquelo directamente en el hueco del gabinete.
- 5. Deslice completamente el aparato en su lugar.
- 6. Sujete el aparato en la abertura del gabinete con los tornillos suministrados.
- 1. Antes de instalar el aparato, asegúrese de verificar que las medidas del gabinete sean correctas para su aparato y que estén presentes las conexiones eléctricas requeridas. Asegúrese de que el conducto eléctrico proporcionado en el aparato pu...
- Quitar el embalaje
- Dimensiones y requisitos del gabinete
- Instalación eléctrica - INSTRUCCIONES DE CONEXIÓN A TIERRA
- Montaje del electrodoméstico
- Prueba del funcionamiento
- 1. Encienda la alimentación eléctrica desde el disyuntor.
- 2. Para modelos HMC80252UC y HMCP0252UC: Controle la alimentación eléctrica de la caja de empalme usando un voltímetro.
- 3. Para todos los modelos: Pruebe el modo del horno.
- 4. Verifique que la luz del horno se encienda y que el horno comience a precalentarse.
- 5. Pruebe el microondas:
- 6. Verifique que la luz del horno se encienda y que el agua se caliente.
- 7. Si alguna de las pruebas no funciona según se explicó anteriormente, comuníquese con el Servicio técnico para obtener asistencia.De lo contrario, la instalación finaliza en este momento.
- 1. Encienda la alimentación eléctrica desde el disyuntor.
- Soporte de Bosch®
- LEER TODAS LAS INSTRUCCIONES ANTES DE UTILIZAR EL APARATO

8
Electrical Installation - GROUNDING INSTRUCTIONS
The models stated on the front cover are either dual-
rated, designed to be connected to either 208/240V AC,
60 Hz, 4-wire, single-phase power supply, or rated at
120V AC, 60 Hz and use a NEMA 5-20 plug to connect
to a dedicated 120 V microwave circuit.
208/240 V models may also be combined with some
Bosch Built-in Ovens and can be connected directly to
the combo appliance. To do this, please refer to detailed
instructions with the Bosch Combination Kit.
9 WARNING
When connected to a 4 or 5-wire, 120/208-Volt 3-
phase power supply, the phase C conductor is not
required for the operation of the appliance.
Electrical Connection with Plug
HMC80152UC
HMC87152UC
Electrical Requirements:
▯ a three prong grounded outlet
▯ 120 V, 60 Hz, AC only
▯ 20 Amp electrical supply with a fuse or a circuit
breaker
This product must be connected to a supply circuit of the
proper voltage and frequency. Wire size must conform to
the requirements of the National Electric Code or the
prevailing local code for this rating. The power supply
cord and plug should be brought to a separate 20-amp
branch circuit single grounded outlet. The outlet box
should be located in the area behind the appliance (see
section Cabinet Dimensions). The outlet box and supply
circuit should be installed by a qualified electrician and
conform to the National Electrical Code or the prevailing
local code.
The voltage used must be the same as specified on this
microwave oven. Using a higher voltage is dangerous
and may result in a fire or oven damage. Using a lower
voltage will cause slow cooking. The manufacturer is not
responsible for any damages resulting from the use of
the oven with any voltage other than specified.
Electrical Connection with Wire Conduit
HMC80252UC
HMC80242UC
HMCP0252UC
The electrical supply should be a 4-wire single-phase AC.
Install a suitable conduit box (not furnished). An
appropriately-sized, UL-listed conduit connector must be
used to correctly attach the conduit to the junction box.
9 WARNING
Local codes may vary; installation, electrical
connections and grounding must comply with all
applicable local codes.
If local codes permit grounding through the electrical
supply neutral, connect both the white neutral wire and
the bare ground wire from the oven to the white neutral
electrical supply wire.
Electrical Connection
The four-wire connection is preferred, but where local
codes permit, the three wire connection is also
acceptable.
9 WARNING
When connected to a 4 or 5-wire, 120/208-Volt 3-
phase power supply, the phase C conductor is not
required for the operation of the appliance.
Four-wire Connection
Ungrounded Neutral
▯ Connect the red oven wire to the red electrical supply
wire (hot wire).
▯ Connect the black oven wire to the black electrical
supply wire (hot wire).
▯ Connect the white neutral oven wire to the white
neutral (not bare or green ground) electrical supply
wire.
▯ Connect the green ground oven wire to the bare or
green ground electrical supply wire.
Model Connection Circuit
Requirements
HMCP0252UC 4 wire conduit
cable
208 V,
60 Hz
20 Amps
240 V,
60 Hz
20 Amps
HMC80252UC
HMC80242UC
4 wire conduit
cable
208 V,
60 Hz
20 Amps
240 V,
60 Hz
20 Amps
HMC80152UC NEMA 5-20 120 V,
60 Hz
20 Amps
HMC87152UC NEMA 5-20 120 V,
60 Hz
20 Amps
SRZHUVXSSO\
MXQFWLRQER[
UHGZLUHV
JUHHQRUEDUH
JUHHQZLUH
8/OLVWHG
FDEOHIURP
ZKLWHZLUHV
EODFNZLUHV
ZLUH
FRQQHFWRU
RYHQ