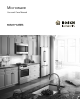
Microwave Use and Care Manual 800/Benchmark SERIES HMV8053U HMV8044U
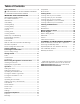
Table of Contents Useandcremanul Safety Definitions .......................................................... 3 9 PRECAUTIONS TO AVOID POSSIBLE EXPOSURE TO EXCESSIVE MICROWAVE ENERGY .......................... 3 IMPORTANT SAFETY INSTRUCTIONS ........................ 4 GROUNDING INSTRUCTIONS .......................................... 4 TV / Radio Interference ....................................................... 5 Intended Use .........................................................................
7KLV %RVFK $SSOLDQFH LV PDGH E\ %6+ +RPH $SSOLDQFHV &RUSRUDWLRQ 0DLQ 6WUHHW 6XLWH ,UYLQH &$ 4XHVWLRQV" ZZZ ERVFK KRPH FRP XV :H ORRN IRUZDUG WR KHDULQJ IURP \RX Safety Definitions 9 SafetyDfintos WARNING This indicates that death or serious injuries may occur as a result of non-observance of this warning. 9 CAUTION This indicates that minor or moderate injuries may occur as a result of non-observance of this warning.
9 S N I Y T E F A S IMPORTANT SAFETY INSTRUCTIONS READ ALL INSTRUCTIONS BEFORE USING THE APPLIANCE T N A T R OD PA ME RI L L A S N O I T C U R T S N I E R O F E B WARNING To reduce the risk of burns, electric shock, fire, injury to persons, or exposure to excessive microwave energy, read all instructions before using the appliance. WARNING If the information in this manual is not followed exactly, fire or shock may result causing property damage or personal injury.
9 IMPORTANT SAFETY INSTRUCTIONS READ ALL INSTRUCTIONS BEFORE USING THE APPLIANCE TV / Radio Interference Cleaning Safety This appliance generates and uses ISM frequency energy. If not installed and used properly, in strict accordance with the manufacturer’s instructions, it may cause interference to radio and television reception.
IMPORTANT SAFETY INSTRUCTIONS 9 READ ALL INSTRUCTIONS BEFORE USING THE APPLIANCE ▯ ▯ ▯ ▯ ▯ Oversized food or oversized metal utensils should not be inserted in a microwave oven as they may create a fire or risk of electric shock. Do not clean with metal scouring pads. Pieces can break off the pad and touch electrical parts involving a risk of electric shock. Do not store any materials, other than manufacturer’s recommended accessories, in this oven when not in use.
9 IMPORTANT SAFETY INSTRUCTIONS READ ALL INSTRUCTIONS BEFORE USING THE APPLIANCE Deep fat frying: Do not deep fat fry in oven. Oil can be heated beyond ideal temperatures very quickly in a microwave oven. Temperatures can climb high enough for the cooking oils to reach their respective flash points and burst into flames. The heated oil may bubble and spatter causing possible damage to the oven and perhaps result in burns.
9 IMPORTANT SAFETY INSTRUCTIONS READ ALL INSTRUCTIONS BEFORE USING THE APPLIANCE State of California Proposition 65 Warnings: WARNING This product can expose you to chemicals including vinyl chloride, which is known to the State of California to cause cancer and birth defects or other reproductive harm. For more information go to www.P65Warnings.ca.gov. Fan Motor Operation After using the oven the fan motor can continue to run to cool the electric components.
Causes of Damage NOTICES: ▯ Metal e.g. a spoon in a glass must be kept at least 1 inch (25 mm) from the oven walls and the inside of the door. Sparks could irreparably damage the glass on the inside of the door. ▯ Water in the hot oven interior: Never pour water into the hot oven interior. Steam is produced. Damage to the enamel can arise due to the temperature change. ▯ ▯ ▯ ▯ Do not leave moist groceries in a closed oven for an extended period of time. It can lead to corrosion inside the oven.
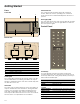
Getting Started Parts Convection Fan The convection fan operates during all convection modes. When the oven is operating in a convection mode, the fan turns off automatically when the door is opened. Front view Oven light (LED) The oven light turns off to save energy after two minutes with the door open. To turn the light back on close the door and open it again.
Touch key Function Keep Warm More Modes Set Keep Warm feature Enter more modes for convenience cooking Set Convection mode Set power level for microwave operation Add 30 seconds to microwave timer Set kitchen timer Use the number keys to enter customized values Turn kitchen ventilation feature on/off Turn surface light on/off Clear entered value/turn appliance off Confirm input, start operation Convection Power Level +30 Seconds Kitchen Timer 0-9 Vent (high/low) Light Clear/Off Start/Enter Display eleme
Using the convection rack The convection rack gives you best cooking results for convection baking. Unsuitable ovenware ▯ Notes ▯ ▯ Never use the convection rack for microwave cooking or heating. Place the convection rack in the oven when the oven is preheated. To use the convection rack: 1. Place convection rack securely on the center of the ▯ ▯ glass turntable. ▯ ▯ ▯ 2. Place food directly on the convection rack.
Before using the appliance for the first time ▯ ▯ ▯ ▯ ▯ ▯ Appliance must be properly installed by a qualified technician before use. Remove all packing materials from inside and outside the oven. While cool, wipe with a clean, damp cloth and dry. There may be a slight odor from your new appliance; this is normal and will disappear after a short time. Optimum cooking results depend on proper cookware being used. Read and understand all safety precautions and Use and Care Manual information.
Convection 3. Touch Start/Enter. The preheat bar appears in the Convection cooking circulates hot air through the oven cavity with a fan. The constantly moving air surrounds the food to heat the outer portion quickly, creating even browning and sealed-in flavor by the constant motion of hot air over the food surfaces. 9 display. The oven starts preheating. ´ ¯ CAUTION The oven door and exterior and the wire rack will become hot during Convection. Always use oven mits.
Operating the microwave The appliance must be turned off. 1. Enter the desired cooking duration with the number keys. The timer display will fill in from right to left. Example: To set a microwave cooking time of 20 minutes and 30 seconds, enter the numbers 2 0 3 0. START is blinking. 2. You can start microwave operation with the default power level 10 by touching Start/Enter, or you can adjust the power level. Touch Power Level. The default power level ˜–‚‹ is blinking.
▯ ▯ ▯ ▯ ▯ ▯ Stirring Stir foods such as casseroles and vegetables from the outside to the center to distribute the heat more evenly. This will allow the food to cook faster. (Constant stirring is not necessary.) Turning Turn over foods such as pork chops, roasts or whole cauliflower halfway through the cook time. This will help to expose all sides equally to microwave energy. Placing food Place delicate areas of food items, such as asparagus tips, toward the center of the turntable tray.
Defrosting suggestions for meat For best results, please read these suggestions when defrosting meat. Meat Weight range Suggestions Ground meat 0.5 to 2 lbs (8 to 48 oz) Steaks, chops or fish 0.5 to 3 lbs (8 to 48 oz) Chicken pieces 0.5 to 3 lbs (8 to 48 oz) After each stage, remove any pieces of food that are nearly defrosted. Let stand covered with foil for 5 to 10 minutes. Ater each stage, rearrange the food.
Sensor Cook Sensor Cook programs Sensor Cook allows you to cook many of your favorite foods without selecting cooking times and power levels. The microwave oven automatically determines the required cooking time for each food item. For best results for cooking by sensor, follow these recommendations: ▯ Food cooked with the sensor system should start from normal storage temperature. ▯ Turntable tray, glass tray and outside of container should be dry. Progr. no.
Panel Lock Settings The panel lock feature is very useful when cleaning the control panel. The lock will prevent accidental programming when wiping the control panel clean. To activate the panel lock: Touch and hold Clear/Off for more than 3 seconds. The ¿ symbol lights up in the display, a double beep sounds. To deactivate the panel lock: Touch and hold Clear/Off for more than 3 seconds. The ¿ symbol disappears from the display. The panel is unlocked.
Cancel operation Touch Clear/Off to cancel the active oven mode. The appliance turns off and the clock is displayed. The cooling fans may continue to run for awhile and then switch off automatically. More Modes Keep Warm Mode no. Name Melt butter CAUTION 2 Melt chocolate WHEN USING KEEP WARM MODE, FOLLOW THESE GUIDELINES: ▯ Do not use the Keep Warm mode to heat cold food. ▯ Be sure to maintain proper food temperature. The USDA recommends holding hot food at 140 °F (60 °C) or warmer.
Cooking Charts The charts can be used as a guide. Follow package or recipe directions. Cooking meat in your microwave Be sure to place prepared meats on a microwave-safe roasting rack in a microwave-safe dish. Start cooking the meat fat side down and if necessary, use narrow strips of aluminum foil to shield any bone tips or thin meat areas. After cooking, check the temperature in several places before letting the meat stand the recommended time.
Cooking vegetables in your microwave ▯ ▯ ▯ ▯ Vegetables should be washed just before cooking. Rarely is extra water needed. If dense vegetables such as potatoes or carrots are being cooked, add about ¼ cup of water. Small vegetables (sliced carrots, peas, lima beans, etc.) will cook faster than larger vegetables. Whole vegetables, such as potatoes, acorn squash or corn on the cob, should be arranged in a circle on the turntable before cooking.
Part Recommendations Oven cavity Keep inside (cavity) of the oven clean. Food particles and spilled liquids can stick to the oven walls, causing the oven to work less efficiently. Wipe up spills immediately. Use a damp, clean cloth and mild soap. DO NOT use harsh detergents or abrasive cleaners.
Maintenance 4. Change the charcoal filter. Charcoal filter replacement The charcoal filter, which was included with your microwave oven, is used for nonvented, recirculated installation (Room Venting). The filter should be replaced every 6 to 12 months depending on use. 1. Disconnect power to the microwave oven at the circuit breaker panel or by unplugging. 2. Remove the vent grill mounting screws. 3. Pull the vent grill away from the unit. 5.
Problem Suggestion If there has been a power interruption, remove the plug from the outlet; wait 10 seconds, then plug the microwave in again. If there was a power outage, the time indicator in the display will show 00:00. ▯ Reset the clock and any cooking instructions. ▯ Reset the household circuit breaker or replace any blown fuses. ▯ Press the Clear/Off key twice and attempt to re–enter cooking instructions. ▯ Plug a different appliance into the power outlet.
Bosch® Support Before Calling Service See the Use and Care Manual for troubleshooting information. Refer to the “Statement of Limited Product Warranty” in the Use and Care Manual. To reach a service representative, see the contact information at the front of the manual or in the following section. Please be prepared with the information printed on your product data plate prior to calling. Data Plate The data plate shows the model and serial number.
of stainless steel, paint/porcelain blemishes, chip, dents, or other damage to the finish of the Product), for a period of thirty (30) days from the date of purchase or closing date for new construction. This cosmetic warranty excludes slight color variations due to inherent differences in painted and porcelain parts, as well as differences caused by kitchen lighting, product location, or other similar factors.
IN EXCESS OF DIRECT DAMAGES WHICH ARE DEFINITIVELY CAUSED EXCLUSIVELY BY BSH, OR OTHERWISE. SOME STATES DO NOT ALLOW THE EXCLUSION OR LIMITATION OF INCIDENTAL OR CONSEQUENTIAL DAMAGES, AND SOME STATES DO NOT ALLOW LIMITATIONS ON HOW LONG AN IMPLIED WARRANTY LASTS, SO THE ABOVE LIMITATIONS MAY NOT APPLY TO YOU. THIS WARRANTY GIVES YOU SPECIFIC LEGAL RIGHTS, AND YOU MAY ALSO HAVE OTHER RIGHTS WHICH VARY FROM STATE TO STATE.
Contenido Manuldeinstruciones Definiciones de seguridad .......................................... 30 9 PRECAUCIONES PARA EVITAR UNA POSIBLE EXPOSICIÓN A UNA EXCESIVA CANTIDAD DE ENERGÍA DE MICROONDAS ......................................... 30 INSTRUCCIONES DE SEGURIDAD IMPORTANTES . 31 INSTRUCCIONES PARA LA CONEXIÓN A TIERRA ... 31 Interferencia con la TV/radio .......................................... 32 Uso previsto .......................................................................
(VWH HOHFWURGRPpVWLFR GH %RVFK HV KHFKR SRU %6+ +RPH $SSOLDQFHV &RUSRUDWLRQ 0DLQ 6WUHHW 6XLWH ,UYLQH &$ ¢3UHJXQWDV" ZZZ ERVFK KRPH FRP XV £(VSHUDPRV RLU GH XVWHG Definiciones de seguridad Defincoesdgurida 9 ADVERTENCIA Esto indica que pueden producirse heridas graves o incluso la muerte si no se cumple con esta advertencia. 9 ATENCION Esto indica que pueden producirse heridas leves o moderadas si no se cumple con esta advertencia.
9 G E S E D S E N O I C C U R TR SE NE LI INSTRUCCIONES DE SEGURIDAD IMPORTANTES LEER TODAS LAS INSTRUCCIONES ANTES DE UTILIZAR EL APARATO S A D O T S A L S E N O I C C U R T S N I ADVERTENCIA Para reducir el riesgo de quemaduras, descarga eléctrica, incendio, heridas a personas o exposición a una excesiva cantidad de energía de microondas, Lea todas las instrucciones antes de usar el aparato.
9 INSTRUCCIONES DE SEGURIDAD IMPORTANTES LEER TODAS LAS INSTRUCCIONES ANTES DE UTILIZAR EL APARATO ADVERTENCIA - Una conexión a tierra incorrecta puede resultar en un riesgo de descarga eléctrica. Consulte a un electricista o a un centro de servicio técnico calificado si no comprende la totalidad de las instrucciones de conexión a tierra o si tiene alguna duda respecto de si el horno está correctamente conectado a tierra. No use un cable de extensión.
9 INSTRUCCIONES DE SEGURIDAD IMPORTANTES LEER TODAS LAS INSTRUCCIONES ANTES DE UTILIZAR EL APARATO Seguridad al cocinar ATENCION Para evitar lesiones personales o daños materiales, debe tenerse en cuenta lo siguiente: ▯ Supervisar el horno en todo momento durante su uso. ▯ No colocar material inflamable al lado del horno o en su interior. ▯ Al flambear alimentos debajo del microondas, encender siempre el ventilador. ▯ No poner en marcha el horno si está vacío.
9 INSTRUCCIONES DE SEGURIDAD IMPORTANTES LEER TODAS LAS INSTRUCCIONES ANTES DE UTILIZAR EL APARATO ATENCION El metal, por ejemplo, una cuchara en un vaso, se debe mantener alejado por lo menos 1 pulgada (25 mm) de las paredes del horno y del interior de la puerta. Las chispas podrían dañan irreparablemente el cristal en el interior de la puerta. ▯ ▯ ▯ ▯ ▯ Sacar las comidas preparadas de su empaque. Estas se calentarán más rápidamente y de manera más uniforme en recipientes para microondas.
9 INSTRUCCIONES DE SEGURIDAD IMPORTANTES LEER TODAS LAS INSTRUCCIONES ANTES DE UTILIZAR EL APARATO Utensilios de cocina Operación en modo de salida Consulte también la Guía de utensilios para microondas. Los utensilios de cocina, la bandeja de cristal y los racks se calientan durante el funcionamiento del microondas. Siempre use agarradores al retirar los elementos del horno. Deje que la bandeja de cristal y los racks de metal (si se utilizan) se enfríen antes de manipularlos.
Causas para los daños AVISOS: ▯ El metal —p. ej., una cuchara en una copa— debe mantenerse alejado, como mínimo, 1 pulg. (25 mm) de las paredes del horno y del interior de la puerta. Las chispas podrían provocar daños irreparables en el cristal del interior de la puerta. ▯ ▯ ▯ ▯ ▯ Agua en el interior del horno caliente: Nunca vierta agua en el interior del horno caliente. Se produce vapor. Se puede dañara el esmalte debido al cambio de temperatura.
Cómo comenzar Componentes Ventilación del horno La ventilación del horno está ubicada en la parte superior de la unidad. Es posible que salga aire tibio de la abertura de ventilación antes, durante y después de la cocción. Es normal que salga vapor de la abertura de ventilación y que se acumule condensación en esta área. Esta área puede estar tibia cuando el horno está en uso. No bloquee la ventilación, dado que es importante para que circule el aire.
Teclas digitales Puede activar una función pulsando brevemente la tecla digital correspondiente. Cada vez que pulse una tecla, sonará un bip breve. Un bip prolongado le indicará que ha ingresado un valor inválido.
Utilización del rack de metal El rack de metal le brinda espacio adicional al cocinar en más de un recipiente al mismo tiempo. Para usar el rack de convección: 1. Coloque el rack de convección en forma segura en el centro del plato giratorio de cristal. 1. Coloque el rack firmemente en los cuatro soportes de plástico. Nota: El rack no debe tocar las paredes de metal ni la parte trasera del microondas. 2. Coloque la misma cantidad de alimentos encima y debajo del rack.
Utensilios no aptos horno ▯ ▯ ▯ ▯ ▯ Utensilios de cocina de metal: El metal evita que la energía de microondas llegue a los alimentos y produce una cocción desigual. Además, evite el uso de brochetas de metal, termómetros o bandejas de film de aluminio. Los utensilios de metal pueden provocar arcos eléctricos, que pueden dañar su horno microondas. Decoración de metal: Bols, tazas, platos y bandejas para servir con borde de metal.
Operación Programación del reloj Puede programar el reloj en el modo de 12 horas. 1. Pulse Clock (Reloj) una vez. 2. Ingrese la hora utilizando las teclas numéricas. Ejemplo: para programar el reloj en 12:41, ingrese 1, 2, 4, 1. 3. Pulse Clock para confirmar. Encendido/Apagado de la luz de superficie El aparato está equipado con una luz de superficie de cocción para iluminar la superficie que se encuentra debajo del aparato. Con la tecla Light (Luz), usted puede programar dos niveles de brillo.
Convección 3. Pulse Start/Enter (Comenzar/Intro). Aparece la barra La cocción por convección hace circular aire caliente a través de la cavidad del horno con un ventilador. El aire en constante movimiento rodea al alimento para calentar la parte externa con rapidez, e incluso dora al alimento y hace que el sabor quede en el interior mediante el movimiento constante de aire caliente sobre las superficies del alimento. 9 de precalentamiento en el display. El horno comienza a precalentarse.
Alimento Fuente Temperatura Tiempo de cocción en minutos Bistec de pescado, de 1/2 pulg. a 1 pulg. de grosor Chuletas de cerdo, 1/2 pulg. de grosor Pizza congelada, corteza crujiente Pizza congelada, corteza suave charola para hornear (Ø 11 pulg.) 350 °F (176 °C) 15 a 25 charola para hornear (Ø 11 pulg.
Nivel Salida de de microonpoten das cia † 50 % … 40 % „ 30 % ƒ 20 % ‚ 10 % Utilizar para Cocinar carne de res Cocinar natilla Cocinar costillas, costillar asado y solomillo asado Cocinar cortes de carne de res menos tiernos Recalentar alimentos envasados congelados Descongelar carne de res, ave y frutos de mar Cocinar pequeñas cantidades de alimentos Terminar de cocinar guisos, estofados y algunas salsas Derretir chocolate Ablandar mantequilla y queso crema Ablandar helado Hacer leudar masa con
5. Pulse Start/Enter para iniciar el programa. Cuando termine la función de descongelar automáticamente, sonarán 4 bips. Se apaga el aparato y se muestra el reloj. Nota: Suena un bip durante la descongelación para todos los programas para dar vuelta el alimento o separar los trozos. Abertura de la puerta del aparato durante el funcionamiento La abertura de la puerta del aparato durante el funcionamiento interrumpirá el modo actual.
Sensor Reheat (Recalentar por sensor) La función Sensor Reheat (Recalentar por sensor) le permite recalentar platos de cena o cacerolas (de 8 a 12 oz) para su comodidad al cocinar. Programación de recalentamiento por sensor 1. Pulse una vez Sensor Reheat (Recalentamiento por sensor). Titilan †§ -‚ y START (Comenzar) en el display. j ³ 2. Pulse Sensor Reheat repetidamente hasta que se muestre el número de programa deseado en el display.
Sensor Cook (Cocción por sensor) Programas de Sensor Cook (Cocción por sensor) La función Sensor Cook (Cocción por sensor) le permite cocinar muchos de sus alimentos favoritos sin seleccionar tiempos de cocción ni niveles de potencia. El horno microondas determina automáticamente el tiempo de cocción requerido para cada alimento.
Bloqueo de panel Valores La función de bloqueo de panel es muy útil al limpiar el control de mandos.El bloqueo evitará la programación accidental al limpiar el panel de control. Para activar el bloqueo de panel: Pulse y mantenga presionada Clear/Off (Borrar/Apagar) durante más de 3 segundos. Se enciende el símbolo ¿ en el display, suenan dos bips. Para desactivar el bloqueo de panel: Pulse y mantenga presionada Clear/Off durante más de 3 segundos. Desaparece el símbolo ¿ del display.
Beverage (Bebida) Programación de Keep Warm (Mantener caliente) La función Beverage (bebida) calienta entre 0.5 y 2 tazas de bebida. Use la siguiente tabla para determinar el valor que utilizará. 2. Ingrese el tiempo deseado utilizando las teclas 1. Pulse Keep Warm (Mantener caliente). Se enciende el símbolo ½ y titila ‹‹:‹‹ en el display. numéricas. 3. Pulse Start/Enter (Comenzar/Intro). N.° de programa Cantidad Pulse la tecla Beverage (Bebida) 1 0.5 tazas (alrededor 1 taza (alrededor 1.
4. Ingrese la categoría de peso deseada (modos 1 a 4) Programación de More modes (Más modos) 1. Pulse una vez More Modes (Más modos). Titilan ‚ y START (Comenzar) en el display. 2. Pulse More Modes repetidamente hasta que se muestre el número de programa deseado en el display. Verifique la etiqueta del menú en la parte inferior de la cavidad del horno o consulte la tabla de programas que figura arriba. 3. Pulse Start/Enter (Comenzar/Intro). Para los modos 1 a 4: titilan ‚ y START en el display.
Cocción de carne de ave en su horno de microondas Asegúrese de colocar la carne de ave sobre una rejilla para asar apta para horno de microondas en un plato apto para horno de microondas. Cubra el ave con papel encerado para evitar salpicaduras. Use tiras angostas de papel de aluminio para cubrir las puntas de huesos o las áreas delgadas de carne, o las áreas que comienzan a cocinarse excesivamente.
Cocción de frutos de mar en su horno microondas Asegúrese de colocar pescado sobre una rejilla para asar apta para horno de microondas en un plato apto para horno de microondas. Asegúrese de siempre cocinar el pescado hasta que se pueda desmenuzar fácilmente con un tenedor.
Componente Recomendaciones Cavidad del horno Mantenga limpio el interior (la cavidad) del horno. Las partículas de alimentos y los líquidos derramados pueden pegarse a las paredes del horno, y esto hará que el horno funcione de manera menos eficaz. Limpie los derrames de inmediato. Use un paño húmedo y limpio y jabón suave. NO use detergentes agresivos ni limpiadores abrasivos.
3. Para volver a instalar el filtro de ventilación, deslícelo en la ranura lateral, luego, haga presión hacia arriba y en dirección al horno para que quede trabado. Vuelva a instalar el segundo filtro con el mismo procedimiento. Mantenimiento Reemplazo del filtro de carbón activo El filtro de carbón activo, que se incluye con su horno de microondas, se utiliza para la instalación no ventilada y recirculada (ventilación de ambiente). Debe reemplazarse el filtro cada 6 a 12 meses, según el uso. 1.
Resolución de problemas Antes de llamar al servicio a clientes, tenga en cuenta las sugerencias y las instrucciones que aparecen a continuación: Problema No funcionan el display del microondas ni el horno. Sugerencia ▯ ▯ ▯ ▯ ▯ El display del horno funciona, pero el horno no funciona. ▯ ▯ Inserte adecuadamente el enchufe en una toma de corriente conectada a tierra. Retire el enchufe de la toma de corriente, espere 10 segundos y, luego, vuelva a enchufar el microondas.
Soporte de Bosch® Antes de llamar al servicio Servicio técnico Para obtener información sobre resolución de problemas, consulte el Manual de uso y cuidado. Consulte la “Declaración de Garantía Limitada del Producto” en el Manual de uso y cuidado. Sabemos que usted ha realizado una inversión considerable en su cocina. Nos dedicamos a brindar asistencia a usted y a su aparato de manera que tenga muchos años de cocina creativa.
DECLARACIÓN DE GARANTÍA LIMITADA DEL PRODUCTO Cobertura de esta garantía y a quiénes se aplica Reparación/reemplazo como único recurso La garantía limitada otorgada por BSH Home Appliances Corporation (“BSH“) en esta Declaración de Garantía Limitada del Producto se aplica únicamente al electrodoméstico Bosch (“Producto“) vendido a usted, el primer comprador usuario, siempre que el Producto haya sido comprado: Durante el período de esta garantía, BSH o uno de sus proveedores de servicio técnico autorizado
Exclusiones de la garantía La cobertura de garantía descrita en el presente excluye todos los defectos o daños que no fueron provocados directamente por BSH, incluidos, entre otros, alguno de los siguientes: ▯ Uso del Producto de maneras distintas del uso normal, habitual y previsto (incluidos, entre otros, cualquier forma de uso comercial, uso o almacenamiento en exteriores de un producto diseñado para interiores, uso del Producto en aeronaves o embarcaciones).
*9001152494* 9001152494 970919 1901 Main Street, Suite 600 • Irvine, CA 92614 • 800-944-2904 www.bosch-home.