Use and Care Manual Guide d’utilisation et d’entretien Manual de uso y cuidado Warming Drawer Models: HWD27, HWD30
Table of Contents About This Manual . . . . . . . . . . . . . . . . . . . . . . . . . . . .1 How This Manual Is Organized . . . . . . . . . . . . . . . . . . . . . . . . . . . . . . . . . . . . . . 1 Safety . . . . . . . . . . . . . . . . . . . . . . . . . . . . . . . . . . . . . .2 Important Safety Instructions . . . . . . . . . . . . . . . . . . . . . . . . . . . . . . . . . . . . . . . 2 Getting Started . . . . . . . . . . . . . . . . . . . . . . . . . . . . . . .5 Parts . . . . . . . . . . . . . . . .
This Bosch Appliance is made by BSH Home Appliances Corporation 5551 McFadden Ave. Huntington Beach, CA 92649 Questions? 1-800-944-2904 www.boschappliances.
About This Manual How This Manual Is Organized This manual contains several sections: • The Safety section describes important procedures that can ensure your safety while using the appliance. • The Getting Started section describes the features and functionality of the appliance, including a description of how to set it up and operate it. • The Operation section describes how to operate and get the best performance out of each component.
Safety Important Safety Instructions READ AND SAVE THESE INSTRUCTIONS WARNING: When properly cared for, your new appliance has been designed to be safe and reliable. Read all instructions carefully before use. These precautions will reduce the risk of burns, electric shock, fire and injury to persons. When using kitchen appliances, basic safety precautions must be followed, including those in the following pages.
Important Safety Instructions READ AND SAVE THESE INSTRUCTIONS Burn Prevention Exercise caution when opening the appliance. Standing to the side, open the door slowly and slightly to let hot air and/or steam escape. Keep your face clear of the opening and make sure there are no children or pets near the unit. After the release of hot air and/or steam, proceed with your cooking. Keep doors shut unless necessary for cooking or cleaning purposes. Do not leave open doors unattended.
Important Safety Instructions READ AND SAVE THESE INSTRUCTIONS Food Safety CAUTION: To maintian food safety, follow these guidelines: 1. DO NOT use the warming drawer to heat cold food (exception: it is safe to use the drawer to crisp crackers, chips or dry cereal and to warm plates). 2. Be sure to maintain proper food temperature. The USDA recommends holding hot food at 140°F or warmer. 3. DO NOT warm food for longer than one hour.
Getting Started Parts Control Panel Med Low f Proo High _ + On/Off Moisture Selector B Display Temperature Pads Setting Pads Signal Light ON/OFF Pad Use this pad to switch the warming drawer on and off. Signal Light The signal light turns on when the drawer is in use. Beep The control panel beeps to confirm an entry. The warming timer beeps when the time has elapsed.
Temperature Pads The temperature pads control the temperature of the drawer bottom. Setting Temperature of Drawer LOW 140 °F MED (Medium) 165 °F HIGH 190 °F PROOF 100 °F Moisture Selector MO IST Y DR Med Low f Proo High _ + On/Off B To keep foods moist: Slide the knob inside the drawer towards “Moist”. This closes the vents and seals the moisture inside the drawer. With the vent closed, the drawer is completely sealed which keeps the hot food moist and soft.
Operation About the Appliance The warming drawer will keep hot, cooked foods at serving temperature. Always start with hot food. DO NOT use to heat cold food other than proofing yeast dough, crisping crackers, chips, dry cereal or warming dishes or plates. Features Warming Timer The warming timer can be set for any increment of 5 minutes. The minimum time is 5 minutes and the maximum is 5 hours. Note: The warming timer default is 1 hour.
Preheating the Warming Drawer Preheat the warming drawer when warming food. For best results, preheat for the following times: LOW: 5 minutes MED: 10 minutes HIGH: 15 minutes PROOF: It is not necessary to preheat the drawer. Warming Food 1. Press the pad for the desired temperature setting. 2. Set the warming timer. 3. Place cooked, hot food in the drawer. It is okay to leave food in the cookware it was prepared.
Getting the Most Out of Your Appliance Temperature Recommendations Food/Cookware English 9 Level Moisture Level Proofing yeast dough PROOF moist Bacon HIGH dry Beef, medium and well done MED moist Beef, rare LOW moist Bread, hard rolls MED dry Bread, soft rolls, coffe cakes MED moist Biscuits MED moist Casseroles MED moist Eggs MED moist Fish, seafood MED moist Fried foods HIGH dry Gravy, cream sauces MED moist Ham MED moist Pancakes HIGH moist Pies, one crust
Cleaning and Maintenance Cleaning Part Recommendations Drawer interior (polished stainless steel) Use dish detergent. Wash, rinse well and dry. For hard water spots or scale, use white vinegar. Apply with a sponge or cloth, rinse, and dry. Painted surfaces Use hot soapy water or mild cleaners such as Fantastik® or Formula 409®. Wash, rinse well and dry. Avoid using abrasive cleaning agents, steel wool pads and oven cleaners.
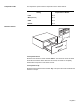
Maintenance Removing the Drawer WARNING: To prevent burns, do not remove drawer while hot. Be sure drawer is empty before removing. Med Low f Proo High _ + On/Off B 1. Pull drawer to fully open position. 2. Press down right drawer clip. 3. Lift up left drawer clip. 4. Firmly pull the drawer straight out. Retract cabinet rails while drawer is removed. Replacing the Drawer 1. Be sure cabinet rails are pushed inside cabinet. 2. Align the drawer rails with the cabinet rails. 3.
Service To reach a service representative, see the contact information at the front of the manual. Please be prepared with the information printed on your product data plate when calling. Data Plate The data plate shows the model and serial number. Refer to the data plate on the appliance when requesting service. The data plate is visible on the left side of the cabinet. It may be necessary to remove the drawer to view it.
STATEMENT OF LIMITED PRODUCT WARRANTY What this Warranty Covers & Who it Applies to The limited warranty provided by BSH Home Appliances Bosch in this Statement of Limited Product Warranty applies only to the Bosch appliance sold to you, the first using purchaser, provided that the Product was purchased: • For your normal, household (non-commercial) use, and has in fact at all times only been used for normal household purposes.
Warranty Exclusions The warranty coverage described herein excludes all defects or damage that are not the direct fault of Bosch, including without limitation, one or more of the following: • Use of the Product in anything other than its normal, customary and intended manner (including without limitation, any form of commercial use, use or storage of an indoor product outdoors, use of the Product in conjunction with air or water-going vessels).
Table des matières À propos de ce manuel . . . . . . . . . . . . . . . . . . . . . . . .1 Comment ce manuel est organisé . . . . . . . . . . . . . . . . . . . . . . . . . . . . . . . . . . . 1 Sécurité . . . . . . . . . . . . . . . . . . . . . . . . . . . . . . . . . . . . .2 Consignes de sécurité importantes . . . . . . . . . . . . . . . . . . . . . . . . . . . . . . . . . . . 2 Démarrage . . . . . . . . . . . . . . . . . . . . . . . . . . . . . . . . . .5 Pièces . . . . . . . . . . . . . . . . . . . . .
Cet appareil électroménager de Bosch est fait par BSH Home Appliances Corporation 5551 McFadden Ave. Huntington Beach, CA 92649 Questions ? 1-800-944-2904 www.boschappliances.
À propos de ce manuel Comment ce manuel est organisé Ce manuel contient plusieurs sections : • La section Sécurité décrit des procédures importantes qui visent à assurer votre sécurité pendant l'utilisation de l'appareil. • La section Démarrage décrit les caractéristiques et fonctionnalités de l'appareil et comprend une description de son installation et fonctionnement. • La section Fonctionnement décrit comment actionner et obtenir le meilleur rendement de chaque composant.
Sécurité Consignes de sécurité importantes LIRE ET CONSERVER CES CONSIGNES AVERTISSEMENT : Votre nouvel appareil a été conçu pour un fonctionnement sûr et fiable si vous en prenez bien soin. Lire attentivement toutes les consignes avant l'emploi. Ces précautions réduiront les risques de brûlures, de choc électrique, d'incendie et de lésions corporelles.
Consignes de sécurité importantes LIRE ET CONSERVER CES CONSIGNES Prévention des brûlures Faire attention en ouvrant la porte de l'appareil. Se tenir sur le côté, ouvrir la porte lentement et légèrement pour laisser l'air chaud et/ou la vapeur s'échapper. Éloigner le visage de l'ouverture et s'assurer que les enfants et animaux sont loin de l'appareil. Une fois la vapeur et l'air chaud échappés, continuer la cuisson. Garder les portes fermées sauf pour la cuisson ou le nettoyage.
Consignes de sécurité importantes LIRE ET CONSERVER CES CONSIGNES Sécurité alimentaire ATTENTION : Pour assurer la sécurité alimentaire, suivre les consignes suivantes : 1. NE PAS utiliser le tiroir-réchaud pour faire chauffer de la nourriture froide (exception : le tiroir peut être utilisé en toute sécurité pour redonner leur croustillant aux biscuits salés, chips et céréales sèches et pour faire chauffer les assiettes). 2. S'assurer de maintenir les aliments à la température adéquate.
Démarrage Pièces Tableau de commande Med Low f Proo Sélecteur d'humidité High _ + On/Off B Affichage Touches de température Touches de réglage Voyant lumineux Touche ON/OFF Utiliser cette touche pour allumer et éteindre le tiroir-réchaud. Voyant lumineux Le voyant lumineux s'allume lorsque le tiroir est en fonctionnement. Signal sonore Le panneau de commande émet un signal sonore pour confirmer une entrée. La minuterie de chauffage émet un signal sonore lorsque le temps est écoulé.
Touches de température Les touches de température contrôlent la température du fond du tiroir. Réglage Température du tiroir LOW 140 °F (60 °C) MED (Medium) 165 °F (73,8 °C) HIGH 190 °F (87,7 °C) PROOF 100 °F (37,7 °C) Sélecteur d'humidité MO IST Y DR Med Low f Proo High _ + On/Off B Pour garder les aliments humides : Faire glisser le bouton situé à l'intérieur du tiroir en direction de « Moist » (Humide).
Fonctionnement À propos de l'appareil Le tiroir-réchaud conserve les aliments cuits et chauds à la température de service. Toujours utiliser des aliments déjà chauds au départ. NE PAS utiliser pour réchauffer des aliments froids sauf pour faire lever les pâtes à base de levure, pour redonner leur croustillant aux biscuits salés, chips et céréales sèches ou pour faire chauffer les assiettes ou les plats à servir.
Préchauffer le tiroir-réchaud Avant de réchauffer les aliments, préchauffer le tiroir-réchaud. Pour obtenir de meilleurs résultats, utiliser les durées de préchauffage suivantes : LOW : 5 minutes MED : 10 minutes HIGH : 15 minutes PROOF : Il n'est pas nécessaire de préchauffer le tiroir. Réchauffer les aliments 1. Appuyer sur une touche pour sélectionner la température désirée. 2. Régler la minuterie de chauffage 3. Placer les aliments cuits et chauds dans le tiroir.
Tirer le meilleur parti de votre appareil Recommandations concernant la température Français 9 Aliments/Batterie de cuisine Niveau Niveau d'humidité Apprêt de la pâte à base de levure PROOF humide Bacon HIGH sec Bœuf, à point et bien cuit MED humide Bœuf, saignant LOW humide Pain, petits pains durs MED sec Pain, petits pain mollets, gâteaux danois MED humide Pain au lait MED humide Ragoûts MED humide Oeufs MED humide Poisson, fruits de mer MED humide Aliments frits HIGH
Nettoyage et entretien Nettoyage Pièce Recommandations L'intérieur du tiroir (acier inoxydable poli) Utiliser un liquide vaisselle. Laver et rincer soigneusement et sécher. Pour les taches d'eau dure ou le tartre, utiliser du vinaigre blanc. Appliquer avec une éponge ou un chiffon, rincer et sécher. Surfaces peintes Utiliser de l'eau savonneuse chaude ou des détergents doux tels que Fantastik® ou Formula 409®. Laver, bien rincer et sécher.
Entretien Dépose du tiroir AVERTISSEMENT : Pour éviter les brûlures, ne pas retirer le tiroir pendant qu'il est encore chaud. Avant de retirer le tiroir, s'assurer qu'il est vide. Med Low f Proo High _ + On/Off B 1. Ouvrir le tiroir au maximum. 2. Appuyer sur l'agrafe droite du tiroir. 3. Soulever l'agrafe gauche du tiroir. 4. Tirer fermement le tiroir vers soi. Faire rentrer les rails de l'armoire lorsque le tiroir est retiré. Remise en place du tiroir 1.
Dépannage Pour contacter un technicien de dépannage, voir les coordonnées sur la couverture avant du manuel. Lorsque vous téléphonez, soyez prêt à fournir les informations imprimées sur la plaque signalétique de votre produit. Plaque signalétique La plaque signalétique comporte le numéro de modèle et le numéro de série. Se reporter à la plaque signalétique de l'appareil électroménager pour faire une demande de dépannage. La plaque signalétique se trouve sur le côté gauche de l'armoire.
ÉNONCÉ DE GARANTIE LIMITÉE DU PRODUIT Couverture de la garantie et à qui elle s'applique La garantie limitée fournie par BSH Home Appliances Bosch dans le présent énoncé de garantie limitée du produit s'applique seulement à l'appareil Bosch qui vous est vendu, le premier acheteur à l'utiliser, à la condition que le produit ait été acheté : • pour votre usage domestique (non commercial) normal et qu'il ait effectivement, en tout temps, été utilisé à des fins domestiques normales ; • à l'état neuf au déta
tout déplacement ou autres frais spéciaux requis par le service de réparation, à supposer qu'il accepte d'effectuer un appel de service. Produit hors garantie Bosch n'est nullement tenu, en droit ou autrement, de vous offrir toute concession, y compris réparations, tarifs proportionnels ou remplacement de produit, une fois la garantie expirée.
PERTES OU FRAIS CONSÉCUTIFS, PARTICULIERS, ACCESSOIRES, INDIRECTS, ET/OU PUNITIFS, DES PERTES COMMERCIALES, Y COMPRIS, NOTAMMENT, LE TEMPS D'ABSENCE AU TRAVAIL, L'HÉBERGEMENT ET/OU LES REPAS AU RESTAURANT, LES FRAIS DE REMANIEMENT EN EXCÉDENT DES DOMMAGES DIRECTS QUI SONT MANIFESTEMENT CAUSÉS EXCLUSIVEMENT PAR BOSCH OU AUTREMENT.
Contenidos Acerca de este manual . . . . . . . . . . . . . . . . . . . . . . . .1 Cómo se organiza este manual . . . . . . . . . . . . . . . . . . . . . . . . . . . . . . . . . . . . . 1 Seguridad . . . . . . . . . . . . . . . . . . . . . . . . . . . . . . . . . . .2 Instrucciones de seguridad importantes . . . . . . . . . . . . . . . . . . . . . . . . . . . . . . . 2 Cómo comenzar . . . . . . . . . . . . . . . . . . . . . . . . . . . . . .5 Piezas . . . . . . . . . . . . . . . . . . . . . . . . . . . . .
Este electrodomestico de Bosch es hecho por BSH Home Appliances Corporation 5551 McFadden Ave. Huntington Beach, CA 92649 ¿Preguntas? 1-800-944-2904 www.boschappliances.
Acerca de este manual Cómo se organiza este manual Este manual contiene diversas secciones: • La sección Seguridad describe los procedimientos importantes que pueden garantizarle su seguridad mientras usa el electrodoméstico. • La sección Cómo comenzar describe las características y la funcionalidad del electrodoméstico, e incluye una descripción de su configuración y operación. • La sección Operación describe cómo operar cada componente y aprovechar al máximo su rendimiento.
Seguridad Instrucciones de seguridad importantes LEA Y CONSERVE ESTAS INSTRUCCIONES ADVERTENCIA: Su nuevo electrodoméstico ha sido diseñado para ser seguro y confiable si recibe el cuidado adecuado. Lea atentamente todas las instrucciones antes de usarlo. Estas precauciones reducirán el riesgo de quemaduras, descarga eléctrica, incendio y lesiones a personas: Al utilizar electrodomésticos de cocina, se deben tomar precauciones de seguridad básicas, incluidas las que se encuentran en las páginas siguientes.
Instrucciones de seguridad importantes LEA Y CONSERVE ESTAS INSTRUCCIONES Sofoque las llamas provocadas por alimentos que se prenden fuego, que no sean incendios ocasionados por grasa, con bicarbonato de sodio. Nunca use agua en incendios ocasionados al cocinar. Prevención de quemaduras Tenga cuidado al abrir el electrodoméstico. Parado a un lado, abra la puerta lenta y ligeramente para dejar escapar el aire caliente y/o el vapor.
Instrucciones de seguridad importantes LEA Y CONSERVE ESTAS INSTRUCCIONES Seguridad en los utensilios de cocina PRECAUCIÓN: Seguridad de los alimentos PRECAUCIÓN: Los recipientes de plástico o las envolturas de plástico pueden derretirse si entran en contacto directo con el cajón o con un utensilio caliente. Si se derrite en el cajón, es posible que no se pueda retirar. Para mantener la seguridad de los alimentos, siga las siguientes indicaciones: 1.
Cómo comenzar Piezas Panel de control Med Low f Proo Selector de humedad High _ + On/Off B Pantalla Botones de temperatura Botones de programación Luz de señal Botón ON/OFF (ENCENDIDO/ APAGADO): Use este botón para encender y apagar el cajón calentador. Luz de señal Cuando el cajón está en funcionamiento, se enciende la luz de señal. Bip El panel de control emite un bip para confirmar que ha ingresado información.
Botones de temperatura Los botones de temperatura controlan la temperatura de la base del cajón. Valor Temperatura del cajón LOW (BAJA) 140 °F MED (MEDIA) 165 °F HIGH (ALTA) 190 °F PROOF (ELEVAR) 100 °F Selector de humedad MO IST Y DR Med Low f Proo High _ + On/Off B Para mantener la humedad de los alimentos: Deslice la perilla que se encuentra dentro del cajón hacia “Moist” (Húmedo). Esto cierra los orificios de ventilación y encierra la humedad dentro del cajón.
Operación Acerca del electrodoméstico El cajón calentador mantiene los alimentos calientes y cocidos a una temperatura adecuada para servir. Siempre comience con alimentos calientes. NO use el cajón para calentar alimentos fríos, salvo para elevar masa con levadura, tostar galletas, papas fritas y cereales secos, o para calentar platos o utensilios para horno. Funciones Contador de tiempo del calentador Puede ajustar el contador de tiempo del calentador en incrementos de 5 minutos.
Precalentar el cajón calentador Precaliente el cajón calentador para calentar alimentos. Para obtener mejores resultados, precaliente el cajón durante el tiempo que se indica a continuación: LOW (BAJA): 5 minutos MED (MEDIA): 10 minutos HIGH (ALTA): 15 minutos PROOF (ELEVAR): no es necesario precalentar el cajón. Calentar alimentos 1. Presione el botón hasta alcanzar el valor de temperatura deseado. 2. Programe el contador de tiempo del calentador. 3.
Cómo aprovechar al máximo su electrodoméstico Recomendaciones de temperatura Español 9 Alimentos/utensilios de cocina Nivel Nivel de humedad Elevar masa con levadura PROOF (ELEVAR) húmedo Tocino HIGH (ALTA) seco Carne de res, término medio y bien cocida MED (MEDIA) húmedo Carne de res roja LOW (BAJA) húmedo Pan, roles de costra dura MED (MEDIA) seco Pan, roles blandos, pastel de café MED (MEDIA) húmedo Bizcochos MED (MEDIA) húmedo Guisados MED (MEDIA) húmedo Huevos MED (MEDIA)
Alimentos/utensilios de cocina Nivel Nivel de humedad Carne de ave asada MED (MEDIA) húmedo Verduras MED (MEDIA) húmedo Platos LOW (BAJA) seco Plato de comida MED (MEDIA) húmedo Español 10
Limpieza y mantenimiento Limpieza Pieza Español 11 Recomendaciones Interior del cajón (acero inoxidable pulido) Use detergente para vajilla. Lave, enjuague bien y seque. Para eliminar marcas de agua dura o sarro, use vinagre blanco. Aplique con una esponja o paño, enjuague y seque. Superficies pintadas Use agua jabonosa caliente o limpiadores suaves como Fantastik® o Formula 409®. , enjuague bien y seque. Evite usar agentes de limpieza abrasivos, esponjas de lana de acero y limpiadores para hornos.
Mantenimiento Para retirar el cajón ADVERTENCIA: Para prevenir quemaduras, no retire el cajón mientras está caliente. Asegúrese de que el cajón esté vacío antes de retirarlo. Med Low f Proo High _ + On/Off B 1. Jale el cajón hasta abrirlo por completo. 2. Presione hacia abajo el gancho derecho del cajón. 3. Levante el gancho izquierdo del cajón. 4. Jale el cajón hacia afuera con firmeza. Lleve hacia atrás los rieles del gabinete al retirar el cajón. Cambiar el cajón 1.
Servicio técnico Para consultar a un representante de servicio técnico, remítase a la información de contacto que aparece en el frente del manual. Cuando llame, tenga a la mano la información impresa en la placa de datos de su producto. Placa de datos La placa de datos muestra el modelo y el número de serie. Al solicitar servicio técnico, consulte la placa de datos del electrodoméstico. La placa de datos se encuentra en el costado izquierdo del gabinete.
DECLARACIÓN DE GARANTÍA LIMITADA DEL PRODUCTO Cobertura de esta garantía y a quiénes se aplica: La garantía limitada otorgada por BSH Home Appliances Bosch en esta Declaración de Garantía Limitada del Producto se aplica únicamente al electrodoméstico Bosch vendido a usted, el primer comprador usuario, siempre que el Producto haya sido comprado: • Para uso doméstico (no comercial) normal y haya sido utilizado en todo momento únicamente para fines domésticos normales.
solicitud, Bosch de todas maneras pagará por la mano de obra y las piezas, y enviará las piezas al proveedor de servicio técnico autorizado más cercano, pero usted seguirá siendo totalmente responsable por el tiempo de viaje y demás cargos especiales de la compañía de servicio técnico, suponiendo que acepte hacer la visita de servicio técnico.
TENDRÁN VIGENCIA ÚNICAMENTE POR EL PERÍODO DE VIGENCIA DE LA PRESENTE GARANTÍA LIMITADA EXPRESA. EN NINGÚN CASO, EL FABRICANTE SERÁ RESPONSABLE POR LOS DAÑOS CONSECUENTES, ESPECIALES, INCIDENTALES, INDIRECTOS, POR "PÉRDIDAS COMERCIALES" Y/O DAÑOS PUNITIVOS, PÉRDIDAS O GASTOS, INCLUIDOS, ENTRE OTROS, TIEMPO FUERA DEL TRABAJO, HOTELES Y/O COMIDAS EN RESTAURANTES, GASTOS DE REMODELACIÓN QUE SUPEREN LOS DAÑOS DIRECTOS, QUE DEFINITIVAMENTE HAYAN SIDO CAUSADOS DE MANERA EXCLUSIVA POR BOSCH O DE OTRO MODO.
Notes: Notas: Remarques :
5551 McFadden Avenue, Huntington Beach, CA 92649 • 800-944-2904 • www.boschappliances.com 9000201147 • 5V0AND • Rev.