Plena Message Manager Installation and Operating Manual en LBB 1965
Plena Message Manager | Installation and Operating Manual | Important safeguards en | 3 Important safeguards 1 Read instructions - All the safety instructions for use should be read before the system is operated. 2 Retain instructions - The safety instructions and instructions for use should be retained for future reference. 3 Heed warnings - All warnings on the unit and in the operating instructions should be adhered to.
Plena Message Manager | Installation and Operating Manual | About this manual en | 4 About this manual This manual provides all the information required to install and operate the unit. Conventions Warning Follow these instructions to prevent personal injury. Caution Follow these instructions to prevent damage to the equipment. Note Read these instructions for tips and other useful information. Safety precautions Warning Do not open the unit when it is connected to the mains.
Plena Message Manager | Installation and Operating Manual | Table of contents en | 5 Table of contents Important safeguards..........................................................................................................................................................3 About this manual ..............................................................................................................................................................4 Safety precautions...................................
Plena Message Manager | Installation and Operating Manual | Table of Contents Bosch Security Systems | 2003-09 | 9922 141 50502en en | 6
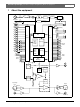
Plena Message Manager | Installation and Operating Manual | About the equipment 1 en | 7 About the equipment MAINS F1 Power 230V Stabiliser 115V Battery 24V F2 Stabiliser 18V Stabiliser Stabiliser 5V 12V 15 Volt RS232 to PC RS232 to LBB 1925 Fault LED Trigger Inputs 1 Fault Relay C NO NC 2 3 MSG Active Relay 4 MCU 5 I/O Expander 6 C NO NC I/O Expander 1 7 Eeprom (Flash) Memory 32 Mbit Tr. 7 8 Tr. 8 9 10 11 Watchdog 5 7 Tr. 9 9 Tr. 10 11 Tr.
Plena Message Manager | Installation and Operating Manual | About the equipment en | 8 The Plena Message Manager functions as an audio source in the overall Plena PA-system. With this unit it is possible to play, via other Plena units, pre-recorded messages that are triggered from external sources or the unit's front panel switches. These pre-recorded messages (that can be made on a PC in .wav-format) can be used for various purposes, e.g. routine messages or emergency calls.
Plena Message Manager | Installation and Operating Manual | About the equipment en | 9 1.3 Package The message manager is packed with the following parts: - 2x RS232 cable for connection with a PC and a system pre-amplifier (9-pin male/female) - 1x mains cable - 1x cable with Cinch connectors - 1x cable with XLR connectors (3-pin male + female) - 1x Installation and User Instructions - 2x 19" brackets to install the unit in a 19" rack - 1x CD-ROM with software to upload messages 1.
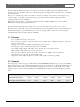
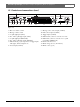
Plena Message Manager | Installation and Operating Manual | About the equipment en | 10 1.5 Controls and connections (rear) 3 9 Loop through LBB 1965/00 8900 196 5005 Supervision NC C Pilottone Mains In NO + 24V Msg Active NC C NO Fault 13 Trigger Input 1 2 GND 3 4 5 6 7 8 9 10 11 12 RS232 to LBB1925 Trigger Input 1-6 ON Pilot Message Tone 1 2 In 4 5 Out 6 8 10 11 Rated Input Power:50VA To.
Plena Message Manager | Installation and Operating Manual | Installation in rack 2 en | 11 Installation in rack Ple na M ess age Ma nag e r Figure 2.1 The message manager is delivered for tabletop use, but you can mount it in a 19" rack using the brackets supplied with the unit. In case of rack mounting, you must: • remove the 4 feet from the bottom of the unit. Without the feet, the unit is 1U high. • ensure that the ambient temperature of the unit in the rack does not exceed 55 °C.
Plena Message Manager | Installation and Operating Manual | External settings and connections 3 en | 12 External settings and connections 3.
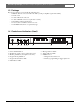
Plena Message Manager | Installation and Operating Manual | External settings and connections 3.2 Normal audio connections LBB1965 Loop through LBB 1965/00 8900 196 5005 Supervision NC C NO + 24V Msg Active NC Pilottone Mains In Trigger Input C NO Fault 1 2 GND 3 4 5 6 7 8 9 10 11 12 230V~ 115V~ 230V~ 50/60Hz Apparatus delivered connected for RS232 to LBB1925 Trigger Input 1-6 WK S/N OFF Out ON Pilot Message Tone Out In 4 2 Rated Input Power:50VA To.
Plena Message Manager | Installation and Operating Manual | External settings and connections en | 14 The message manager can be used with all Plena amplifiers via the Cinch output (4) or the XLR Output (6). The level of the messages can be set via the message volume control (2). To fully benefit from the features of the message manager in the overall Plena system (e.g. to distribute pre-recorded messages to pre-programmed zones) the unit must be connected via the system pre-amplifier LBB1925.
Plena Message Manager | Installation and Operating Manual | External settings and connections en | 15 3.
Plena Message Manager | Installation and Operating Manual | External settings and connections en | 16 3.
Plena Message Manager | Installation and Operating Manual | Operation 4 en | 17 Operation 4.1 Uploading Plena Message Manager 1 2 3 4 5 6 7 8 9 Figure 4.
Plena Message Manager | Installation and Operating Manual | Operation • • en | 18 In the left hand part of the screen the messages (max. 12) can be filled out. Proceed as follows: • Put the cursor in the File box of message # 1. • Type the message file name and location (or use the Browse box to go to the folder where the message is stored). • Proceed in the same way for all necessary messages. The Time, Size and Sample (sample rate) fields will automatically be filled out.
Plena Message Manager | Installation and Operating Manual | Operation en | 19 The status bar at the bottom of the screen contains three fields: - The STATUS field shows the progress of the uploading process. - The RS232 PORT shows the RS232 data during uploading. - The rightmost box of the status bar shows the actual upload time. On the supplied CD-ROM you can find a copy of the program R8brain (r8brain.exe, available as freeware at www.voxenga.com). With the help of this program the sample rate of the .
Plena Message Manager | Installation and Operating Manual | Operation en | 20 active, this announcement will start again from the beginning. Non-repeating single-shot announcements are just cancelled without finishing. 4.3 Monitoring The message manager comprises a 6.3 mm headphone output socket (2) with a momentary monitor pushbutton (3). When the unit is not active it is possible to select messages for monitoring. Note that memory supervision (checksum) is disabled during monitoring.
Plena Message Manager | Installation and Operating Manual | Operation • • • • • • • en | 21 Briefly press one of the pushbuttons (9), e.g. #11. The corresponding trigger indicator LED (8) will flash and the (upper) trigger indicator LEDs 1 to 6 will indicate the stored zones for pushbutton #11. The message indicator LEDs (7) will only indicate the messages related to pushbutton #11. Their place in the sequence is not indicated.
Plena Message Manager | Installation and Operating Manual | Technical data 5 Technical data 5.1 Electrical Mains voltage Max mains power consumption Max mains inrush current Battery voltage Max battery current 230/115 Vac, ±10%, 50/60Hz 50 VA 3 A @ 230 Vac / 6A @ 115 Vac 24 Vdc, +20%/-10% 1A 5.2 Messages Data format Supported sample rates (fs) Frequency response @ fs = 24 kHz @ fs = 22.050 kHz @ fs = 16 kHz @ fs = 12 kHz @ fs = 11.
Plena Message Manager | Installation and Operating Manual | Technical data 5.5 Controls Trigger inputs (Screw) Activation Supervision Supervision method contact closure on trigger inputs 1-6, selectable loop resistance check Control outputs (Screw) Message active relay Fault relay 100 V, 2 A (voltage free, SPDT) 100 V, 2 A (voltage free, SPDT) RS232 (9-pin D-sub) PC to LBB1965/00 LBB1965/00 to LBB1925/10 115 kb/s, N, 8, 1, 0 (upload) 19.2 kb/s, N, 8, 1, 0 (zone control) 5.
Plena Message Manager | Installation and Operating Manual | Bosch Security Systems | 2003-09 | 9922 141 50502en en | 24
For more information visit www.boschsecuritysystems.com © Bosch Security Systems B.V.