We give you the edge.
Familiarise yourself with your telephone Important notes What you should definitely read -- Your TM 13 and all keys at a glance (see Pages 6/7) -- Basic operating principles (starting on Page 9) Please note This telephone was designed exclusively for connection to Tenovis telecommunications systems. It may not be directly connected to a public telephone network.
Table of Contents Familiarise yourself with your telephone Important Notes . . . . . . . . . . . . . . . . . . . . . . . . . . . . . . . . . . . . . . . . . . . . . . . . . . . . . . 2 Your TM 13 at a glance . . . . . . . . . . . . . . . . . . . . . . . . . . . . . . . . . . . . . . . . . . . . . . . 6 All keys at a glance . . . . . . . . . . . . . . . . . . . . . . . . . . . . . . . . . . . . . . . . . . . . . . . . . . . 7 Get to know your telephone Special features of your telephone . . . . . . . .
TM 13 an Integral 33 Using the telephone with partners Using the telephone with partners - . . . . . . . . . . . . . . . . . . . . . . . . . . . . . . . . . . . . 63 Using the telephone with Multiline Using the telephone with Multiline- . . . . . . . . . . . . . . . . . . . . . . . . . . . . . . . . . . . . 74 Customise your telephone Switching the mode of operation . . . . . . . . . . . . . . . . . . . . . . . . . . . . . . . . . . . . . . . . 89 Silencing the telephone . . . . . . . . . . . . . . .
Table of Contents When in doubt, look it up Overview of telephone functions . . . . . . . . . . . . . . . . . . . . . . . . . . . . . . . . . . . . . . . . 137 Display . . . . . . . . . . . . . . . . . . . . . . . . . . . . . . . . . . . . . . . . . . . . . . . . . . . . . . . . . . . . . 143 Display during emergency operation . . . . . . . . . . . . . . . . . . . . . . . . . . . . . . . . . . . . 147 Menu items in the display . . . . . . . . . . . . . . . . . . . . . . . . . . . . . . . . . . . . . . . . .
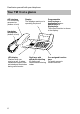
Familiarise yourself with your telephone Your TM 13 at a glance AEI interface For connecting accessories (bottom of unit) Display The displays assist you in operating the phone.
Familiarise yourself with your telephone All keys at a glance Digit keys with letters: for dialing call numbers and entering codes. The alphabetic labelling allows you to dial letter codes (vanity numbers). Star and Hash: for special functions Destinations: shows additional levels of the display keys. Call monitoring: switches the loudspeaker on and off and enables dialing with the handset on--hook. Redial: redials the 5 most recently dialed call numbers. Refer--back: initiates refer--back.
Get to know your telephone Special features of your telephone The display helps you The displays also lead you step--by--step through the operation of the phone, and contain various information, such as your current connection. The display keys have varying functions, depending on the operating steps you are currently executing. The current function of each key is shown in the display (see Page 11).
Get to know your telephone Basic operating principles The following pages provide a short description of the basic operating principles of your telephone. -- How to select and call up functions in the menu -- What your phone’s idle display shows you -- How to use the display keys of your phone -- How to enter letters, such as a name in the telephone book Table of Contents Selecting functions in the menu . . . . . . . . . . . . . . . . . . . . . . . . . . . . . . . . . . . . . . . .
Get to know your telephone Basic operating principles Selecting functions in the menu Press the menu key. The menu appears. or Press the Up or Down arrow key until the desired menu item is highlighted. Press the Enter key to call up the highlighted function. Cancelling or ending a procedure If you made a mistake or want to end a procedure: Press the Release key to cancel or end the procedure.
Get to know your telephone Basic operating principles What does the idle display show? The idle display contains: 1234 BERT 11.11.99 16:50↓ SMIT MYER MILL JOHN DAVE SAMM GARA JUDY PLANE -- Your name and call number -- Date and time Display keys 1234 Bert 12.11.99 16:50 BERT SMIT MYER ANDR MATT GREE GARA JUDY BOSS PLANE The display keys can have various functions assigned to them (only those 10 keys that are beneath the display). The current function of each key is shown in the display.
Get to know your telephone Basic operating principles Entering a text (example: Telephone book) Enter the desired name by using the digit keys with alphabetic labeling. You can enter the letters A to Z and the numbers 1 to 0, asdescribed in the following example: Entering the letter C: Press the digit key 2 three times. Enter the digit 2: Press the digit key 2 four times.
Get to know your telephone Make it easy on yourself Adjusting the volume You can adjust various acoustic settings, such as the ringing of the handset or the handsfree mode settings, to adapt to your surroundings. Adjusting the contrast of the display You can adjust the contrast of the display according to your surroundings (see Page 127). Specifying the language of the menu The menu items can be displayed in either English, German or French (see Page 128).
Get to know your telephone Initial operation of your telephone Changing the language for the display and the Minimail This message appears in the idle display. Status 'D/GB/F↑ Status 'D/GB/F↑ Language Language Mail Mail texts texts 'English↓ 'English↓ 'English↓ 'English↓ Press the Enter key to call up the corresponding menu item. The display shows the languages available for the display texts. Select the desired language for the display texts. Confirm your selection.
Telephoning as usual Making a call You can use the telephone as usual within and outside your telephone system. Internal: Dial the desired extension number directly. External: Depending on the system, dial the external extension number, e.g. ”9”. You can use the destination keys to dial the most recent call number again (Redial) and to dial frequently needed call numbers. You can initiate an automatic call--back within your telephone system to be notified when an occupied connection becomes free.
Telephoning as usual Making a call Calling within your telephone system Lift the handset. ... Enter the call number. Using destination keys to call within your telephone system Lift the handset. Press the destination key for the desired subscriber. Calling outside your telephone system Lift the handset. Enter the exit code. ... Enter the call number. Using destination keys to calling outside your telephone system Lift the handset. Enter the exit code.
Telephoning as usual Making a call Dialing the last call number again (Redial) Lift the handset. Press the Redial key to dial the last call number again. In case of busy signal (Automatic call--back) The internal connection dialed is busy. Initiate call--back. Replace the handset. As soon as the other connection is free, your telephone rings. Lift the handset. The other connection is called automatically via the telephone system. Repeatedly redialing a call number The connection dialed is busy.
Telephoning as usual Making a call Deactivating the call number and call charges displays During a call: Scroll to the Display menu item. Confirm your selection. Call number and name of the caller are no longer displayed and the call number is not stored in the redial memory. The call charges display is deactivated, but the charges continue to be counted internally. Activating the call number and call charges displays Select the Display menu item again. Confirm your selection.
Telephoning as usual Making a call Calling via the system from a remote phoneYou can call from outside of the telecommunication system to conduct an expensive long--distance call, for example, via the system. In this case the system incurs the call charges. This is possible from every telephone with subsequent-tone dial (DTMF). Dial your telecommunication system call number from an external telephone, e.g. 0697505. Enter your system’s flat--rate line code, e.g. 89.
Telephoning as usual Accepting calls You can lift the handset and speak with the caller as usual. Alternatively, you can answer the call by pressing the Handsfree key , which enables you to conduct the call with the handset on--hook. If another subscriber in your system receives a call, you can pick up the call from your phone. When you receive a call . . . . . . . . . . . . . . . . . . . . . . . . . . . . . . . . . . . . . . . . . . . . . . . 21 When another telephone receives a call (Pick--up) . . . .
Telephoning as usual Accepting calls When you receive a call Your telephone rings. The call is shown in the display. Lift the handset. When another telephone receives a call (Pick--up) Another telephone rings. ... Enter the number of the ringing telephone with your handset on--hook. Scroll to the Call pick-up menu item. Confirm your selection and wait until the call arrives at your telephone. Lift the handset. • Using the telephone without the handset: Press the Handsfree key.
Telephoning as usual Handsfree mode You can activate the loudspeaker of your telephone in order to hear the caller out loud in the room. You can also activate the Handsfree mode during a call and then continue the conversation with the handset on--hook. Hello... Hearing the caller through the loudspeaker (Call monitoring) . . . . . . . . . . . . . . . 23 Using the telephone with the handset on--hook (Handsfree mode) . . . . . . . . . . . 23 Handsfree -- Ending the call . . . . . . . . . . . . . . . .
Telephoning as usual Handsfree mode Hearing the caller through the loudspeaker (Call monitoring) During a call: Activate the loudspeaker. You can hear the caller through the loudspeaker. If you want to adjust the volume of the loudspeaker, select the ”Volume” menu item. The loudspeaker can be deactivated again by pressing the Loudspeaker key. Using the telephone with the handset on--hook (Handsfree mode) During a call: Activate the Handsfree mode. Replace the handset.
Telephoning as usual Making several connections simultaneously You can accept or refuse an additional call (Call waiting) during an existing connection. You can freely switch back and forth between the callers. Connections to a maximum of four parties can be established simultaneously. You can speak with two callers simultaneously (Conference). Please note that for the following functions the operating procedures for CTI agents (CTI = Computer-Telephone-Integration) can differ.
Telephoning as usual Making several connections simultaneously Answering an additional call (Second call) Press the Interchange function key. You can find this function key on the very right of the bottom row. Confirm your selection. You are then connected with the additional caller. The first caller is waiting and cannot hear your conversation. Accepting up to two additional calls You receive a second call while you are on the phone. You hear an alerting tone, and the bell symbol flashes.
Telephoning as usual Making several connections simultaneously Refusing an additional call Scroll to the Refuse call menu item. Confirm your selection. Consultation during a call (Refer--back) During a call: Initiate refer--back. The caller is waiting. ... Enter the number of the subscriber whom you want to consult.
Telephoning as usual Making several connections simultaneously Forwarding a second caller During a call: Press the Interchange function key. You see the name and call number of the second caller. Press the Enter key. You are then connected with the additional caller. The first caller is waiting and cannot hear your conversation. Initiate refer--back. ... Enter the number of the desired subscriber. You can now announce the call. Your first call partner is waiting. Press the Transfer function key.
Telephoning as usual Making several connections simultaneously Calling two parties simultaneously (Conference) During a call: Initiate refer--back. The caller is waiting. ... Enter the call number of the consultation subscriber. If you are connected to both subscribers, you can initiate the conference. Scroll to the Conference menu item. Confirm your selection. Speaking with just one conference subscriber If necessary, select the Interchange whom you want to speak.
Telephoning as usual Making several connections simultaneously Disconnecting selected conference subscribers During the conference: If necessary, select Interchange users in order to switch the subscriber you want to disconnect to the front field of the display. Disconnect the subscriber. Ending the conference During the conference: Scroll to the Terminate conf. menu item. Confirm your selection.
Telephoning as usual Diverting calls You can divert calls to another connection within your telephone system. You can also activate an additional Call diversion destination to divert calls only when your line is busy. Diverting calls for your telephone . . . . . . . . . . . . . . . . . . . . . . . . . . . . . . . . . . . . . . . 31 Diverting calls when your line is busy - . . . . . . . . . . . . . . . . . . . . . . . . . . . . . . . . . 31 Deactivating call diversion . . . . . . . . . . . . . . . . .
Telephoning as usual Diverting calls Diverting calls for your telephone Scroll to the Call diversion menu item. Confirm your selection. Scroll to the Div. menu item. ... Enter the internal call number to which the calls are to be diverted. Confirm your selection. The display shows the status message ”DIV. xxxx” and the LED illuminates. Diverting calls when your line is busy Scroll to the Call diversion menu item. Confirm your selection. Scroll to the Div. ... busy menu item.
Telephoning as usual Diverting calls Changing call diversion from another phone You can call from outside of the telecommunication system to set up or change a call diversion for your telephone or another telephone. This is possible from every telephone with subsequent-tone dial (DTMF). Dial the subscriber whose call diversion is to be changed: Dial your telecommunication system call number from an external telephone, e.g. 0697505. Enter your system’s flat--rate line code, e.g. 89.
Telephoning with convenience Who called? (Call list) If you do not to answer a call, the day of the week and time of the call will be stored in the call list. You can display this list at any time and return calls to the subscribers entered in it. The list contains the 10 most recent entries. Jones 13.04 08:53 Miller 12.04 15:56 Smith 12.04 13:12 Larsen 12.04 10:47 Dialing a number from the call list . . . . . . . . . . . . . . . . . . . . . . . . . . . . . . . . . . . . . . .
Telephoning with convenience Who called? (Call list) Dialing a number from the call list The display shows the ”List” message. Scroll to the Display call list menu item. Confirm your selection. Scroll to the desired menu item, e.g. 069123456 . Lift the handset. Deleting an entry The display shows the ”List” message. Scroll to the Display call list menu item. Confirm your selection. Scroll to the desired menu item, e.g. 069123456 . Confirm your selection. Scroll to the Delete menu item.
Telephoning with convenience Who called? (Call list) Deleting all entries Scroll to the Display call list menu item. Confirm your selection. Scroll to the Delete all menu item. Confirm your selection. Accepting an entry from the telephone book The display shows the ”List” message. Scroll to the Display call list menu item. Confirm your selection. Scroll to the desired menu item, e.g. 069123456 . Confirm your selection. Scroll to the Reallocate menu item. Confirm your selection.
Telephoning with convenience Using the telephone book Your telephone has a personal telephone book, in which you can store up to 268 call numbers. You can then dial these call numbers quickly and conveniently. You may modify the entries in the personal telephone book yourself. Brown 2435 Bauer 3827 Dann 7483 Garl 6126 Dialing a call number from the telephone book . . . . . . . . . . . . . . . . . . . . . . . . . . . . 37 Entering a new call number into the telephone book . . . . . . . . . . . . . . .
Telephoning with convenience Using the telephone book Dialing a call number from the telephone book Call up the telephone book. N or Press a digit key with letters or a programmed function key to enter the first letter of the name, e.g. N. Confirm the entry. Scroll to the desired menu item, e.g. Nadine 069123456 . Lift the handset. Entering a new call number into the telephone book Call up the telephone book. Scroll to the New entry menu item. Confirm your selection and enter the new data.
Telephoning with convenience Using the telephone book Viewing entries in the telephone book Call up the telephone book. Scroll to the Display lists menu item. Confirm your selection. Scroll to the desired item, e.g. Destination keys . Confirm your selection. You will see all entries that are assigned to destination keys. Editing entries in the telephone book Call up the telephone book. N or Press a digit key with letters or a programmed function key to enter the first letter of the name, such as N.
Telephoning with convenience Using the telephone book Storing a call number as a note During a call: Call up the telephone book. Scroll to the New entry menu item. Confirm your selection and enter the call number of the caller. Scroll to the Allocate menu item. Select the Note menu item. Scroll to the Store menu item. Confirm your selection.
Telephoning with convenience Using the telephone book Assigning a call number in the telephone book to a destination key Call up the telephone book. Scroll to the Modify entry menu item. Confirm your selection. Scroll to the desired menu item, e.g. Nadine 069123456 . Confirm your selection. Scroll to the Edit menu item. Confirm your selection. Scroll to the Allocate menu item. Press the Redial key repeatedly until Destination 1..20 appears. Press the desired destination key.
Telephoning with convenience Using the telephone book Storing a call number in the telephone book as a DSS destination Call up the telephone book. Scroll to the Modify entry menu item. Confirm your selection. Scroll to the desired menu item, e.g. Nadine 069123456 . Confirm your selection. Scroll to the Edit menu item. Confirm your selection. Scroll to the Allocate menu item. Press the Redial key repeatedly until DSS destination appears. Press the desired key on the DSS module.
Telephoning with convenience Using the telephone book Storing an emergency number or own call number Call up the telephone book. Scroll to the Modify entry menu item. Confirm your selection. Scroll to the desired menu item, e.g. Nadine 069123456 . Confirm your selection. Scroll to the Edit menu item. Confirm your selection. Scroll to the Allocate menu item. Press the Redial key repeatedly until Own appears. call number or Indiv. emerg. no. Press the desired destination key (only for ”Indiv. emerg.
Telephoning with convenience Storing all incoming calls (Talk list) The talk list stores a maximum of 10 subscriber call numbers from which you have been called and you have talked to. The most recent entry will be at the top of the list. You can call up call numbers selectively and, if desired, dial immediately. Call numbers from the talk list can easily be stored in the telephone book. John 31.05 10:56 Benning18.05 12:13 Voss 04.05 08:16 Dann 04.05 07:42 Displaying and selecting the talk list . .
Telephoning with convenience Storing all incoming calls (Talk list) Displaying and selecting the talk list Scroll to the Display talk list menu item. Confirm your selection. A list of all entries in the talk list appears. The subscriber and time are displayed at the end of the list. Scroll to the desired menu item, e.g. Sandra 10:13 . Confirm your selection. Scroll to the Dial menu item. Confirm your selection. Your telephone automatically activates the Handsfree mode.
Telephoning with convenience Storing all incoming calls (Talk list) Deleting all entries Scroll to the Display talk list menu item. Confirm your selection. Scroll to the desired menu item, e.g. 069123456 . Confirm your selection. Scroll to the Delete all menu item. Confirm your selection. Adding a call number to the telephone book Scroll to the Display talk list menu item. Confirm your selection. Scroll to the desired menu item, e.g. Sandra 10:13 . Confirm your selection.
Telephoning with convenience Querying messages (Voice mail) If your system is connected to a Voice mail, callers can leave messages for you similar to an answering machine. You can query these messages by calling. Message... Diverting all calls to the Voice mail . . . . . . . . . . . . . . . . . . . . . . . . . . . . . . . . . . . . . . 47 Querying messages . . . . . . . . . . . . . . . . . . . . . . . . . . . . . . . . . . . . . . . . . . . . . . . . . .
Telephoning with convenience Querying messages (Voice mail) Diverting all calls to the Voice mail Scroll to the Call diversion menu item. Confirm your selection. ... Enter the internal call number that is assigned to the Voice mail in your system. Confirm your selection. Querying messages The idle display shows the symbol for ”Messages” . Scroll to the Messages: menu item. Confirm your selection. Scroll to the Server message menu item. Confirm your selection. Dial.
Telephoning with convenience Viewing call charges All call charges incurred since the last reset are stored and totalled in your telephone system. You can view the call charges for the last two calls and delete the display. It is also possible to display the current call charges during a conversation in either units, DM or Euros. You can delete the counters for single calls and the sum if this function was set accordingly by the TENOVIS Service.
Telephoning with convenience Viewing call charges View call charges Scroll to the Call charges menu item. Confirm your selection. Activating and deactivating the call charges display Scroll to the Call charges menu item. Confirm your selection. Scroll to the menu item Disable charges or Enable charges . Confirm your selection. Resetting the call charges counter Scroll to the Call charges menu item. Confirm your selection. Scroll to the Delete single counter menu item.
Telephoning with convenience Viewing call charges Switching the call charges display to Euros Scroll to the Charges menu item. Confirm your selection. Scroll to the Convert to Euro menu item. Confirm your selection. Select the currency DEM . Confirm your selection. Switching the charges display to units Scroll to the Charges menu item. Confirm your selection. Scroll to the Display units menu item. Confirm your selection. i • Use the function ”Disable conversion” function to switch from Euros to DM.
Telephoning with convenience Viewing call charges Metering the call charges for private calls and projects You want to dial a call number with a project or private PIN. ... Enter the external line code that has been assigned for dialing with a project or private code in your telephone system, e.g. ”1”. This external line code can contain up to 5 digits. ... Enter the code that has been assigned for private use or the respective project, e.g. ”3433”. This code can contain up to 9 digits. ...
Telephoning with convenience Reminding yourself (Appointments) You can have your telephone remind you of important appointments. Up to ten appointments can be entered. You can choose whether you want to be reminded just once or every day. You will hear a signal tone to remind you of the appointment and see the text you entered for this appointment. Entering a new appointment . . . . . . . . . . . . . . . . . . . . . . . . . . . . . . . . . . . . . . . . . . . 53 View appointment . . . . . . . . . . . .
Telephoning with convenience Reminding yourself (Appointments) Entering a new appointment Scroll to the Appointments menu item. Confirm your selection. Scroll to the Enter menu item. Confirm your selection and enter the new appointment. Scroll to the Store menu item. Confirm your selection. The following message appears in the idle display: Appointment activated . View appointment Scroll to the Appointments menu item. Confirm your selection. The appointments already entered are displayed.
Telephoning with convenience Sending and receiving texts You can send short texts to up to 5 people. Up to 10 texts are available: -- 7 prepared texts that you can edit or add to, -- 3 texts which you can compose yourself. You can also receive texts. The mailbox is a call list for texts. Callers can leave up to 10 Minimails. A Minimail has the length of one display line. The display will indicate that you have received a Minimail. Meeting 14:30 ... Selecting and sending a prepared text message . . . . .
Telephoning with convenience Sending and receiving texts Selecting and sending a prepared text message Scroll to the Messages: menu item. Confirm your selection. Scroll to the Send Minimail menu item. Confirm your selection. Scroll to the desired menu item, e.g. Meeting ... 00:00 00.00 . Complete the entry, i.e. enter the date and time. Confirm the entry. ... Enter the call number of the recipient. Confirm your selection. ”+” indicates, that the subscriber has been selected.
Telephoning with convenience Sending and receiving texts Editing and sending a prepared text message Scroll to the Messages: menu item. Confirm your selection. Scroll to the Send Minimail menu item. Confirm your selection. Scroll to the Edit menu item. Confirm your selection. The texts which can be edited are shown in the display. You can then edit the texts or simply overwrite them. Confirm the entry. ... Enter the call number of the recipient. Confirm the entry.
Telephoning with convenience Sending and receiving texts Composing and sending your own text message Scroll to the Messages: menu item. Confirm your selection. Scroll to the Send Minimail menu item. Confirm your selection. Scroll to the Edit menu item. Confirm your selection. Scroll down through all texts. You can now enter the text. Confirm the entry. ... Enter the call number of the recipient. Confirm the entry. ”+” indicates, that the subscriber has been selected. Scroll to the Send menu item.
Telephoning with convenience Sending and receiving texts Sending a text message to all subscribers Scroll to the Messages: menu item. Confirm your selection. Scroll to the Send Minimail menu item. Confirm your selection. Scroll to the desired entry. ... Complete the entry, i.e. enter the date and time. Confirm the entry. ... Enter the call numbers of the desired recipients. Scroll to the Minimail to all menu item. Confirm your selection.
Telephoning with convenience Sending and receiving texts Viewing and deleting received text messages The idle display shows the symbol for ”Messages” : Scroll to the Messages: menu item. Confirm your selection. Scroll to the View Mailbox menu item. Confirm your selection. Scroll to the desired text message, e.g. Meeting 14:00 14.01 . Confirm your selection. Scroll to the Delete menu item. Confirm your selection.
Telephoning with convenience Locking your telephone You can protect the telephone against unauthorised use by locking it with a PIN (Personal Identification Number). You can enter this PIN yourself and also change it at any time. Others will then only be able to use your telephone for dialing internal or emergency numbers or to accept calls, depending on the locking level. You can choose from 5 different locking levels (not included in the standard setting, please refer to the TENOVIS Service).
Telephoning with convenience Locking your telephone Setting / changing the PIN (Personal Identification Number) Scroll to the Lock menu item. Confirm your selection. Scroll to the Enter PIN menu item. Confirm your selection. ... Enter the current PIN. This step is excluded when you enter your PIN for the first time. ... Enter the new PIN. ... Enter the PIN again to confirm. Locking your telephone Scroll to the Lock menu item. Confirm your selection. Scroll to the Lock menu item.
Telephoning with convenience Locking your telephone Unlocking your telephone In the idle display: Scroll to the Locked entry. Confirm your selection. ... Enter the current PIN. If you enter an incorrect PIN three consecutive times, the telephone is blocked for the next 15 minutes. Specifying the locking level Scroll to the Lock menu item. Confirm your selection. .. Enter the desired locking level with a digit key.
Using the telephone with partners Using the telephone with partners The TENOVIS Service can connect up to 10 telephones of your system with each other to form a partner group. The display provides information on the activities of each partner. You can set your telephone to sound a short tone whenever one of your partners receives a call (Partner beep). By simply pressing a few keys you can also set and delete partner diversions. A Deputy function key must be set for this.
Using the telephone with partners Using the telephone with partners Information in the partner display A " A A or A Flashes alternately with the partner display: The partner is being called. Flashes alternately with the partner display: The partner for whom a partner diversion is set is being called. Flashes alternately with the partner display: The partner is being called simultaneously by two different callers. The partner is making a call.
Using the telephone with partners Using the telephone with partners Diverting calls from one partner to another Scroll to the Further functions: menu item. Confirm your selection. Scroll to the Partners menu item. Confirm your selection. Press the key for the partner for whom you are diverting. Press the key for the partner to whom you want to divert. Scroll to the Store menu item. Confirm your selection. The partner diversion is set for the phone. You can activate it at any time.
Using the telephone with partners Using the telephone with partners Setting the partner beep Scroll to the Further functions: menu item. Confirm your selection. Scroll to the Partners menu item. Confirm your selection. Scroll to the Set partner beep menu item. Confirm your selection. Press the key for the partner (also multiple) to switch on the partner beep. i • It is possible that your telephone is set up for Multiline instead of for partner functions.
Using the telephone with partners Using the telephone with partners Expanding the partner group Scroll to the Further functions: menu item. Confirm your selection. Scroll to the Partners menu item. Confirm your selection. Scroll to the Expand group menu item. Confirm your selection. ... Enter the call number of the subscriber that is supposed to be added to the partner group. Scroll to the Store menu item. Confirm the entry.
Using the telephone with partners Using the telephone with partners Reducing the partner group Scroll to the Further functions: menu item. Confirm your selection. Scroll to the Partners menu item. Confirm your selection. Scroll to the Reduce group menu item. Confirm your selection. Press the key for the partner that is supposed to be removed from the group. Scroll to the Delete menu item. Confirm your selection.
Using the telephone with partners Using the telephone with partners Restricting partner signaling Scroll to the Further functions: menu item. Confirm your selection. Scroll to the Partners menu item. Confirm your selection. Scroll to the Restr. signaling menu item. Confirm your selection. The partners can no longer see in their display if you are making a call, being called, if call diversion is activated for your phone, etc. Allowing partner signaling Scroll to the Further functions: menu item.
Using the telephone with partners Using the telephone with partners Assigning partners to different destination keys Scroll to the Further functions: menu item. Confirm your selection. Scroll to the Partner menu item. Confirm your selection. Scroll to the Spec partner pos. menu item. Confirm your selection. Press the key for the partner that is to be assigned to a different key. Press the partner or destination key that is supposed to be assigned.
Using the telephone with partners Using the telephone with partners Assigning a partner to the DSS module Scroll to the Further functions: menu item. Confirm your selection. Scroll to the Partners menu item. Confirm your selection. Scroll to the Spec partner pos. menu item. Confirm your selection. Scroll to the Partner on DSS menu item. Confirm your selection. The partners are transferred to the top row of keys of the DSS module in their current order.
Using the telephone with partners Using the telephone with partners Deactivating partner display Scroll to the Further functions: menu item. Confirm your selection. Scroll to the Partners menu item. Confirm your selection. Scroll to the Set partner disp. menu item. Confirm your selection. Press the desired partner key (or several keys). The black triangle disappears. Labeling partner fields with text Press the desired partner key. Scroll to the Edit menu item.
Using the telephone with partners Using the telephone with partners Setting a deputy key Scroll to the Further functions: menu item. Confirm your selection. Scroll to the Partners menu item. Confirm your selection. Scroll to the Set deputy key menu item. Confirm your selection. Press the key of the partners for whom call diversion is to be be activated. Scroll to the Return menu item. Confirm your selection. Press the key of the partners to whom the calls are to be diverted to.
Using the telephone with Multiline Using the telephone with Multiline The TENOVIS Service has set up the telephone system so that you and each of your colleagues have access to every line (32 available) in order to make and answer calls. The display provides you with information on all lines and calls. The keys of the display act as line keys. You can also connect a DSS module to have single or all lines displayed.
Using the telephone with Multiline Using the telephone with Multiline Table of Contents Information in the display . . . . . . . . . . . . . . . . . . . . . . . . . . . . . . . . . . . . . . . . . . . . . . 76 Occupying a line . . . . . . . . . . . . . . . . . . . . . . . . . . . . . . . . . . . . . . . . . . . . . . . . . . . . . 76 Answering a call to a phone line . . . . . . . . . . . . . . . . . . . . . . . . . . . . . . . . . . . . . . . . 76 Answering calls when you are already on the phone . .
Using the telephone with Multiline Using the telephone with Multiline Information in the display Display Meaning Call number / name Your telephone is idle Call number / name + A colleague is making a call (Connection) Your own call Call number / name flashes You are receiving a call with Call number / name Hold Call number / name Hold -- Recall according to time Call number / name Exclusive hold flashes slowly, ”HOLD” message flashes with + flashes slowly, ”EXHD” message Call number / na
Using the telephone with Multiline Using the telephone with Multiline Answering calls when you are already on the phone Press the line key for the call you want to pick up. The connection is put on hold (see ”Automatic hold (basic setting)”). Answering the call depends on the settings of your phone (see ”Setting the info display”). If the automatic hold was deactivated by the service technician, the connection is lost.
Using the telephone with Multiline Using the telephone with Multiline Initiating refer--back During a call: Initiate refer--back. The caller is waiting. ... Enter the number of the subscriber whom you want to consult. Once the refer--back subscriber has answered the call, you can initiate a conference (see Page 28). Initiating a conference via phone lines Setting up a conference is only possible if an active connection and a connection on hold have been made. Press the Conference function key.
Using the telephone with Multiline Using the telephone with Multiline Setting call diversion Scroll to the Call diversion menu item. Confirm your selection. Press a line key for the call number assigned to you, for which you want to set up call diversion. This step is omitted if you only have one call number. Scroll to the menu item Div. or Div. ... busy . Enter the internal call number to which the calls are to be diverted. Confirm your selection.
Using the telephone with Multiline Using the telephone with Multiline Deactivating call diversion Scroll to the Call diversion menu item. Confirm your selection. Press the line key for which the call diversion is to be disabled. This step is omitted if you have only one call number. Select the active call diversion (indicated by ”+”). Confirm your selection.
Using the telephone with Multiline Using the telephone with Multiline Dialing a number from the local call list A call on a line assigned to you has not been answered. The idle display (status) shows the message ”New ln. call list”. Scroll to the New ln. call list status item. Confirm your selection. Scroll to the desired entry. The right--hand side of the display shows you which line assigned to you received the call. Lift the handset.
Using the telephone with Multiline Using the telephone with Multiline Locking a line Scroll to the Lock menu item. Confirm your selection. Press a line key for the call number assigned to you that you want to lock. This step is omitted if you only have one call number. Scroll to the Lock menu item. Confirm your selection. The display shows you how many of your call numbers are locked. Unlocking a line Scroll to the Lock menu item. Confirm your selection. Press the line key of the line you want to unlock.
Using the telephone with Multiline Using the telephone with Multiline Placing all lines on the DSS module Scroll to the Further functions: menu item. Confirm your selection. Scroll to the Line function menu item. Confirm your selection. Scroll to the Set line position menu item. Confirm your selection. Scroll to the Lines on DSS module menu item. Confirm your selection. All existing lines are signaled only on the DSS module by light diodes.
Using the telephone with Multiline Using the telephone with Multiline Assigning lines to different line keys Scroll to the Further functions: menu item. Confirm your selection. Scroll to the Line function menu item. Confirm your selection. Scroll to the Set line position menu item. Confirm your selection. Press the line key which you want to assign to a different key. Press the line or destination key to which it is supposed to be assigned. The line is now assigned to a new key.
Using the telephone with Multiline Using the telephone with Multiline Activating line beep Scroll to the Further functions: menu item. Confirm your selection. Scroll to the Line function menu item. Confirm your selection. Scroll to the Set line beep menu item. Confirm your selection. Press the desired line key repeatedly until every line has been signaled according to your needs.
Using the telephone with Multiline Using the telephone with Multiline Setting the info display Scroll to the Further functions: menu item. Confirm your selection. Scroll to the Line function menu item. Confirm your selection. Scroll to the Set info display menu item. Confirm your selection. You can now specify whether you want to retrieve a call directly or pick up a calling / on--hold line via an info query. Each type requires its own operating procedures: Info Retrieve on: 1.
Using the telephone with Multiline Using the telephone with Multiline Sending a Minimail Scroll to the Messages: menu item. Confirm your selection. Scroll to the Send Minimail menu item. Confirm your selection. Scroll to the desired menu item, e.g. Meeting ... 00:00 00.00 . Complete the entry, i.e. enter the date and time. Confirm the entry. ... Enter the call number of the recipient. Confirm your selection. ”+” indicates, that the subscriber has been selected.
Using the telephone with Multiline Using the telephone with Multiline Switching the line display on / off Scroll to the Further functions: menu item. Confirm your selection. Scroll to the Line function menu item. Confirm your selection. Press the desired line key that is to be or is not to be displayed. The black triangle disappears.
Customise your telephone Switching the mode of operation You can change the mode of operation according to your needs. There are three different ways the menus can be displayed. -- Simple mode: All three lines of the display are used for the menu. -- Standard mode: Your telephone is originally set to the standard mode. The current menu item is displayed in the first line of text. You can use the arrow keys to scroll to the other menu items.
Customise your telephone Silencing the telephone You can deactivate the normal ringing, signal tone and VIP ringing if, for example, you are in a meeting. An incoming call is then indicated only by the alerting tone. If you are a subscriber to a group line, you can temporarily cut yourself out of the group line. Table of Contents Deactivating the ringing / signal tone / VIP tone . . . . . . . . . . . . . . . . . . . . . . . . . . . 91 Activating the ringing / signal tone / VIP tone . . . . . . . . . . .
Customise your telephone Silencing the telephone Deactivating the ringing / signal tone / VIP tone Scroll to the Further functions: menu item. Confirm your selection. Scroll to the Further Settings: menu item. Confirm your selection. Scroll to the Silence menu item. Confirm your selection. Scroll to the desired menu item, e.g. Ringing tone . Switch the desired tone to ”off”. Activating the ringing / signal tone / VIP tone Scroll to the Further functions: menu item. Confirm your selection.
Customise your telephone Silencing the telephone Leaving a group line Scroll to the Further functions: menu item. Confirm your selection. Scroll to the Phone settings menu item. Confirm your selection. Scroll to the Part of group menu item. Switch the menu item to ”off”. Calls will then be diverted to the next group line subscriber.
Customise your telephone Taking a call elsewhere (Following) You can also use another telephone to set up call diversion to your own phone. You first have to prepare this function on your own telephone. The process is set, activated and deactivated with particular codes. Please contact your TENOVIS Service for the valid codes. Table of Contents Preparing the Following process on your own telephone . . . . . . . . . . . . . . . . . . . 94 Activating the Following process on another telephone . . . . . . .
Customise your telephone Taking a call elsewhere (Following) Preparing the Following process on your own telephone Lift the handset. Press the Star key and enter the code, e.g. ”13”. Replace the handset. Activating the Following process on another telephone At the other phone: Lift the handset. Press the Star key and enter the code, e.g. ”14”. ... Dial your own call number. Replace the handset. Incoming calls to your telephone are then diverted to the other phone.
Customise your telephone Taking a call elsewhere (Following) Deactivating the Following process on your own telephone Lift the handset. Press the Hash key and enter the code, e.g. ”13”. Replace the handset. Deactivating the Following process on another telephone At another phone: Lift the handset. Press the Hash key and enter the code, e.g. ”14”. ... Dial your own call number. Replace the handset.
Customise your telephone Double Call Your telephone and another telephone ring simultaneously for the same incoming call. Double Call is set, activated and deactivated with particular codes. Setting a Double Call destination Lift the handset. Press the Star key and, for example, enter the code ”33”. ... Enter the call number of your Double Call destination. Press the Hash key. Replace the handset. Activating Double Call Lift the handset. Press the Star key and, for example, enter the code ”34”.
Customise your telephone Setting function keys You can assign often used functions to the programmable function keys. These functions can then be performed by simply pressing the respective key. You can find more information on this subject on Page 137. Setting function keys Scroll to the Further functions: menu item. Confirm your selection. Scroll to the Set function keys menu item. Confirm your selection. Press the key to which you want to assign the new function. Press the desired function, e.g.
Customise your telephone Setting macro functions You can assign multiple--step macro functions to the function keys of your telephone. This, for example, allows you to activate and deactivate a fixed call diversion by simply pressing a key. Table of Contents Assigning a macro to a function key . . . . . . . . . . . . . . . . . . . . . . . . . . . . . . . . . . . . . 99 Assigning partner diversion to a function key . . . . . . . . . . . . . . . . . . . . . . . . . . . . . 100 Enabling a function key . . .
Customise your telephone Setting macro functions Assigning a macro to a function key Scroll to the Further functions: menu item. Confirm your selection. Scroll to the Set up macro menu item. Confirm your selection. Select the desired function: DIV1 or DIV2 for call diversion, or PCK1 or PCK2 for Call pick--up. ... Enter the call number to which you want to divert the calls (Call diversion), or from which you want to pick up calls (Call pick--up). Confirm your selection.
Customise your telephone Setting macro functions Assigning partner diversion to a function key Scroll to the Further functions: menu item. Confirm your selection. Scroll to the Set up macro menu item. Confirm your selection. Select function PDV1 or PDV2. Use the partner keys to enter the call numbers for which you want to set up the partner diversion. Call diversion from x to y: Enter two partners to set up the simple partner diversion.
Customise your telephone Setting macro functions Enabling a function key Scroll to the Further functions: menu item. Confirm your selection. Scroll to the Set up macro menu item. Confirm your selection. or Scroll down through all functions or press the Enter key. Press the key that is to be enabled. Scroll to the Function key free menu item. Confirm your selection.
Customise your telephone Telephone settings You can set your telephone according to your individual needs. This function gives you the option, for example, to activate the Second Call or to set the DTMF pulse duration. Should questions arise, please ask your TENOVIS Service. Setting the telephone Scroll to the Further functions: menu item. Confirm your selection. Scroll to the Phone settings menu item. Confirm your selection. Select the desired menu item, e.g. Second call .
Customise your telephone Deactivating the automatic tone dial (DTMF) Your telephone has been set as standard to send the pressing of a key as a tone when dialing during a connection. This allows you, for example, to query the Voice mail or to remotely operate the answering machine. These digits are neither displayed nor entered into the redial memory. Deactivating the automatic tone dial (DTMF) Scroll to the Further functions: menu item. Confirm your selection. Scroll to the Phone settings menu item.
Customise your telephone Activating key beep You can set the telephone to indicate the pressing of a key by a beep (key beep). Activating the key beep Scroll to the Further functions: menu item. Confirm your selection. Scroll to the Phone settings menu item. Confirm your selection. Select the Key beep menu item. Set the menu item to ”on”. i • If you want to deactivate the key beep, simply set the menu item to ”off”.
Customise your telephone Time Zones The current time of 26 cities can be displayed. Viewing the time zone Scroll to the Alter. time zone menu item. Confirm your selection. The display shows the current time of 26 cities. i • Due to the varying changeovers between standard and daylight--savings times from country to country, the time which your telephone displays for a particular city may not correspond to the actual time of that city.
Customise your telephone Private User Mobility With your personal call number you can simply log in to every telephone within your system. This allows you to use this telephone in the same manner as your own. This function is secured by a Personal Identification Number (PIN). To use this function, it has to be enabled in the system and two function keys need to be assigned with the functions ”Sign up” and ”Sign off”. Signing up at a telephone / ”Log on” ON Press the Sign up function key. ...
Customise your telephone Storing personal data Your personal telephone settings can be stored locally in the telephone unit, as well as centrally in the system, if enabled by the TENOVIS Service. Your data is protected in the telephone system by a password. The TENOVIS Service can centrally store or play back your personal telephone data. This can be avoided by blocking the central data saving. Table of Contents Locally storing data immediately . . . . . . . . . . . . . . . . . . . . . . . . . . . . . . .
Customise your telephone Storing personal data Locally storing data immediately Scroll to the Further functions: menu item. Confirm your selection. Scroll to the Further Settings: menu item. Confirm your selection. Scroll to the Save menu item. data Confirm your selection. Scroll to the Save data immediately menu item. Confirm your selection. Locally storing data automatically Scroll to the Further functions: menu item. Confirm your selection. Scroll to the Further Settings: menu item.
Customise your telephone Storing personal data Deactivating local data saving Scroll to the Further functions: menu item. Confirm your selection. Scroll to the Further Settings: menu item. Confirm your selection. Scroll to the Save data menu item. Confirm your selection. Scroll to the Save data on menu item. Switch the menu item to ”off”. i • If you want to reactivate the local data storing, scroll to the ”Save data off” menu item and select ”on”.
Customise your telephone Storing personal data Centrally storing data immediately Scroll to the Further functions: menu item. Confirm your selection. Scroll to the Further Settings: menu item. Confirm your selection. Scroll to the Save data menu item. Confirm your selection. Scroll to the Save centrally immediately menu item. Confirm your selection. ... Enter your PIN. The digits are shown as asterisks ” * ” in the display. The message ”Save data centrally” is shown in the display.
Customise your telephone Storing personal data Blocking central data saving Scroll to the Further functions: menu item. Confirm your selection. Scroll to the Further Settings: menu item. Confirm your selection. Scroll to the Save data menu item. Confirm your selection. Scroll to the Save centrally free menu item. Confirm your selection. ... Enter your PIN. The digits are shown as asterisks ” * ” in the display. Your data can no longer be saved centrally.
Customise your telephone Setting VIP functions With appropriate preparations you can set special functions between the telephones of your system. In order to do this, the pre--settings of the sending and the receiving telephones need to correspond with each other. The following pages will give you examples for typical uses of the VIP functions. To simplify matters, the sending telephone will be called the ”executive set” and the receiving telephone the ”secretary’s set” in these examples.
Customise your telephone Setting VIP functions Automatic call answering (Handsfree answer back) Scroll to the Further functions: menu item. Confirm your selection. Scroll to the Further Settings: menu item. Confirm your selection. Scroll to the VIP functions menu item. Confirm your selection. Scroll to the Get VIP functions menu item. Confirm your selection. ... Enter your PIN. The digits are shown as asterisks ” * ” in the display.
Customise your telephone Setting VIP functions Using an executive phone as intercom to the reception area Setting the executive set: Scroll to the Further functions: menu item. Confirm your selection. Scroll to the Further Settings: menu item. Confirm your selection. Scroll to the VIP functions menu item. Confirm your selection. Scroll to the Send VIP funct. menu item. Confirm your selection. ... Enter your PIN. Set the Send VIP funct. menu item to ”on”. Leave the menu.
Customise your telephone Setting VIP functions Using an executive phone as intercom to the reception area (cont.) Setting the secretary’s set: Scroll to the Further functions: menu item. Confirm your selection. Scroll to the Further Settings: menu item. Confirm your selection. Scroll to the VIP functions menu item. Confirm your selection. Scroll to the Get VIP functions menu item. Confirm your selection. ... Enter your PIN. Set the Get VIP functions menu item to Authorized users .
Customise your telephone Setting VIP functions Using an executive phone as intercom to the reception area (cont.) Setting the secretary’s set (cont.): Call up the telephone book to indicate the entry of the executive set as VIP. Select the desired entry, edit and scroll to the VIP Set VIP number number menu item. to Yes . Scroll to the Store menu item. Confirm your selection. This entry is now indicated as ”executive set”. • ”Setting VIP functions” is not installed as standard on your phone.
Customise your telephone Setting VIP functions Sending a message from the executive set to the secretary’s busy set Setting the executive set: Scroll to the Further functions: menu item. Confirm your selection. Scroll to the Further Settings: menu item. Confirm your selection. Scroll to the VIP functions menu item. Confirm your selection. Scroll to the Send VIP funct. menu item. Confirm your selection. ... Enter your PIN. Set the Send VIP funct. menu item to ”on”. Leave the menu.
Customise your telephone Setting VIP functions Sending a message from the executive set to the secretary’s busy set (cont.) Setting the secretary’s set: Scroll to the Further functions: menu item. Confirm your selection. Scroll to the Further Settings: menu item. Confirm your selection. Scroll to the VIP functions menu item. Confirm your selection. Scroll to the Get VIP functions menu item. Confirm your selection. ... Enter your PIN.
Customise your telephone Setting VIP functions Announcements from the executive set Setting the executive set: Scroll to the Further functions: menu item. Confirm your selection. Scroll to the Further Settings: menu item. Confirm your selection. Scroll to the VIP functions menu item. Confirm your selection. Scroll to the Send VIP funct. menu item. Confirm your selection. ... Enter your PIN. Set the Send VIP funct. menu item to ”on”. Leave the menu.
Customise your telephone Setting VIP functions Announcements from the executive set (cont.) Setting the secretary’s set: Scroll to the Further functions: menu item. Confirm your selection. Scroll to the Further Settings: menu item. Confirm your selection. Scroll to the VIP functions menu item. Confirm your selection. Scroll to the Get VIP functions menu item. Confirm your selection. ... Enter your PIN. Set the Get VIP functions menu item to Authorized users . Leave the menu.
Customise your telephone Setting VIP functions Using the VIP functions Using the Announcement / Intercom functions: Secretary Press the corresponding destination key or select the telephone book entry. Press the Handsfree key or lift the handset. Do not press the Call monitoring key (otherwise you will place a normal call)! The secretary’s set automatically activates the Handsfree mode. Both subscribers can now talk to each other.
Customise your telephone Setting VIP functions Deactivating all VIP functions Scroll to the Further functions: menu item. Confirm your selection. Scroll to the Further Settings: menu item. Confirm your selection. Scroll to the VIP functions menu item. Confirm your selection. Scroll to the Send VIP funct. menu item. Confirm your selection. ... Enter your PIN. Set the menu items ”Send VIP functions”, ”Announcement/Acknowledgement”, ”Hands--free answer back” and ”Get VIP functions” to ”off”.
Customise your telephone Setting VIP functions Deactivating VIP functions for certain telephones (”Receiving VIP functions” must be set to ”Authorised”) For removing single VIP functions: Call up the telephone book. Select the desired entry and scroll to the Attribute menu item. Press the Enter key repeatedly until Normal call appears. Scroll to the Store menu item. Confirm your selection. For incoming VIP functions: Call up the telephone book.
Customise your telephone Setting VIP functions Menu items that prepare your telephone for receiving VIP calls Announce/Ackn (in the ”Telephone settings” menu) Announcement with acknowledgement. You hear a short signal tone, your telephone automatically activates the Handsfree mode and you can answer directly. The caller needs to have this attribute activated in his telephone. Set the ”Receive VIP functions” to ”Authorised” or to ”on”.
Customise your telephone Setting VIP functions Get VIP functions off: The VIP function is not available. Authorised users: The VIP functions are only available for subscribers that you have previously indicated in your telephone book by the entry ”VIP number yes”. on: VIP functions available for all subscribers. VIP number You are indicating a call number as a VIP number in your telephone book.
Customise your telephone Setting audio, contrast and language You can modify various audio settings as well as the contrast of the display. You can also change the language of the display texts at any time. The language of the prepared Minimails can be changed independently of the language of the display texts. The available languages are English, German and French. Table of Contents Adjusting audio and contrast . . . . . . . . . . . . . . . . . . . . . . . . . . . . . . . . . . . . . . . . . . .
Customise your telephone Setting audio, contrast and language Adjusting audio and contrast Scroll to the Further functions: menu item. Confirm your selection. Scroll to the Further Settings: menu item. Confirm your selection. Scroll to the Audio/Contrast menu item. Confirm your selection. Scroll to the desired menu item, e.g. Loudsp. .. 1...8 . Use the number keys to enter the desired volume of 1 to 8. Confirm the entry. The settings are stored.
Customise your telephone Setting audio, contrast and language Changing the language for the display and Minimail Scroll to the Further functions: menu item. Confirm your selection. Scroll to the Further Settings: menu item. Confirm your selection. Scroll to the Switch language menu item. Confirm your selection. Select the desired language for the display texts, e.g. Deutsch . Confirm your selection. Select the desired language for the Minimail, e.g. English . Confirm your selection.
Customise your telephone Activating the CSTA Answer Call If your telephone network and your PC network for CSTA (Computer Service Telephony Application) are connected to each other and the CSTA Answer Call function is activated, you can also receive calls on your PC. When the telephone rings, simply click the symbol for the CSTA Answer Call on your computer screen. The telephone automatically activates the Handsfree mode and you can speak with the caller.
Customise your telephone Activating call monitoring when AEI--dialing You can connect your telephone to a PC and operate the phone with the according software. You can specify directly at the phone whether Call monitoring should be activated when you dial with the PC. Activating Call monitoring when AEI--dialing Scroll to the Further functions: menu item. Confirm your selection. Scroll to the Further Settings: menu item. Confirm your selection. Scroll to the Headset/AEI menu item.
Extras for your telephone Konf--Tel external handsfree equipment You can connect the external handsfree equipment ”Konf-Tel Conference Unit 101/AEI” to the AEI interface of your telephone to improve handsfree quality. The built--in microphone and loudspeaker on your phone are then deactivated. You can adjust the handsfree volume directly on the Konf--Tel. Activating Konf-Tel . . . . . . . . . . . . . . . . . . . . . . . . . . . . . . . . . . . . . . . . . . . . . . . . . . .
Extras for your telephone Konf--Tel external handsfree equipment Activating Konf-Tel Scroll to the Further functions: menu item. Confirm your selection. Scroll to the Further Settings: menu item. Confirm your selection. Scroll to the Headset/AEI menu item. Confirm your selection. Scroll to the Headset present menu item. Press the Redial key repeatedly until AEI appears. Scroll to the AEI operation menu item. Press the Redial key repeatedly until Y ETSI AT appears. The settings are stored.
Extras for your telephone DSS module The TENOVIS Service can connect up to two DSS modules to your telephone. (DSS module = Direct Station Select module) Every DSS module has 36 keys, which the TENOVIS Service can assign according to your needs. The following options are available: -- Call numbers of your partners -- Individual destinations (frequently used call numbers) -- Line keys (for Multiline) Keys with light diode Labelling strips Dialing with the DSS module . . . . . . . . . . . . . . . . . . . .
Extras for your telephone DSS module Dialing with the DSS module Lift the handset. Press the DSS key for the desired subscriber. For partner keys the light diode indicates whether the connection is free or busy. Light diode Connection off on free (idle status) busy slowly flashing quickly flashing call second call i • Instead of lifting the handset first and then dialing, you can also press the DSS key for the desired subscriber and then lift the handset (Dialing with handset on--hook).
Extras for your telephone Handsfree with auxiliary loudspeaker You can connect an auxiliary loudspeaker to your telephone for improved handsfree quality. Connecting an auxiliary loudspeaker Plug connector AEI interface on bottom of telephone XY Z AEI -- Pull the plug connector out of the AEI--Z interface on the telephone. Do not lose the plug connector, or you will not be able to deactivate the auxiliary loudspeaker later! -- Connect the auxiliary loudspeaker to the AEI--Z interface on the phone.
Extras for your telephone Handsfree with auxiliary loudspeaker Setting an auxiliary loudspeaker Scroll to the Further functions: menu item. Confirm your selection. Scroll to the Further settings: menu item. Confirm your selection. Scroll to the Audio/Contrast menu item. Confirm your selection. Scroll to the Loudsp. .. 1...8 menu item. Use the number keys to enter the desired volume of 1 to 8. For optimum Handsfree mode quality, keep the volume setting as low as possible.
When in doubt, look it up Overview of the telephone functions If you do not know what is concealed behind a function name, such as Code dial, you can look it up here. This list contains all functions that can be assigned to the display keys. The corresponding symbols or abbreviations then appear in the display. The pages mentioned contain further information on the respective topic. A ACD ACD user function Activates the ACD user function to log on and off of the automatic call distribution.
When in doubt, look it up Overview of the telephone functions Corr Correction key CPCK Call pick-up (! Page 21) Allows you to pick up calls from the line shown in the display. Enter the respective number and press ”Pick--up”. If Direct dial has been activated, you will need to press this key before entering the first digit. Correct entered digits. The characters are deleted from back to front in the display. The Correction key has been assigned to a display key as standard.
When in doubt, look it up Overview of the telephone functions F Function key free (! Page 101) Deletes the current assignment of a function key. G GLN Leave group line - (! Page 92) You can leave or access a group line. This function needs to be enabled by the TENOVIS Service. H HOLD Hold - (! Page 77) You can place a call on hold. HST Headset to AEI ”Headset to AEI” is switched on or off in order to save the step of going via the menu. I → + Increase vol./contr.
When in doubt, look it up Overview of the telephone functions LCL . Line call list This function allows you to view the call for those lines that are not assigned directly to you or your colleagues. LINE Line function - (! Page 88) You can have calls to another line indicated on your telephone, as well as modify the line display. LIST Display call list (! Page 34) The call list contains all calls which you did not answer. 1...
When in doubt, look it up Overview of the telephone functions OFF Logout user - (! Page 106) If you are logged on to another telephone in your system, use this function key to log out again. This function needs to be previously enabled in your system to for you to use it. ON Login user - (! Page 106) If this function is enabled in your system, you can use your personal call number or PIN to log on to any telephone in the system.
When in doubt, look it up Overview of the telephone functions TBC Central TBook The central telephone book (CETB) is a call number memory in your telephone system. Here you can find and dial call numbers just like with your own telephone. The search for a call number in the central telephone book can be facilitated by assigning the Search function to a function key. ←…→ Text shift key This key allows you to view texts that are indicated by ”...
When in doubt, look it up Display The display provides you with important information on the connections and settings of your telephone. This includes messages which you can see in the status display. Symbols in the display You are receiving a call. You are receiving a second call. You are on the phone. You have a second connection. You are part of a conference. ”on” = Data connection (flashes: Data call) The loudspeaker of the telephone (”Monitoring”) is activated. ”Handsfree answer back” is activated.
When in doubt, look it up Display Information in the display There is a message for you in the Voice mail. Second call off: Additional calls are rejected during a connection. Second call is deactivated in the ”Telephone settings” menu. A Appmt. activate Appears, if you set an appointment. Appointment expired An appointment has expired. You can either change or delete it. C Call Back stored You have initiated an automatic call--back.
When in doubt, look it up Display Divert call? Call diversion: You can choose whether you want terminate the call or be connected to the call diversion destination. -- Connecting: Press the Enter key, -- Terminate call: Replace the handset. Door device on The door device is turned on. To deactivate: Select the line or press the corresponding function key. H Headset present This message will appear in the idle display if a headset has been connected and activated.
When in doubt, look it up Display PUM Mobile direct dial call number (Private User Mobility): If you have logged on to another telephone in your system, this status message in the idle display indicates that you are logged on to this telephone. You can use it in the same manner as your own telephone. To log off of a telephone: Select the status message or press the Logout function key. R Restr.
When in doubt, look it up Display during emergency operation In case of a power outage your telephone is automatically set to emergency operation. This will change some of the function settings. Depending on the setting, certain functions, such as handsfree, are blocked. If the display is not deactivated, the corresponding messages will be displayed in it. Overview of messages AEI off Your telephone has switched itself to emergency operation and the AEI interface is blocked.
When in doubt, look it up Menu items in the display Depending on the functions you are currently using, the menu items for selecting the next operating step appear. This overview contains all menu items, arranged alphabetically. A Accept call If you want to accept a second call. Accept entry To transfer an entry from the central telephone book (CTB) of your system into your personal telephone book. ACD user function You can sign up for the automatic call distribution.
When in doubt, look it up Menu items in the display X FTZ AT: This mode of operation corresponds to the definition of the X interface of the FTZ, as used for the first generation of the ISDN main connection telephones. With this protocol, the AEI interface is compatible with PC applications, especially with ISDN cards that are required by this X interface. Caution! Connect only devices that have a potential separator which meets the criteria for a base insulation according to EN 60950. Alerting 1...
When in doubt, look it up Menu items in the display Attribute (in the telephone book) Normal call: The called subscriber will hear the normal ringing tone. VIP call: Team call rings with a VIP ringing tone. Announcement: You can make an announcement. The telephone of the called team subscriber activates call monitoring. Announcement with acknowledgement: You can make an announcement. The telephone of the called team subscriber activates the handsfree microphone and can answer directly.
When in doubt, look it up Menu items in the display Call charges You can view the list of the call charges incurred. Call div.? The caller can decide whether they want to terminate the call or be connected to the call diversion destination. Call diversion You can divert calls to other telephones, whether externally or within your system. The name of the incoming caller is shown in your display if they are stored in your local telephone book.
When in doubt, look it up Menu items in the display Connect For switching a connection that is on hold in the front display window to the active connection. Continue main TB To search for an entry in the central telephone book of the system. Contrast Setting the diplay lighter or darker. Eight levels of contrast are avaiable. Convert to Euro Setting the call charges display from DM to Euros. Correction -- Correcting an entered call number (also for redial and destination numbers).
When in doubt, look it up Menu items in the display Data destination Assign: Select this setting for all entries in the telephone book which you can access automatically. Data sum conn. The call charges incurred for all data connections are displayed. You can select whether this is to be done in DM, Euros, or units. Delayed redial Redial: If the line is busy, the most recently dialed call number is dialed again automatically. Delete The highlighted entry is deleted.
When in doubt, look it up Menu items in the display Dial Set terminal adapter: Different settings enable incoming and outgoing or only outgoing connections. Manually: Only async. Support for simple terminals. You can enter the call number via the keyboard of the terminal. AT command: Only async. For automatic connection control via AT commands from the terminal. Hotline 108: For applications in the permanent line mode. The destination address is transmitted from the telephone book of your phone.
When in doubt, look it up Menu items in the display Display Testing the display. The display first shows a light display, then all displays and finally a pattern. Every display will be shown for 5 seconds. Display call list For viewing the call list. Every incoming call that has not been answered is entered into the call list. Display lists You can choose which telephone--book entries you want to display as a list, e. g. all partner - or destination numbers. Display VIP mess.
When in doubt, look it up Menu items in the display DSS priority destinations Allocation: Store a call number on a key of your DSS module. When you press the Direct call key, your telephone will automatically activate the Handsfree mode. In case the called subscriber’s line is busy, you can still speak to them if you have pick--up authorisation. Press the Direct call key once more. E Edit Editing a telephone book entry Emerg. no. + own no.
When in doubt, look it up Menu items in the display G Get VIP functions on / off / authorized users Receive VIP functions: You can activate the VIP functions on your telephone for either all subscribers or only for authorised users. Authorised users need to have the entry ”VIP number yes” in the telephone book when storing. H Handset 1...4 Adjusting the handset volume. You can select from level 1 (soft) to 4 (loud) for the volume setting. Hands-free 1...
When in doubt, look it up Menu items in the display I Incoming Allows you to adjust the response threshold and the switch--over manner for the handsfree mode to best suit your surroundings. For optimum use select the lowest setting possible. If your telephone is equipped with convenience handsfree equipment you can also adjust the echo and the amplification. The lower the level the lower the effect of the echo. Should questions arise, please refer to the TENOVIS Service. Indiv. emergency no.
When in doubt, look it up Menu items in the display Line 11 to 20 Lines 11 to 20 are shown in the display so that you can move them. Line 21 to 30 Lines 21 to 30 are shown in the display so that you can move them. Line 31 to 32 Lines 31 to 32 are shown in the display so that you can move them. Line beep on For activating Double Call on lines. Line display You can delete the display of a line and acitvate it again. Lines Set the line functions and the lines display according to your needs.
When in doubt, look it up Menu items in the display Loudsp. 1...8 Adjusting the loudspeaker volume. You can select a volume level from 1 (soft) to 8 (loud). M Mediate Alternating between your first call partner and a refer--back subscriber. Memory Tests the volatile memory that stores all telephone settings. This memory is not protected in case of a power outage. If the memory works correctly, you will hear an affirmative response tone and the display will show the message ”Test status test ended”.
When in doubt, look it up Menu items in the display N Name Enter the name. New entry You can enter a new call number into the telephone book. New: from PA X to PA Y You can enter a call diversion from partner X to partner Y. Simply press the desired partner keys. Next Note Notes Number The next entry is displayed. Allocation: Enter a call number as note during a connection. Notes can be separately listed in the telephone book. If a note contains a call number, you can dial it as well.
When in doubt, look it up Menu items in the display Outgoing Allows you to adjust the response threshold and the switch--over manner for the handsfree mode to best suit your surroundings. For optimum use select the lowest setting possible. If your telephone is equipped with convenience handsfree equipment you can also adjust the echo and the amplification. A higher level increases the microphone signal. Should questions arise, please refer to the TENOVIS Service.
When in doubt, look it up Menu items in the display PDV1, PDV2 Partner diversion, you can prepare two partner diversions and activate / deactivate them via function keys. R Reallocate You can store a call number directly from the call list, the talk list or the redial in your telephone book. Refer back/Dest. Determines, how refer--back with destination keys is to be carried out.
When in doubt, look it up Menu items in the display S Save data You can determine whether your data is to be stored in a permanent memory. Save data centrally Free / Barred The TENOVIS Service can centrally store or play back your personal telephone data. This can be avoided by blocking the central data saving. Save data centrally immediately You can ”immediately” store your data in the system. First enter your PIN. Your telephone is not ready for use while storing.
When in doubt, look it up Menu items in the display Set line position You can assign a line to a different DSS, line or destination key. Set partner beep For activating Double Call for partners. Set partner disp. You can delete the display of a partner and acitvate it again. Set TA Terminal adapter: Set the transmission parameters that correspond to the respective data terminal. This setting can only be modified when there is no data connection. Signal tone 1...8 Adjusting the signal tone volume.
When in doubt, look it up Menu items in the display Subsequent tone dial (DTMF) slow/medium/fast You can modify the DTMF impulse duration (DTMF dialing = Dual--tone multifrequency dialing). This can be of use when, for example, an answering machine does not react to signals from your telephone. Depending on the answering machine, an impulse duration of 1000 ms or 500 ms is necessary. Your telephone is pre--set to 100 ms. Switch language Select the language for the display.
When in doubt, look it up Menu items in the display Tone ring 1...8 Adjusting the sound of the ringing tone. You have the choice between 8 different sounds. Tone VIP 1...8 Changing the sound of the VIP call tone. You can choose between 8 different sounds. Transfer call Connecting an additional caller with a refer--back subscriber. Trap a call Allows you to register the call number of a caller you do not want to speak to. This function must be enabled by the TENOVIS Service.
When in doubt, look it up Menu items in the display VIP ringing tone on / off For deactivating the VIP ringing tone. The VIP ringing tone indicates distinctive calls from your VIP partners. Volume You can change the volumes of the handset and loudspeaker during a call. These changes are only valid during that connection. i • Functions which are labeled with - are not installed as standard on your phone.
When in doubt, look it up Ringing and handset tones Tones for internal and external calls Normal ringing tone for external calls: This tone can be switched off (→ Page 91). Normal ringing tone for internal calls: This tone can be switched off (→ Page 91). Alerting tone: Additional call during a connection, partner beep. Boss call: VIP- function. This tone can be switched off (→ Page 91). Call when ”Handsfree answer back”: Announcement (also with acknowledgement), Message if busy: Special tone.
When in doubt, look it up If something is not working The incorrect date and time are displayed Select the menu item ”Time/Part/Ln./DSS”. Date and time will be updated by the system. The call number of a caller is not displayed The call was transmitted without the call number, meaning that the incoming call is analogous or the caller has turned off his call number display. The partner or line display disappeared The line display was deactivated in the ”Partner” or ”Line functions” menu.
When in doubt, look it up If something is not working A call diversion is not executed Check whether the call diversion is activated. A call number that has been dialed with code dialing, cannot be extended The subsequent dialing function possibly is locked. A call is shown in the display but the phone does not ring Check whether the ringing tone is switched off (in the ”Silence” menu).
When in doubt, look it up Terminal adapter If a terminal adapter is installed in your TM 13, make a connection to compatible data terminals via the V.24 interface. First, set the transmission parameters. Depending on the connection to your telephone system, you can use the telephone as usual at the same time. Making a data connection via the telephone Scroll to the TA dialing menu item. Confirm your selection. ... Enter the call number of the other party. Scroll to the Dial menu item.
When in doubt, look it up Terminal adapter Setting the terminal adapter Scroll to the Set TA menu item. Confirm your selection. This menu shows you all the parameters that can be changed. Set all the parameters according to the requirements of your terminal one after the other. Some parameters cannot be modified. For more information on the single parameters, please refer to the operation manual of the terminal adapter. Testing the terminal adapter Scroll to the Test TA menu item.
When in doubt, look it up Testing the telephone You can test various functions of your telephone. You cannot be called as long your telephone is in the test mode. Leave the test mode when you are done with the tests. Each test takes only a few seconds. Start function test Scroll to the Further functions: menu item. Confirm your selection. Scroll to the Test mode menu item. Confirm your selection. Select the desired function, e.g. Display . Confirm your selection.
When in doubt, look it up Signing up for automatic call distribution The TENOVIS Service needs to set a personal call number (max. of 5 digits) and a personal password (6 characters) for your telephone in order to enable ACD (Automatic Call Distribution) or BCC (Business Call Center). You need your call number and password to sign up. Signing up for automatic call distribution Scroll to the Further functions: menu item. Confirm your selection. Scroll to the ACD user function menu item.
When in doubt, look it up Index Activating, Connection, 25 AEI interface, 135, 148, 150, 152, 162 Alerting tone, 85 Announcement, 119, 125 Announcement with acknowledgement, 124, 125 Announcements with acknowledgement, 149 Appointment, 52 Appointments Entering, 53, 149 Expired, 149 Viewing, 53, 149 Attribute, 125, 150 Automatic call--back, 150 Call monitoring, 23 When dialing with PC, 130, 160 Call number Assign to destination key, 40 Dialing again, 17 Entering, 37 Noting, 39 Own, 156, 162 Reallocating, 3
When in doubt, look it up Index CORR, 138 DSS module, 156 Correcting, 12 DTMF Modifying impulse duration.
When in doubt, look it up Index Help, 170 Malfunction, 170 Hold Automatic hold, 77 Exclusive hold, 77 Manual, 77 Mediating, 26, 27, 160 Idle display, 11 Message, 54 Incoming, 158 Messages, Sending, 125 Info display, 86 Microphone, 160 Switching on or off, 160 Intercom, 114 Internal, 15 Key beep, 104, 158 Menu, 7 Selecting a function, 10 Minimail Changing text, 56 Receiving, 59 Sending, 55 Keyboard beeps, 158 Mobile direct dialing call number, 146 Keys Labelling, 13 Overview, 7 Mode of opera
When in doubt, look it up Index Overview Display, 143 Display during emergency operation, 147 Functions, 137 Keys, 7 Menu items, 148 Telephone, 6 Parity, 162 Participating in a group line, 92 Partner, 63 Allow signaling, 69 Calling, 64 Diverting, 65, 100 Diverting calls, 155 Double Call, 66 Form groups, 67 on DSS module, 71 Reducing group, 68 Requesting, 170 Restrict signaling, 69 Refer--back, 26 With destination keys, 163 Release, 7 Requesting time, 170 Ringing, 91, 169 Switching on and off selectively,
When in doubt, look it up Index Switching between calls, 26 Trap call, 142, 167 Symbols in the display, 143 Unlocking, 62 T dialing, 172 Updating the partner display, 166 Talk list, 43, 44 Upper--case letters, 12 Telephone Locking, 60 Mounting, 2 Overview, 6 User functions, 148 Telephone book, 36 Call number on DSS module, 41 Call number to destination key, 40 Centrally, 142 Dialing a call number, 37 Note, 39, 161 Search for name, 37 VIP functions On/off, 157 Sending, 164 Telephone settings, 10
When in doubt, look it up 181
Tenovis GmbH & Co. KG · Austria Hüttenbrennergasse 5 · A-1030 Wien T +43 (0)1 87870-0 F +43 (0)1 87870-7370 Telenorm Ltd. · Greece Ethelonton Aimodonton Str. 3 12131 Peristeri, Athen T +301 5785220 · F +301 5785227 N.V. Tenovis S.A. · Belgium Rue Henri Genesse 1 · B-1070 Bruxelles T +32-2-5255111 F +32-2-5255000 NORMA Telecom AG · Greece Polytechniou 6 54626 Saloniki T +303 1500600 F +303 1555347 Tenovis S.r.l.