Owner’s Manual Food Processor Plus models: MCM 5000 UC • MCM 5100 UC MCM 5200 UC READ THIS MANUAL thoroughly for important safety and operating instructions before using this appliance.
IMPORTANT SAFEGUARDS WARNING: A risk of fire and electrical shock exists in all electrical appliances and may cause personal injury or death. When using electrical appliances, basic safety precautions should always be followed, including the following: 1. Read all instructions before using the food processor. 2. To protect against risk of electric shock, do not put the drive unit in or under water or other liquid. 3. This appliance is not for use by children. 4.
TABLE OF CONTENTS IMPORTANT SAFEGUARDS .................................................................. 2 Table of contents ..................................................................................... 3 ABOUT YOUR FOOD PROCESSOR ...................................................... 4 Bosch Food Processor ........................................................................... 4 Unpacking ...............................................................................................
Congratulations on having selected one of the Bosch Food Processors. A series of food processors designed to simplify common food preparation tasks of the home cook: stirring, beating, slicing, mincing, grating and chopping as well as juicing.
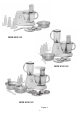
MCM 5000 UC MCM 5100 UC MCM 5200 UC Figure 1 5
Power Unit Features The MCM 5000 power units have the following features, refer to figure 2: Getting to Know Your Food Processor The Bosch Food Processors are comprised of various attachments, depending on the system purchased (see above). 530-watt motor One of the most powerful motors offered with any food processor system. Bosch engineers are continually working on expanding the usefulness of your Bosch Food Processor.
Built-in Safety Cutout The Bosch Food Processors are provided with a built-in safety cutout to protect the motor against overheating. • A dual drive, figure 2f, used by bowl accessories: one high-torque drive used to drive dough hook, citrus juicer and other special accessories requiring high torque; and, a high speed drive used to drive the multifunction blade, beater, whipping whisk and other accessories requiring higher speeds. If the safety cutout should open: a.
high speed blender drive and pressed down until it snaps in place. If high speed blender drive is to be used, remove the safety motor drive cover from the high speed blender drive and place mixing bowl over dual drive and turn clockwise to lock into position as shown in figure 4a. Next place the mixing bowl cover, with pusher/measuring cup in the feeding tube, on the bowl.
6. 9. Operate unit with rotary switch. Once the attachment is in place, the speed of its moving components can be controlled through the use of the rotary switch at the front of the power unit. See figure 2. The rotary switch has six or four positions, depending on the model you have: All MCM models have the following: a. “M,” a momentary “pulse” position that provides full speed and power for the time it is held in position. Continue use.
Attachments The attachment(s) that have been used should be disassembled and washed, dried and stored for future use. 6. Always grasp multifunction blade by top of center column. Do not grip by the blades. The Bosch Food Processors are provided with a three-quart mixing bowl and multifunction blade, beater or whipping whisk, dough hook, reversible slicing disc, reversible coarse grating disc and fine grating disc (MCM 5200 UC only) as shown in figure 5.
4. Next place the mixing bowl cover on the bowl. Make sure arrows on cover and bowl are aligned, so that tabs on bowl fit into channels in cover and then turn cover clockwise until tab on cover enters cover interlock and turn until tab clicks into place, figure 6b. Figure 5. Figure 6. 5a. Cover w/dual feeding tubes 5b. Cover w/integral feeding tube The cover should be in place whenever the power unit is in operation. The cover serves to prevent accidental contact with the moving blade.
How to Use Dough Hook All the MCM models come with the mixing bowl, cover and pusher/measuring cup. The MCM 5200 comes with a dough hook, as shown in figure 5e, while the MCM 5100 and 5200 comes with the dough hook as shown in figure 5j. Both of these dough hooks are intended to be used to knead yeast doughs and to mix cookie and pastry doughs, and also when adding nuts, chocolate chips, dried fruit, hard butter or shortening, hardened brown sugar, etc. to batters.
Use of mixing bowl with whipping whisk Before beginning to attach this or any other attachment, make sure that the power unit is on a smooth, clean, suitable work surface and switched to the Off position, “O/Off,” and that you have the safety motor drive cover in place of the high speed, blender drive. the whipping whisk has engaged the dual drive by turning the whipping whisk counterclockwise while pushing down until it stops. 1.
Placing into Operation with Whipping Whisk Make sure that the power unit is on a smooth, clean, suitable work surface and switched to the Off position, “O/Off.” Pull the electrical cord out to the necessary length and plug into a convenient outlet. The mixing bowl with whipping whisk is now ready for operation. Sample recipes may be found in the recipe section, at the back of this manual. WARNING 1. Blades on discs are sharp. Handle carefully. Always use the center plastic holder to lift or handle discs.
• place the cut zucchini or carrots in the feeding tube on end until the feeding tube is packed. WARNING The blades on the discs are very sharp. Handle with care. Use center plastic holder when handling discs. To slice a single narrow item, a carrot for example: • place the carrot in the feeding funnel opposite the cutting edge of the disc. 4. Next place the mixing bowl cover on the bowl.
If power unit is not functioning see TROUBLESHOOTING section. Note: The mixing bowl and its cover must be in place with the top cover rotated clockwise so that tab on cover engages the cover interlock before the blender can be used. See below. Removing Contents Before beginning to remove the contents from the mixing bowl, make sure that the power unit has been turned to the Off position, “O/Off,” and unplugged. Remove the cover by turning counterclockwise and lifting off.
1. Before using the blender for the first time it should be washed. See Before Using for the First Time, on page 4. 4. Place the blender jar/blade assembly on the high speed blender drive of the power unit and turn clockwise to lock in place, see figure 10a. Then place cover with cover closure/funnel on blender jar and turn clockwise to lock in place, figure 10b. Do not place the blender jar/blade assembly in the dishwasher or allow it to stand in water. This will tend to wash out the lubricant.
When the blender is being used on dry materials, such as nuts or dry bread, the best results will be obtained when the blender jar is filled with approximately 1/2 cup of material to be blended. the closure/funnel may be left in place and the liquids added by pouring it into the closure/funnel, see figure 11a.
Citrus Juicer All the MCM models of the Bosch Food Processors include the citrus juicer accessory. The citrus juicer accessory is shown below, figure 12. the center column and turning it clockwise, as shown in figure 13, until tab on cover enters cover interlock and turn until tab on the rim of the citrus juicer clicks into place. Figure 12. How to Use Citrus Juicer The citrus juicer fits into the mixing bowl for juicing of citrus fruits such as oranges, lemons, grape fruit, etc.
1. Before using the mixing bowl and juice extractor for the first time, they should be washed. See Before Using for the First Time, on page 4. Removing Contents Before beginning to remove the contents from the bowl, make sure that the power unit has been turned to the Off position, “O/Off.” Remove the juicer and bowl from the power unit by turning the juicer and bowl counterclockwise while lifting. The contents of the bowl may now be poured into a suitable container.
turning the cover counterclockwise while lifting. Then remove the grater/strainer. Empty pulp from the strainer, as required. If bowl needs to be emptied, pour juice into a suitable container. place the cover, with pusher on the bowl and turn clockwise until tab on cover enters cover interlock and turn until tab clicks into place, figure 15b. Placing into Operation with Juice Extractor Make sure that the power unit is on a smooth, clean, suitable work surface and switched to the Off position, “O/Off.
Service and Repair The Bosch Food Processors require no special care other than the care and cleaning noted in this manual. If you are having a problem with your food processor, before calling our Customer Support group, please refer to the TROUBLESHOOTING section below.
TROUBLESHOOTING Problem Power unit does not function Possible Cause Remedy 1.A circuit breaker may have tripped or a fuse has blown in the power supply circuit. Reset circuit breaker or replace fuse. 2.Safety motor drive cover is not in place on high speed, blender drive, when dual drive is being used. Place safety motor drive cover on high speed blender drive. 3.The built-in safety cutout may have tripped.
Sample Recipes Fruit Smoothies Salsa 2 2 1/2 1 1–2 1 Chop the following ingredients in Bosch blender or food processor, on highest speed: 1–4 1 1/8 8 Dried Arabol Chilies (start with one, add more for increased spiciness) clove garlic cup water ounces tomato sauce (add half) cups fruit juice cups frozen fruit can frozen juice concentrate cup fruit-flavored yogurt cups of ice fresh banana Place all ingredients in Bosch blender and mix until smooth, on highest speed.
Oatmeal-Chocolate Chip Cookies 2 1 2 1 1–3/4 1 1/2 3 1 cups packed brown sugar cup shortening eggs teaspoon vanilla cups flour teaspoon baking soda teaspoon salt cups quick-cooking rolled oats cup chocolate chips Cream the brown sugar, shortening, eggs and vanilla in the mixing bowl, on speed 1 or 2. Add flour, baking soda and salt. Blend well, stir in rolled oats and chocolate chips by hand. Drop by spoonfuls onto greased baking sheets. Bake in a 350° F oven for 8– 10 minutes.
Important Notes 26
BOSCH Small Appliance Warranty BSH Home Appliances (“BOSCH”) warrants all new small appliances to be free from original defects in design, materials and workmanship for one (1) year after the sale to the original owner. Within the stated warranty period, BOSCH will repair or replace, at its sole option, any small appliance or parts thereof which prove defective under the conditions of normal use and service at no charge to you. It is the owner’s responsibility to return the appliance for repair.
Looking for more information about BOSCH products? Visit our Web site: www.boschsmallappliances.