
Operation Manual


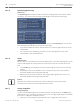


Table Of Contents
- Title Page
- Table of Contents
- Safety
- Unpacking
- Product Description
- Overview of Installation Steps
- Configuration Programming in the Shipping Box
- Configuration Programming on a Temporary Table-top Stand
- Mounting Location and Mounting Orientation
- Overview of Mounting Options
- Install the Camera
- Make Connections - Power and Control
- Cant the Camera
- Typical System Configurations
- Configuration
- Configuration via IP, Basic Mode
- Configuration via IP, Advanced Mode
- Advanced Mode: General
- Identification
- Password
- Date/Time
- Display Stamping
- Advanced Mode: Web Interface
- Appearance
- LIVE Functions
- Logging
- Advanced Mode: Camera
- Installer Menu
- Encoder Profile
- Encoder Streams
- Privacy Masks
- Picture Settings
- Lens Settings
- PTZ Settings
- Illumination/Wiper
- Scenes and Tours
- Sectors
- Miscellaneous
- Audio
- Pixel Counter
- Advanced Mode: Recording
- Storage Management
- Recording Profiles
- Maximum Retention Time
- Recording Scheduler
- Recording Status
- Advanced Mode: Alarm
- Alarm Connections
- VCA
- Virtual Masks
- Audio Alarm
- Alarm E-Mail
- Alarm Task Editor
- Alarm Rules
- Advanced Mode: Interfaces
- Alarm Inputs
- Alarm Outputs
- Advanced Mode: Network
- Network Access
- DynDNS
- Advanced
- Network Management
- Multicast
- Image Posting
- Accounts
- IPv4 Filter
- Encryption
- Advanced Mode: Service
- Maintenance
- Licenses
- Diagnostics
- System Overview
- Operation
- Troubleshooting
- Maintenance
- Decommissioning
- Technical data
- Keyboard Commands By Number
- Back Page

1 Command number field
2 Keypad (numbers 0-9)
3 Show a preset scene
4 Set a preset scene
5 Initiates a command
6 Deletes a number in the Command Number field
7 Used to select a menu item
8 Stops a command
To Enter a Keyboard Control Command:
1. Place the cursor in the Command Number field.
2. Click the desired command number via the on-screen keypad.
3. Click either the Aux on button or the Aux off button to initiate or stop the command.
4. If the command initiates a menu, use the Up/Down arrows on the View Control to
navigate the menu. Click the Focus button or Iris button to select a menu item.
To Set a Preset Shot:
Preset shots (or scenes) are camera positions that are saved in memory for future use.
1. Move your cursor over the live image and wait for the area to display a directional arrow.
2. Click and hold a mouse button to pan to the desired position that you want to save.
3. Click any number combination from 1-256 from the on-screen keypad to identify the
scene number.
4. Click the Set scene button. The image area displays a message that indicates which shot
number was saved.
To View a Preset Shot:
1. Click the number of the scene you want to view using the on-screen keypad.
2. Click the Show scene button.
Notice!
For more information about the camera settings and controls, click the Help on this page?
link to open the online help.
92 en | Operation
MIC IP starlight 7000 HD, MIC IP
dynamic 7000 HD
2014.05 | 1.0 | F.01U.291.520 Operation Manual Bosch Security Systems, Inc.