
Installation instructions


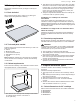


Table Of Contents
- Hob
- en-us
- fr-ca
- es-mx

en-us Checking the installation
8
Power supply
Model 240V AC, 60Hz system: circuit
breaker
208V AC, 60Hz system: circuit
breaker
NET8069SUC 40Amp 30Amp
NET8069UC 40Amp 30Amp
NET8669SUC 50Amp 40Amp
NET8669UC 50Amp 40Amp
NETP069SUC 40Amp 40Amp
NETP669SUC 40Amp 40Amp
NEM5066UC 30Amp 30Amp
NEM5666UC 40Amp 40Amp
5.2 Connecting electrical supply
WARNING
Before installing, turn power OFF at the service panel.
▶
Lock service panel to prevent power from being turned
ON accidentally.
To reduce the risk of electrical shock and fire, do not use a
flexible power-supply cord with this appliance. Connect
only to a 3-wire, 120/240-Volt power supply; the neutral
conductor is not required for the operation of the appli-
ance. The voltage at the power supply electrical connec-
tions shall be 150-volts-to-ground or less.
Requirement:The electrical power supply system should
be a 1-phase, 3-wire system with ground connection.
1. Install a suitable junction box (not furnished).
– An appropriately-sized, UL-listed conduit connector
must be used to correctly attach the conduit to the
junction box.
– The branch-circuit breakers ampacity, the wire sizes
and the connections must conform to the require-
ments of the National Electrical Code or Canadian
Electrical Code and all local codes and ordinances.
2. Attach the flexible conduit to the junction box. Metal
conduit and leads are factory installed.
3. Connect the cooktop lead wires to the junction box sup-
ply wires in proper phase.
– black (L1) to black
– red (L2) to red
– green or blank copper wire to ground
Checking the installation
6 Checking the installation
Checking the installation
Check if your unit is working properly after you have com-
pleted the installation steps.
WARNING
Before you turn on power supply, make sure all controls
are in the OFF position.
1. Remove everything from the cooktop surface including
stickers.
2. Clean the cooktop surface with cooktop cleaning cream.
3. Switch on the circuit breaker.
4. Verify that all cooking zones function properly.
Customer Service
7 Customer Service
Customer Service
If you have any questions on use, are unable to eliminate
an issue in the appliance yourself, or the appliance needs
to be repaired, please contact our Customer Service.
With any warranty repair, we will make sure your appli-
ance is repaired by an authorized service provider using
genuine replacement parts. We use only genuine replace-
ment parts for all repairs.
Detailed information on the warranty period and terms of
warranty can be found in the Statement of Limited Product
Warranty, from your retailer, or on our website.
If you contact the Customer Service, you will need the
model number (E-Nr.) and the production number (FD) of
your appliance.
USA:
1-800-944-2904
www.bosch-home.com/us/owner-support/get-support
www.bosch-home.com/us/shop
CA:
1-800-944-2904
www.bosch-home.ca/en/service/get-support
www.bosch-home.ca/en/service/cleaners-and-accessories
7.1 Model number (E-Nr.) and production
number (FD)
You can find the model number (E-Nr.) and the production
number (FD) on the appliance's rating plate.
Making a note of your appliance's details and the Cus-
tomer Service telephone number will enable you to find
them again quickly.
7.2 Rating plate location
You can find the rating plate of your appliance:
¡ on the underside of the appliance
¡ in the appliance pass