
User Guide
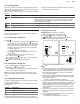
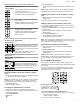
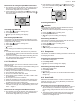


Table Of Contents
- Hob
- en-us
- Table of contents
- 1 IMPORTANT SAFETY INSTRUCTIONS
- 2 Preventing material damage
- 3 Environmental protection and energy-saving
- 4 Induction cooking
- 5 Familiarizing yourself with your appliance
- 6 Operation
- 6.1 Turning the cooktop on
- 6.2 Turning the cooktop off
- 6.3 Cooking zone settings
- 6.4 Recommended cooking settings
- 6.5 FlexInduction™ cooking zone
- 6.5.1 Cookware recommendations for the flexible cooking zone
- 6.5.2 Using the flexible zone as two separate cooking zones
- 6.5.3 Activating the FlexInduction™ function
- 6.5.4 Changing the power level for the flexible cooking zone
- 6.5.5 Adding cookware to the flexible cooking zone
- 6.5.6 Deactivating the FlexInduction™ function
- 6.6 PowerMove® function
- 6.7 Kitchen timer
- 6.8 Count-up timer
- 6.9 SpeedBoost®
- 6.10 ShortBoost
- 6.11 Keep warm
- 6.12 AutoChef®
- 6.13 Panel lock
- 6.14 Wipe protection
- 6.15 Basic settings
- 6.16 Energy consumption display
- 6.17 PowerManager function
- 7 Home Connect™
- 8 Cooktop-based hood control
- 9 Cleaning and maintenance
- 10 Troubleshooting
- 11 FAQs
- 12 Disposal
- 13 Customer service
- 14 STATEMENT OF LIMITED PRODUCT WARRANTY
- fr-ca
- Table des matières
- 1 IMPORTANTES CONSIGNES DE SÉCURITÉ
- 1.1 Définitions des termes de sécurité
- 1.2 Indications générales
- 1.3 Utilisation prévue
- 1.4 Restriction sur le groupe d'utilisateurs
- 1.5 Utilisation sécuritaire
- 1.6 Sécurité des enfants
- 1.7 Interférence électromagnétique
- 1.8 Installation et entretien appropriés
- 1.9 Mises en garde conformément à la proposition 65 de l'État de Californie
- 2 Prévenir les dommages matériels
- 3 Protection de l'environnement et économies
- 4 Cuisson par induction
- 5 Description de l'appareil
- 6 Fonctionnement
- 6.1 Mise en marche de la table de cuisson
- 6.2 Mise à l'arrêt de la table de cuisson
- 6.3 Paramètres de la zone de cuisson
- 6.4 Paramètres de cuisson recommandés
- 6.5 Zone de cuisson FlexInduction™
- 6.5.1 Recommandations de batterie de cuisine pour la zone de cuisson flexible
- 6.5.2 Utilisation de la zone flexible comme deux zones de cuisson séparées
- 6.5.3 Activer la fonction FlexInduction™
- 6.5.4 Modification du niveau de puissance de la zone de cuisson flexible
- 6.5.5 Ajout d'ustensiles de cuisine à la zone de cuisson flexible
- 6.5.6 Désactivation de la fonction FlexInduction™
- 6.6 PowerMove® fonction
- 6.7 Kitchen timer
- 6.8 Count-up timer
- 6.9 SpeedBoost®
- 6.10 ShortBoost
- 6.11 Garder au chaud
- 6.12 AutoChef®
- 6.13 Verrouillage du panneau
- 6.14 Protection essuyageProtection essuyage
- 6.15 Réglages de base
- 6.16 Affichage de la consommation énergétique
- 6.17 Fonction PowerManager
- 7 Home Connect™
- 8 Commande de hotte basée sur la table de cuisson
- 9 Nettoyage et entretien
- 10 Dépannage
- 11 FAQ
- 12 Élimination
- 13 Service à la clientèle
- 14 ÉNONCÉ DE LA GARANTIE LIMITÉE DU PRODUIT

en-us Operation
14
¡ If more than one item of cookware is detected on the
flexible cooking zone, the function is deactivated.
¡ When you move or lift up the cookware, the cooktop au-
tomatically starts searching and the power level of the
area in which the cookware was detected is set.
Cooking areas for PowerMove® function
The size of the cooking area depends on the cookware
used and whether it is positioned correctly.
Cooking areas for small pans
Cooking areas for large pans
Activating PowerMove®
1. Select one of the two cooking zones in the flexible cook-
ing zone.
2. Press power move.
a The indicator above power move lights up.
a The flexible cooking zone is activated as a joined cook-
ing zone.
a The power level in the area in which the cookware is lo-
cated lights up in the cooking zone display.
Changing the power level for PowerMove®
You can change the power levels for the individual cook-
ing areas during the cooking process.
1. Set the cookware down on the cooking area.
2. Change the power level in the settings area.
a Only the power level for the cooking area on which the
cookware is located is changed.
Deactivating PowerMove®
▶
Press power move.
a The indicator above power move goes out.
Notes
¡ If you set one of the cooking areas to , the function is
deactivated after a few seconds.
¡ When the function is deactivated, the power levels for
the three cooking areas are reset to the preset values.
6.7 Kitchen timer
You can use the Kitchen timer to set a time of up to
99minutes.
The Kitchen timer is independent from other settings and
does not switch off a cooking zone.
You can also use the Kitchen timer when the cooktop is
turned off or the panel lock is activated.
Setting the Kitchen timer
WARNING
Boilovers can cause smoke and some foods and oils may
catch fire if left on high temperature settings.
▶
When using a timer, always supervise the cooktop.
▶
Do not allow anything to boil over or burn.
1. Press kitchen timer.
a lights up in the timer display.
a The indicator above kitchen timer lights up.
2. Set the desired time in the settings area.
3. Press kitchen timer to confirm.
a The time starts to count down after a few seconds.
a When the time has elapsed, a beep sounds. blinks in
the timer display.
a The indicator above kitchen timer blinks.
4. Press any key to turn off the signals. After 10seconds
the signals stop automatically.
Changing or canceling the kitchen timer
1. Press kitchen timer.
2. Set the desired time in the settings area.
To cancel the kitchen timer, set the time to .
3. Press kitchen timer to confirm.
6.8 Count-up timer
The Count-up timer displays the time that has elapsed
since activating the function.
The Count-up timer works independently from the cooking
zones and from other settings. This function does not au-
tomatically switch off a cooking zone.
Starting the Count-up timer
WARNING
Boilovers can cause smoke and some foods and oils may
catch fire if left on high temperature settings.
▶
When using a timer, always supervise the cooktop.
▶
Do not allow anything to boil over or burn.
▶
Press count up timer.
a lights up on the timer display.
a The indicator above count up timer lights up.
Canceling the Count-up timer
1. Press count up timer.
a The timer stops running.
2. Press count up timer again.
a The timer is cleared and turns off.
6.9 SpeedBoost®
With this function you can heat larger quantities of water
faster than with power level 9. This function temporarily in-
creases the top output of the selected cooking zone.
You can also use this function on the flexible cooking zone
if it is used as a joined cooking zone.