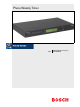
Plena Weekly Timer Installation and User Instructions en PLN-6TMW
Plena Weekly Timer | Installation and User Instructions | Important Safeguards Important safeguards Prior to installing or operating this product, always read the Important Safety Instructions, which are available as a separate document (9922 141 7014x). These instructions are supplied together with all equipment that can be connected to the mains. Thank you for choosing a Bosch Security Systems product.
Plena Weekly Timer | Installation and User Instructions | Table of contents en | 3 Table of contents Important safeguards ...................................................................................................................................................2 Table of contents ...........................................................................................................................................................3 1. Introduction ................................................
Plena Weekly Timer | Installation and User Instructions | Table of contents en | 4 8.6 Main menu buttons .............................................................................................................................................................. 30 8.6.1 Setup ................................................................................................................................................................................. 30 8.6.2 System settings ............................
Plena Weekly Timer | Installation and User Instructions | Introduction 1 1.1 Introduction Purpose These Installation and User Instructions provide information on installing, configuring, and operating the Plena Weekly Timer. 1.2 1.6 Signs 1.6.1 Note signs The signs used in combination with Notes provide extra information about the Note. See the following examples: Digital document Note General sign for notes.
Plena Weekly Timer | Installation and User Instructions | Introduction 1.7 Conversion tables In this manual, SI units are used to express lengths, masses, temperatures etc. These can be converted to non-metric units using the following information. table 1.1: Conversion of units of length 1 in = 25.4 mm 1 mm = 1 in = 2.54 cm 1 cm = 1 ft = 0.3048 m 1m= 1 mi = 1.609 km 1 km = 0.03937 in 0.3937 in 3.281 ft 0.622 mi table 1.2: Conversion of units of mass 1 lb = 0.4536 kg 1 kg = 2,2046 lb table 1.
Plena Weekly Timer | Installation and User Instructions | System overview 2 System overview 2.1 Plena The Plena Weekly Timer is part of the Plena product range. Plena provides public address solutions for places where people gather to work, worship, trade, or to relax. It is a family of system elements that are combined to create public address systems tailored for virtually any application.
Plena Weekly Timer | Installation and User Instructions | System overview Intentionally left blank.
Plena Weekly Timer | Installation and User Instructions | Equipment en | 9 3 Equipment However, these options are only available if the Plena Weekly Timer Configuration software is being used. 3.1 Introduction The intuitive front panel allows users to easily switch between the two programmable schedules.
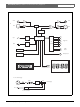
Plena Weekly Timer | Installation and User Instructions | Equipment en | 10 Cinch Cinch IN XLR 1 2 VCA 3 1 2 3 XLR Chime Generator 1 Clock Sync Main µC 2 3 I/O Expander USB 4 Trigger Out 5 6 3x DIP Switch Push Buttons Rotary Selector LEDs RS-232 Connector Display External Display AC / DC Power Supply F1 230V ±5V Power Supply 115V 24V Block Converter DC / DC Converter figure 3.
Plena Weekly Timer | Installation and User Instructions | Equipment 3.2 Controls, connectors and indicators 3.2.1 Front panel en | 11 See figure 3.2 for an overview of the controls and indicators.
Plena Weekly Timer | Installation and User Instructions | Equipment 3.2.2 en | 12 Display See figure 3.3 for an overview of the main display. 1 PAUSED - indicates that all events are temporarily suspended (see section 6.3) 2 DELETE - indicates that the displayed event can be deleted (see section 7.
Plena Weekly Timer | Installation and User Instructions | Equipment 3.2.3 en | 13 Rear panel See figure 3.
Plena Weekly Timer | Installation and User Instructions | Equipment 3.3 Installation The Timer can be installed on a table-top or in a 19inch rack. Two rack-mounting brackets are supplied (see figure 3.5 for installation details). en | 14 3.4 External connections 3.4.1 Connect the back-up power supply The Timer has two 24 Vdc screw terminals (7) for connecting a backup power supply. You must connect an earth (12) to the unit to increase the electrical stability of the system. 7 - + figure 3.
Plena Weekly Timer | Installation and User Instructions | Equipment 3.4.2 en | 15 Connecting other Plena devices The following inputs and outputs can be used to connect the Timer to other Plena devices (see figure 3.7): • Audio loop through - Cinch input • Audio loop through - Cinch output • Audio loop through - XLR input (female) • Audio loop through - XLR output (male) The cinch input and XLR input, as well as the cinch output and XLR output are connected in parallel (see figure 3.1).
Plena Weekly Timer | Installation and User Instructions | Equipment 3.4.3 Power 1 Make sure the power switch (14) on the rear of the Timer is set to the “O” position (see figure 3.8). Caution Potential equipment damage. Before connecting the mains lead, always check the voltage selector on the rear panel of the Timer. 2 Make sure the voltage selector (115V/ 230V) (13) is correctly set for the country’s main voltage (see figure 3.8).
Plena Weekly Timer | Installation and User Instructions | Switch on and off 4 4.1 Switch on and off Caution Potential equipment damage. Before applying power, always check the voltage selector on the rear panel of the Timer. 1 Make sure the voltage selector (115V/ 230V) (13) is correctly set for the country’s main voltage (see figure 4.1). 2 Set the power switch (14) on the rear of the Timer to the “I” position. 14 Line fus T10L e 250V figure 4.
Plena Weekly Timer | Installation and User Instructions | Switch on and off Intentionally left blank.
Plena Weekly Timer | Installation and User Instructions | Setting the date and time 5 Setting the date and time Note You can also use the Plena Weekly Timer Configuration software to set the date and time. For more information, see section 8. 5.1 en | 19 Summer and Winter (daylight saving) time settings The clock can be set for European or North American Summer/Winter time (daylight saving time). To do this: 1 Locate the set of DIP switches on the rear panel (see figure 5.2).
Plena Weekly Timer | Installation and User Instructions | Setting the date and time If no Summer/ Winter time (daylight saving time) is selected (option 3 in the above table), you can use the Program buttons on the front panel (see figure 3.2) to manually switch between Summer and Winter time. To do this: • Press and hold in Program button 1 to switch to Summer time (daylight saving time). A small symbol of the sun will be displayed. • Press and hold in Program button 2 to switch back to Winter time.
Plena Weekly Timer | Installation and User Instructions | Manual settings 6 Manual settings You can use the controls on the front panel to manually override programmed events. The Timer will automatically return to the programmed schedule at the start of the next event. 6.1 6.3 Note All events will be suspended until the Pause button is pressed again, and the word “Paused” is no longer displayed.
Plena Weekly Timer | Installation and User Instructions | Manual settings Intentionally left blank.
Plena Weekly Timer | Installation and User Instructions | Programming a schedule 7 7.1 Programming a schedule Introduction 7.2 en | 23 Programming an event 1 Make sure the Timer is switched on (see section 4). 2 Momentarily press and release the Set button. The Program LEDs on the front panel will be alternately lit (see figure 7.1). This section describes how to use the controls on the front of the Timer to program a schedule.
Plena Weekly Timer | Installation and User Instructions | Programming a schedule 5 Turn the rotary selector to select the day that you want to program, and then push the rotary selector to confirm the setting. The hours will start to flash. Using the same method as described in step 5: 6 Select the hour and confirm. The minutes will start to flash. 7 Select the minutes and confirm. The event symbol will start to flash, and the next available event number will be displayed (see figure 7.3).
Plena Weekly Timer | Installation and User Instructions | Programming a schedule table 7.2: Output contact trigger settings Trigger Status of event settings An event is switched on, and stays on until switched off. en | 25 Status of switch Example Closed A light is switched on An event is switched off. Open After a while, the same light is switched off An event is switched on, and then immediately switched off (pulsed). Closed, and then immediately open A message is started No event selected.
Plena Weekly Timer | Installation and User Instructions | Programming a schedule 7.3 Viewing and editing events Note Once you have pressed the rotary selector to either “confirm a new event” or “edit an existing one”, you will have to continue programming that event. You cannot return to previous events in any one programming session. To view or edit an event, first follow steps 1 through 7 of section 7.2.
Plena Weekly Timer | Installation and User Instructions | Configuration software 8 Plena Weekly Timer Configuration software 8.1 en | 27 2 Follow the instructions on the window, and then click [Next]. A window similar to the one in figure 8.2 will appear. Introduction This chapter describes how to: • install the Plena Weekly Timer Configuration software (version: 1.0012). • connect a PC to the Timer. • program events, using the PC. • upload schedules from the PC to the Timer.
Plena Weekly Timer | Installation and User Instructions | Configuration software 4 Select the Program Manager Group, and then click [Next]. A window similar to the one in figure 8.4 will appear. 7 Click [Finish] to complete the installation process. The software is now ready to use. figure 8.6: Installation complete figure 8.4: Start installation 5 Follow the instructions on the window, and then click [Next]. The software will start to install (see figure 8.5). figure 8.
Plena Weekly Timer | Installation and User Instructions | Configuration software 8.4 Connecting to a PC The supplied USB cable can be used to connect a PC to the Plena Weekly Timer (see figure 8.7). It is not necessary to switch the Timer off. 8.5 en | 29 Starting the software Proceed as follows: 1 Go to the desktop of Windows (see figure 8.8 for an example). Note The configuration software can be also used when the PC is not connected to the Timer, for example, to program a new schedule at home.
Plena Weekly Timer | Installation and User Instructions | Configuration software 8.6 Main menu buttons After entering the correct password, the Main menu will appear (see figure 8.10). Use the blue buttons on the left of this window to access all windows of the configuration software. The various functions of the main menu are described in full detail on the following pages (for more detailed information, see section 8.7 through section 8.12). 8.6.
Plena Weekly Timer | Installation and User Instructions | Configuration software 8.7 System settings Use this window to enter: • the global system settings. • the global time settings. 8.7.2 • • Note The global system settings in this window influence all other general settings of the Timer (also see section 8.8.1). For example, if “Chime repeat” is set to 2, all chimes will be repeated twice for any one event.
Plena Weekly Timer | Installation and User Instructions | Configuration software 8.8 Schedule programming Use this button to: • edit the programing for schedule 1 or 2. • upload the edited schedule to the Plena Weekly Timer. 1 From the main menu, click the Schedule programming button. The following window will appear (see figure 8.13). figure 8.13: Programming and upload buttons Note The edit program function for schedule 1 and schedule 2 is identical.
Plena Weekly Timer | Installation and User Instructions | Configuration software 8.8.1 en | 33 Schedule programming Use this window to program events. Events can be: • scheduled for each day of the week. • assigned individual properties, such as the time the event takes place, and the type of chime or trigger required (see figure 8.14). figure 8.14: Schedule programming window 1 Click the day tab (at the top of the window) to display the day that you want to update.
Plena Weekly Timer | Installation and User Instructions | Configuration software Time Click the up or down arrow to change the time of a scheduled event. Hours and minutes have to be clicked on, and changed individually. Note By default, the minimum time between any two programmable events is one minute. If you change the time of an event to take place before or after an existing event, the software will ask you if you want to sort the event in the schedule.
Plena Weekly Timer | Installation and User Instructions | Configuration software 8.8.2 Upload configuration Use this option to upload the edited schedule from the PC to the Plena Weekly Timer. en | 35 2 Click Upload configuration. The following window will appear (see figure 8.16) showing that uploading is taking place. When uploading is complete, this window will close. 1 From the main menu, click the Schedule programming button. The following window will appear (see figure 8.15). figure 8.
Plena Weekly Timer | Installation and User Instructions | Configuration software 8.9 en | 36 Download schedule Use this option to download the schedule from the Plena Weekly Timer to the PC. 1 From the main menu, click the Download schedule button. The following dialog box will appear (see figure 8.17). figure 8.18: “Save schedule as” window figure 8.17: Download schedule dialog box 2 Click either Yes or No to the question “do you want to save the present configuration file?”.
Plena Weekly Timer | Installation and User Instructions | Configuration software 8.10 Modify password 8.11 en | 37 Save configuration file Use the Modify password button to modify the password for accessing the software. Use the Save configuration file button to save the current configuration file. 1 From the main menu, click the Modify password button. The following window will appear (see figure 8.20). 1 From the main menu, click the Save configuration file button.
Plena Weekly Timer | Installation and User Instructions | Configuration software 8.12 Open configuration file Use the Open configuration file button to open an existing configuration file. 1 From the main menu, click the Open configuration file button. The following window will appear (see figure 8.23). figure 8.23: Open configuration file window 2 Select the configuration file that you want to open, and then click Open.
Plena Weekly Timer | Installation and User Instructions | Technical data 9 9.1 Technical data Electrical Supply voltage: 115/230 V(AC) ± 10% ac, 50/60 Hz Power consumption: 30 Watts 9.2 Performance Frequency response: 20 Hz - 20 kHz (-3 dB) Total harmonic distortion: < 0.01% (1 kHz) Signal-to-noise: > 85 dB Dynamic range: > 100 dB 9.3 Audio inputs XLR nominal input 0 dBV (symmetrical) 9.4 Audio outputs XLR nominal input 0 dBV (symmetrical) 9.
Plena Weekly Timer | Installation and User Instructions | Technical data Intentionally left blank.
For more information visit www.boschsecuritysystems.com © Bosch Security Systems B.V.