
Operating instructions

en
|
8
|
Installation and Operating Instructions
|
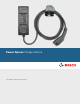
Power Xpress Charge Station
EL-50600-7-2 | REV. B | 20.10.2013
Bosch Automotive Service Solutions LLC
Electrical Requirements for
Battery Charging
WARNING: The Charge Station must
be installed by a licensed electrician
in accordance with all national and
local electrical codes, ordinances,
requirements, and all authorities having
jurisdiction.
CAUTION: The AC electrical connection
must have a grounded, dedicated service-
main. No other loads shall be connected to
the same circuit. Use of a non-dedicated
circuit could exceed the current rating of
the circuit breaker and cause it to trip or
open.
CAUTION: Do not use portable or stationary
backup generating equipment to charge
the vehicle. This may cause damage to the
vehicle’s charging system. Only charge the
vehicle from utility-supplied power.
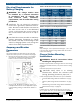
Amperage and Breaker
Parameters
Note:
The Charge Station has been factory set at 30-amp
output for a 40-amp circuit. For all other amperages:
1. Remove the domed cap from the current-adjust-
ment selector (positioned just above the reset
button on the front of the Charge Station).
2. Using a small, at-blade screwdriver, set the cur-
rent-adjustment selector to the applicable output
current-limiting setting, as indicated in Table 1 or
Table 2.
Table 1. North American Current-Adjustment Settings
Charge
Station
Current-
Adjustment
Setting
Charge
Station
Output,
Amp
Breaker
Required,
Amp
Wire
Required,
Gauge
NEMA
Receptacle
Required
(plug-in
version)
1 12 15 12 6-15
2 16 20 12 6-20
3 24 30 10 6-30
4 32 40 8 6-50
5 30 40 8 6-50
Table 2. European Current-Adjustment Settings
Charge
Station
Current-
Adjustment
Setting
Charge
Station
Output,
Amp
Breaker
Required,
Amp
Wire
Required,
mm
2
1 13 16 3.31
2 16 20 3.31
3 20 20* 5.26
4 32 40 8.36
5 30 40 8.36
*Line service breaker; not appliance service breaker
Note:
Only settings 1–5 are operational. Settings 6, 7, 8, 9, and
0 are not used, and the Charge Station will not function
under these settings.
Charge Station Mounting
Instructions
WARNING: Read all instructions before
installing the Charge Station.
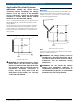
Identify an approximate mounting location for the Charge
Station that is within 10 feet (3 m) of the vehicle‘s charg-
ing inlet.
Determine the power source location.
CAUTION: Verify there is no existing
infrastructure behind the selected wall
(wiring, plumbing, ductwork, pipes, etc.)
Follow the appropriate instructions for your installation:
• “Finished Wall Charge Station Installation” on page
9
• “Masonry Wall Charge Station Installation” on page
13
• “Molded Plug-Connected Charge Station Installation
(North America only)” on page 16
Note:
If wall surface is unnished (studs only), mount a 36 ×
17.5 × 3/8-in. (90 × 45 × 1-cm) plywood surface between
the studs and securely fasten in place. Follow “Finished
Wall Charge Station Installation” for mounting and “Ma-
sonry Wall Charge Station Installation” for wiring.